Wild Tracks
Wild Tracks is the audio playback and recording system for D-Mitri. It uses solid-state drives to store audio files.
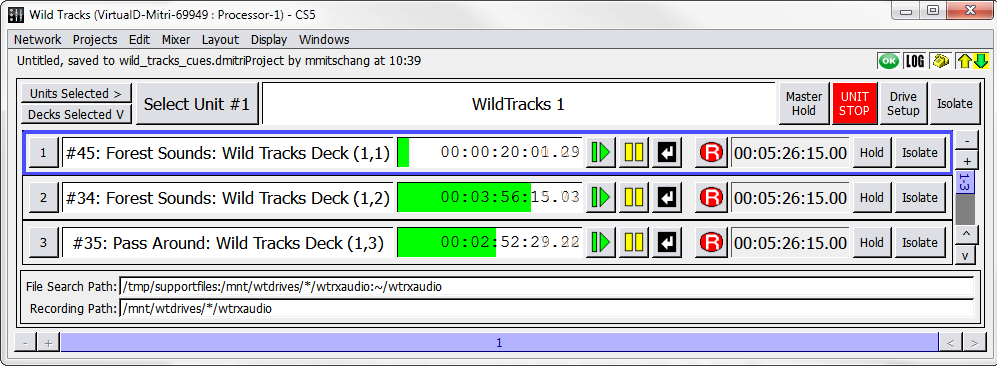
Wild Tracks window
The Wild Tracks window is where Wild Tracks Decks can be set up and controlled. Each Wild Tracks Unit has 32 decks.
 |
Wild Tracks Window
A Wild Tracks Deck is a collection of Wild Tracks entries which all share the same timeline and transport controls. Decks can be triggered individually or in groups. A Wild Tracks entry can be the playback of an audio file or tone generator, the recalling a cue or subcue, and a few other types. These are covered in “Wild Tracks Entries” on page 169. These entries can be arranged in time to create complex multitrack sequences, then captured into a Wild Tracks Deck subcue. This process is explained in “Wild Tracks Subcues” on page 173.
If you are familiar with multitrack audio editing programs, you can think of each deck as a sep- arate multitrack session, each of which can be captured into a cue and recalled inde- pendently. Each deck has a timeline, transport controls, and a list of entries (usually audio files) associated with it. Capturing a deck into a cue captures all of the information about the entries (including timing placement within the deck, volume envelopes, and loops) in addition to information about the deck as a whole (such as cursor placement or timecode locking).
Wild Tracks entries can be audio files, tone generators, or even a cue recall. Entries that have audio associated with them can be assigned to any of the Wild Tracks channels, as configured in the Mixer Configuration window. You can even assign multiple entries to the same channel.
The Wild Tracks window has four areas, each of which can be turned on or off in the Display menu. These are Meters, Deck Graphics, Deck Info, and File Search Path.
Meters
The Meters area of the Wild Tracks window displays the audio playback activity for all chan- nels, as well as global Wild Tracks controls.
 |
Wild Tracks window, Meters Area
This section includes the following controls.
Control | Function |
|---|---|
Units Selected buttons | Units Selected toggles channel select for all Wild Tracks modules. |
Decks Selected button | Decks Selected toggles channel select for all Wild Tracks Decks. |
Select Unit N | Selects the currently displayed Wild Tracks module. |
Wild Tracks Unit Label | Displays the name of the selected Wild Tracks module. |
Master Hold button | Click the Master Hold button to hold all decks of the current Wild Tracks module, effectively pausing playback from all those decks currently play- ing, and preventing the initiation of playback from those decks in the module not already playing. Click the Master Hold button again removes the hold on all decks in the current Wild Tracks module, and decks which had been playing when the hold was placed resume playback. |
Unit Stop button | Stops all the playbacks from decks in the current Wild Tracks module, without affecting other functions, such as autofollow and SpaceMaps. |
Drive Setup button | Opens the Setup Drives window (see “Setup Drives Window” on page 156). |
Isolate button | Toggles automation isolation for all decks in the current module, or, if cho- sen, for all decks in all modules. |
Channel Metering | Meters for each channel of playback. The number of channels is config- ured in the Mixer Configuration window. |
PAFL button (one per channel) | Each PAFL button is labeled with the Wild Tracks Send channel number. To use this feature, you must have at least one output configured as a PAFL. The PAFL button’s mapping follows the PAFL mapping established in the Inputs window, the checkboxes in the left column of the Inputs win- dow control these PAFL buttons the same way they control the L button in the Inputs window. It is also possible to bring up the Show Signal Path dialog by right-clicking any Send channel number. |
Deck Indicator button (one per channel) | These are below the PFL buttons. If audio is playing on a channel, the button displays the number of the deck in use. The Deck Indicator button is a shortcut to display the deck that is playing audio on that channel. |
Tablet Controls
The Wild Tracks window has additional channel editing controls, accessible through the Dis- play menu. These controls are particularly useful for tablet/touch screen displays, but can also be used with a regular mouse.
When Display > Show Tablet Controls is enabled, five buttons are displayed across the bot- tom of the window.
Control | Description |
|---|---|
Show EQ | When the Show EQ function is active, touching or clicking a meter causes the corresponding channel processing window to open, allowing quick access to EQ, dynamics, and delay con- trols. |
Mute | When the Mute function is active, touch or click a meter to mute that channel. |
Show Strip | When the Show Strips function is active, touch or click a meter to open the corresponding mixer window, with the selected channel in the first column. |
Isolate | When the Isolate function is active, touch or click a meter to isolate that channel. |
Select | When the Select function is active, touch or click a meter to select that channel. Several chan- nels can be selected at one time. |
Setup Drives Window
The Drive Setup button brings up the Setup Drives window, where you can import audio (“Importing Audio Using Drive Setup” on page 157) and create virtual drives (“Using Wild Tracks Offline” on page 183). The contents of the window depend on which tab is selected.
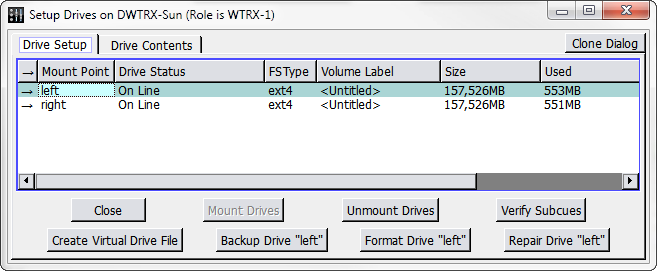 |
Setup Drives Window
The title bar of the Drive Setup window now indicates what role (if any) the Wild Tracks module is currently playing (active or backup).
Importing audio using Drive Setup
The Setup Drives dialog makes it easy to import files into the Wild Tracks window:
Click the Drive Setup button to open the Setup Drives dialog.
Click the Drive Contents tab and navigate to the folder.
Drag the audio file(s) from the local directory to the Drive Contents tab.
Drag the file(s) to the Wild Tracks window to place it in the Wild Tracks deck.
Drive Setup tab
The Drive Setup tab offers tabular data and buttons, as outlined in the following table.
Button/Column Data | Function/Definition |
|---|---|
Mount Point | Refers to the physical location of the Wild Tracks drives; left drive sled or right drive sled. |
Drive Status | Status of the Wild Tracks drive: Online or Offline. |
FSType | Displays what file system (if any) is installed on the drives. This column is populated even when the drives are not mounted. |
Volume Label | Name of the drive. This value is editable, and can be used to set the name of the drive as it should appear in the Drive Setup pane henceforward. |
Size | Total size of the drive. |
Used | Amount of space currently assigned to files. |
Available | Amount of free space. |
Comment | Enter text comments here. |
Close | Click to close the window. |
Mount Drives | Click to search for connected drives that are not listed in the Setup Drive window. |
Unmount Drives | Click to stop the drive so it can be safely disconnected (similar to ejecting a flash drive before physical removal). |
Button/Column Data | Function/Definition |
|---|---|
Verify Subcues | Click to check if the subcues are present on all locally mounted drives. |
Create Virtual Drive File | Click to create a virtual drive file. |
Backup Drive | Click to back up one selected drive to another. |
Format Drive | Click to format the selected drive. (This erases all content on the drive, a confirmation dialog is displayed.) |
Repair Drive | Click to attempt repairs to the selected drive. Drive repair is generally used to attempt recovery of a drive’s file system on those rare occasions when the file system structure has become cor- rupt. This function does not recover damaged files, but rather recovers access to files by attempting to repair a drive’s file system. |
Drive Contents tab
A row of buttons runs at the top of the tab.
Button | Function |
|---|---|
Refresh Directory | Click to refresh the window. |
Viewing: | Text box that displays the current directory's file path. |
Parent Directory | Click to go up one directory level. |
Create New Folder | Click to create a new folder in the current directory. |
Copy Selected Files | Click to copy the selected files and/or folders. |
Cut Selected Files | Click to cut the selected files and/or folders. |
Paste Selected Files | Click to paste the copied/cut files and/or folders. |
Delete Selected Files | Click to delete the selected files and/or folders. The Delete function does not move a file to the trash for possible retrieval later; the file is deleted from the drive completely. |
Upper Section
The upper section of the Drive Contents tab contains the following controls.
Checkbox/Column Data | Function/Definition |
|---|---|
Upload to both Drives | When selected, any file you upload to one drive is automatically copied to the other drive as well. |
Upload to both Modules | On a system configured with redundant Wild Tracks modules, CueStation presents an Upload to both Modules checkbox. When this checkbox is selected, CueStation directs uploaded files to both the primary and redundant Wild Tracks modules. This checkbox can be used in conjunc- tion with the Upload to both Drives checkbox to simultaneously upload to four different destination drives (two drives on each module). |
File Name | The name of the file. |
File Size | The size of the file in MB. |
Audio Length | How long the file plays in hours, minutes, seconds, frames, subframes. |
Chans | The number of channels within the audio file. |
Last Modified | The last date the file was modified. |
Lower Section:
The lower section of the Drive Contents tab contains the following controls.
Button/Column Data | Function/Definition |
|---|---|
Status | The percentage completed of a file download or upload. |
Xfer Speed | Transfer rate in megabytes per second. |
Xfer Information | What files or folders are being downloaded or uploaded. If multiple files are being downloaded or uploaded simultaneously, the information for all the file transfers appears on a single line, which is updated as the trans- actions progress. For example, for a download of six files, the information line reads 1/6 for the first of the six files, 2/6 for the second, and so on. |
Button/Column Data | Function/Definition |
|---|---|
Import Files | Imports audio files from any connected directory. |
Import Folder | Imports folders and their contents from any connected directory. |
Remove Selected File Transfers | Click to stop an exporting file in mid-transfer. File transfer is an incremental process. If stopped in the middle of a trans- fer, an incomplete file of whatever percentage had finished downloading remains on the destination drive(s). |
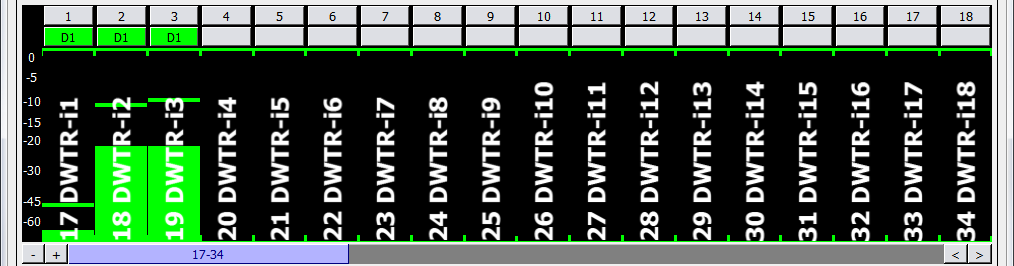
Deck Graphics
The deck graphic display shows the relative position of the Wild Tracks entries included in that deck.
 |
Wind Tracks Window, Deck Graphic Display
The controls for this area are as follows:
Controls for panning and zooming of the deck view: Scroll to Start, Scroll Left, Scroll Right, and Scroll To End.
Horizontal zoom controls: Zoom In, Zoom to Extents, and Zoom Out.
Three sets of timecode numbers, which define the span of locations currently visible within the deck view. From left to right, the numbers indicate the minimum location, the median location, and the maximum location that are visible within the window.
If there are any Wild Tracks elements enabled on the deck, they are represented by a green bar in the timeline view. Drag audio files in the timeline view to change the time when that file starts playing.
Right-click an element in the timeline to display a context menu with the following options.
Menu Item | Function |
|---|---|
Render Track Waveform ([length]) | This allows you to view the waveform of the track you are using, similar to many multitrack editing programs. In order to preserve processing power, only the portions of the files that are currently visible within the deck are rendered. |
Render All Track Waveforms ([length]) | Selecting this will cause all waveforms in the deck to be rendered. |
Cancel Waveform Rendering | Stops rendering the selected file. |
Cancel All Waveform Rendering | Stops all rendering. |
Clear Waveform Image | Clears the waveform rendered on the selected track. |
Clear All Waveform Images | Clears the waveforms rendered on all tracks. |
Clip Initial Silence | Adjusts the Wild Tracks Entry to eliminate silence at the beginning of the track. Choose the threshold (dB) for determining where silence ends and audio content begins. (The file itself is not changed.) |
Seek to Beginning of Track | Click to go to the beginning of the track. |
Seek to End of Track | Click to go to the end of the track. |
Clear Selected Track Region | Click to remove a selected portion of the track. |
Select Entire Track as Track Region | Selects the entire track. |
Select Intro Region as Track Region | Selects only the intro region of the track (from the left edge of the green bar to left edge of the first loop). |
Select Loop Region as Track Region | Selects only the loops region of the track. |
Select Outro Region as Track Region | Selects only the outro region of the track (from the right edge of the last loop to the right edge of the green bar). |
Clear Track Loop Region | Click to clear any looping designations on a track. |
Menu Item | Function |
|---|---|
Clip Track to Selection | This option is only available if a region is selected, and it will set the File Offset, Play Offset, and Play Length values to correspond with that region of the file. |
Unclip Track | Click to reset File Offset, Play Offset, and Play Length values back to their defaults. |
Make Batch File from Track | This will make a batch file of the track you have selected, which can then be used in other subcues. |
 TIP: Use Command+[arrow keys] (Mac) or Ctrl+[arrow keys] (Windows) when a file is selected in the timeline to snap it to the nearest edge of another file, the top
of the deck, or the cursor.
Changing the Height of Tracks in Timeline
The deck timeline can be zoomed vertically as well as horizontally. Use the following Display menu commands to change the vertical zoom.
Command | Function |
|---|---|
Make Bars Shorter | Zoom out vertically. |
Make Bars Taller | Zoom in vertically. |
Reset to Default Bar Height | Reset to the default zoom level. |
Wild Tracks Envelopes
In the Wild Tracks window, you can draw volume envelopes in the Deck timeline, and capture them as part of the Wild Tracks Deck subcue. This allows greater control over level adjustments between tracks and reduces the number of additional cues required to make level changes.
Right-click a track in the timeline to access the following options.
Option | Function |
|---|---|
Adjust Envelope Levels in Selected Range | This will adjust all selected points by the same amount. This is only enabled when a region of the entry is selected. |
Convert Envelope to 'Simple/ Loop-Aware' Envelope Type | There are two types of envelope types: Simple and Loop-Aware. Loop- Aware envelope points will repeat with looped regions, whereas Simple ones will not. |
Clear Envelope Points in Selected Range | Clears all of the envelope points in the selection. |
Display File Format Information | Displays the file format type (WAV, AIFF, etc.). |
Tip
When editing envelope points in the Wild Tracks window, you can hold Shift when dragging to only affect the time (horizontal movement). Hold Option (Mac) or Alt (Windows) to only affect the level (vertical movement). Hold Command (Mac) or Ctrl (Windows) for fine control of point movement when zoomed out.
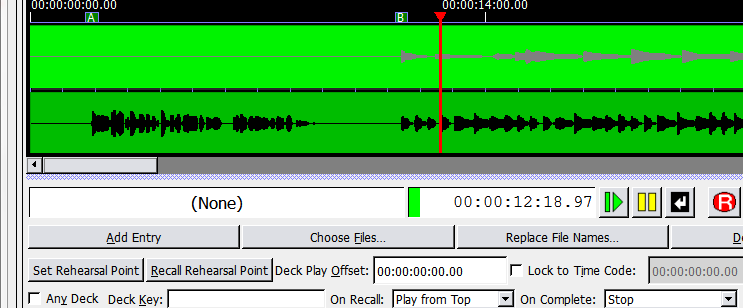
Deck Info
The Deck Info area consists of two sections: Deck Controls and Wild Tracks Elements.
Deck Controls
The Deck Controls section has options and controls that relate to the entire deck.
 |
Wild Tracks Window, Deck Controls
The following table contains a list of deck controls accessible from the Wild Tracks window.
Option/Control | Function |
|---|---|
Deck ID number | Click to select a deck for capturing subcue information. |
Deck Label | Displays the ID number of the subcue recalled for that deck, the name of the file assigned to that deck, and the Wild Tracks and Deck ID numbers. |
Deck Playback Position | Shows the current cursor position within the timeline of that deck. |
Transport buttons | Play, Pause, Stop, and Record. |
Option/Control | Function |
|---|---|
Total Play Length | Shows total play length. |
Hold button | Acts similar to a pause button, but does not affect the playing/stopped status of the deck. |
Isolate button | When the Isolate button is active (yellow), the deck will not be affected by cue automation. |
Add Entry | Allows you to add a Wild Tracks element to the deck. This can include a file for playback, a tone or noise generator, or a few other types; see “Wild Tracks Entries” on page 169. |
Choose Files | Opens a dialog box to add audio files to the deck. You can also add files by dragging them into the Deck Info area from a directory listing. |
Replace File Names | Allows you to switch out the selected file for a different one. |
Delete Selected | Removes the selected element from the list. |
Set/Recall Rehearsal Point but- tons | These allow you to place or go to rehearsal points in the deck, which means you can start a Wild Track at any point in its playback sequence. For more information on setting and recalling rehearsal points, see “Set/ Recall Rehearsal Points” on page 168. |
Deck Play Offset | Indicates the point on the deck timeline where playback will start. The default is the beginning of the deck. |
Lock to Timecode checkbox | Locks the deck transport to external timecode. |
Timecode field | Used to lock the deck playback to timecode. Playback will stop when the Timecode stops, or the deck reaches the end of the playback range. |
Deck Enabled | Normally selected, activating the subcue. When this box is unchecked, the subcue will not play back when recalled. If you are programming a sequence of overlapping Wild Tracks Deck cues, this allows you to listen to only the subcues you are working on. |
Any Deck checkbox | If checked, signifies that the Wild Tracks subcue does not explicitly spec- ify which deck should be used for that subcue. In this case, when the subcue is recalled, CueStation assigns it to a deck that is currently not in use, starting with the highest number available. If Any Deck is NOT checked, then every time the subcue is recalled, it will use the same deck. |
Deck Key text box | To set a key for the deck. More information about using deck keys can be found in “Advanced Techniques” on page 181. |
Option/Control | Function |
|---|---|
On Recall drop-down menu | To select which state the deck should be in when recalled by a subcue. |
On Complete drop-down menu | To select the desired action when the deck cursor reaches the end of the last entry in the timeline. |
Action text box (beside On Complete drop-down menu) | Provides the option of assigning any valid text command, as described in Appendix C, “D-Mitri Text Commands.” |
TIP: When using multiple decks, it can be difficult to keep track of which decks are playing. To create a compact Wild Tracks display, choose Windows > Clone
Window command, and turn off all display options. This creates a second Wild Tracks window that displays only the deck label, deck playback position, and transport but- tons.
 |
Compact Wild Tracks Display
Wild Tracks Elements
The next area within the Deck Info section is a list of all the elements included within the Wild Tracks Deck subcue.
 |
Wild Tracks Window, Elements Section
Click a column heading to sort the elements alphabetically by the contents of that column. Click it again to sort them in reverse order.
Element | Function |
|---|---|
Type | Shows the type of element, and also determines what kind of information is listed in the File Name column. Right-click in the Type column to change the type of element. See “Wild Tracks Entries” on page 169 for a full description of these types. |
File Name | Identifies the name of the file, if the entry is a Playback type. If it is a Record entry, File Name indicates the name of the file that will be written to. |
Sends | Specifies a list of Wild Tracks sends to which the audio should be routed. |
Loops | Allows you to replay the file or file region repeatedly. Set this value to -1 to loop indefinitely. |
Level | Specifies the volume level (in dB) of the file or tone generator. |
Play Length (hh:mm:ss:fr:sf) | Specifies the duration of playback. Note that this can be set to a value shorter than the actual length of the file to play back a region of the file. |
Loop Start | Sets the start time of the region to be looped. The default is the start of the file, but you can create smaller regions within the file to be looped. |
Loop End | Sets the end time of the region to be looped. |
Cross Fade | Sets the amount of cross fading you want Wild Tracks to use for loop-iter- ation discontinuities. The default cross fade time is 30ms. For no cross fade, set it to 0ms. There is no maximum cross fade time, although values greater than half of a loop iteration will be treated as if they were equal to half of a loop iteration. |
Element | Function |
|---|---|
File Offset | Specifies the point within the file where playback should begin. This, combined with Play Length, allows you to play back a region of the file. |
Play At (hh:mm:ss:fr:sf) | Specifies the point in the deck timeline where the file will start playing. |
File Format | Displays the format of the file, for recording entries. |
ID | Sets a unique ID for the file entry. |
Enabled | Displays whether the track is enabled or disabled. |
Paths
The File Search Path is the default directory that Wild Tracks searches for audio files on the Wild Tracks drives. Recording path is the default directory where Wild Tracks will record audio.
 |
Wild Tracks Window, Paths Section
Set/Recall Rehearsal Points
The Set Rehearsal Point and Recall Rehearsal Point buttons allow you to place or go to rehearsal points in the deck timeline.

 Points Rehearsal
Set and Recall Rehearsal Point buttons
Wild Tracks Window, Rehearsal Point Controls
To set and recall rehearsal points:
In the Wild Tracks deck, move the red time indicator bar to the desired spot.
Click the Set Rehearsal Point button. A rehearsal point selection dialog is displayed.
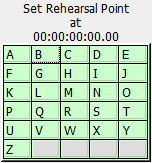 |
Rehearsal Point Selection Dialog
Select the letter you want to associate with the rehearsal point.
The rehearsal point will be placed at that point in the Wild Tracks deck. To start the cue at a rehearsal point, click Recall Rehearsal Point and select the point's letter from the context win- dow.
Wild Tracks entries
This section describes the different types of Wild Tracks deck entries and the parameters associated with them.
Entry Parameter | Definition |
|---|---|
Playback | The Playback type has an audio file associated with it, which will be played according to the offset and loop values. The file will be listed in the File Name column. |
Record | Indicates that when the subcue is recalled, recording will begin on that deck, on the channel(s) listed in the Sends column. |
Sine Wave | Generates a sine wave for an infinite length of time. The default frequency is 261.63 Hz (middle C), but you can specify any frequency between 1Hz– 24kHz by typing the number into the File Name column. |
Pink Noise | Generates an infinite amount of pink noise. |
White Noise | Generates an infinite amount of white noise. |
Entry Parameter | Definition |
|---|---|
Frequency Sweep | Generates a series of tones that sweep a range of frequencies. The default is a five second sweep that rises from 20Hz to 20kHz. To adjust the length of the sweep, enter a different value into the Play Length col- umn. To adjust the starting frequency, type the value into the File Name column. For example, type pitch=500 to start at 500Hz. To specify both starting and ending frequencies, specify the pitch twice. For example, type in pitch=500 pitch=100 to specify a sweep that starts at 500Hz and sweeps down to 100Hz. |
Square Wave | Generates a square wave of infinite length. The frequency and duty cycle can be specified in the File Name column. For example, enter 440 duty=50 in the File Name column to generate a wave at 440Hz with a duty cycle of 50%. |
Triangle Wave | Generates a triangle wave. The frequency and duty cycle can be specified in the File Name column. For example, enter 440 duty=50 in the File Name column to generate a wave at 440Hz with a duty cycle of 50%. |
Sawtooth Wave | This generates a sawtooth wave. The frequency and duty cycle can be specified in the File Name column. For example, enter 440 duty=50 in the File Name column to generate a wave at 440Hz with a duty cycle of 50%. |
Command | Executes the specified text command. Right-click the File Name field of a Command entry to reveal examples of commands that can be executed. The commands include Recall Cue, Recall Subcue, Update Cue, Update Subcue, Print Message to Log, and others. You can create a Recall Cue or Recall Subcue entry by right-clicking a cue or subcue and dragging it into a Wild Tracks deck or Wild Tracks deck subcue. |
Rehearsal Point | Sets a rehearsal point in the timeline view. |
Command Cue Context Menu
For cues with the Command Type, right-clicking in the File Name area activates a new context menu containing descriptions of commonly used D-Mitri Text Commands. You can leave the command as-is or edit it to suit the parameters.
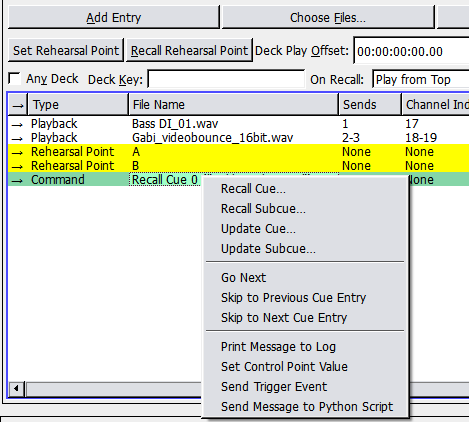 |
Command Cue Context Menu
Example: after selecting Go Next from the context menu, the text Go on Player 1 appears in the cell. This command presses the GO button in the Transport Window for Cue List Player #1 when the command track is played.
Note
Any valid D-Mitri text command can be entered into the File Name field.
The context menu only provides examples of commands that are likely to be useful when being executed from a Wild Tracks deck. For more information on D-Mitri text commands, see Appendix C, “D-Mitri Text Commands.”
Text Command | Function |
|---|---|
Recall Cue | Brings up the Select a Cue dialog with a list of current cues, along with their ID numbers and names. |
Recall Subcue | Brings up the Select a Cue dialog with a list of current subcues, along with their ID numbers and names. |
Update Cue | Brings up the Select a Cue dialog with a list of current cues, along with their ID numbers and names. |
Update Subcue | Brings up the Select a Cue dialog with a list of current subcues, along with their ID numbers and names. |
Go Next | Equivalent to pressing a GO button in the Transport window. If on player N is specified, then the GO button will be pressed on Cue List Player #N. If not, it will default to Cue List Player #1. |
Skip to Previous Cue Entry | Skips to the previous cue position in the Transport window. |
Skip to Next Cue Entry | Skips to the upcoming cue position in the Transport window. |
Print Message to Log | Prints the specified text to the system log. |
Set Control Point Value | Sets the specified values to the specified addresses. The syntax is similar to what is seen in Mixer Parameter subcues. For example, set input 1–8 level = +5.5 or set output 5,7,9–11 mute = false. The following example specifies a wait of 5.5 seconds followed by a fade over 10 seconds: set input 1 level = –50.0 waitTime=5.5 fadeTime=10.0 |
Sent Trigger Event | Sends a Trigger Event to the D-Mitri system. Any triggers (previously set up with the External Control/Setup Triggers command) that match event string will be activated. |
Sent Message to Python Script | Launches a new Python script process in the specified slot in the Script Execution window. A slotindex value of –1 will cause the script to be run in the background (not shown in the Script Execution window). The filename should be the name of a python script in the Support Files window, or in the templates folder. |
Also, for cues with the Command Type, the file name of any cue or subcue now includes its reference name (such as Recall Cue 0).
Select a Cue Window
To assign a cue to a Command entry, right-click the File Name field to display the available command types. The Select a Cue window is displayed when choosing Recall Cue, Recall Subcue, Update Cue, or Update Subcue. The Select a Cue window contains a list of current cues or subcues, along with their ID numbers and names.
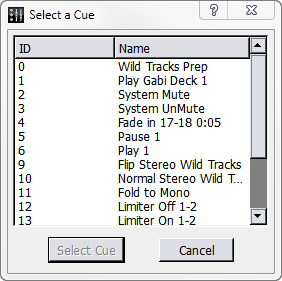 |
Select a Cue Window
When a cue or subcue is selected, the effect depends on whether you previously selected Recall or Update.
Command | Function |
|---|---|
Recall Cue/Subcue | Selected cues or subcues will recall when triggered. |
Update Cue/Subcue | Allows modification of the selected cue or subcue so that its control points match the values of those control points currently set in CueSta- tion. |
Wild Tracks subcues
Wild Tracks Deck subcues contain a variety of information about playback (or recording) of audio files. Each subcue corresponds to a single Wild Tracks Deck, which can contain up to 24 tracks of audio playback. You can specify the deck number explicitly, or set it to Any Deck to let CueStation choose a deck automatically.
There are two main methods of creating a Wild Tracks subcue. The easiest and fastest method is by dragging audio files into the Cue List window. Another method is to set up a multitrack sequence within the Wild Tracks window.
Creating a Wild Tracks Subcue in the Cue List Window
This is the quickest way to create Wild Tracks subcues.
Open the Cue List (or Cue Library) window.
In the operating system, open a file browser window and navigate to the wtrxaudio
directory.
Click an audio file and drag it directly into the list of cues section of the Cue List window.
CueStation will automatically create a cue that contains one Wild Tracks deck subcue with the following information:
The subcue will be a playback type Wild Tracks deck subcue, with the file offset, play off- set, level, loop count, and playback position set to defaults.
CueStation will automatically detect how many tracks are in the audio file and assign it the appropriate number of sends.
In the subcue, the Name field will be set to an asterisk (*), which signifies Any Deck. When the cue is recalled, CueStation will automatically assign it to the first available deck, start- ing with the highest number. For instance, if you have 32 decks, the cue will be assigned to deck 32, unless that deck is already in use, in which case it will be assigned to deck 31.
At this point, you can edit the subcue directly within the Cue List window. If you want to change the deck number, for instance, that can only be done by editing the Name field in the subcue.
Or, if you recall the cue, you can then set the input levels, pans, and other settings appropri- ately, and then use Capture Differences to add these control points into the same cue.
When the subcue is recalled, the Deck Label in the Wild Tracks window is automatically set to the name of the subcue, as shown.
Creating a Wild Tracks Subcue in the Wild Tracks Window
This method of creating a Wild Tracks deck subcue is useful for creating more complex multi-track sequences.
Open the Wild Tracks window and locate a deck that is not in use.
Drag in audio files; playback entries will be created for them automatically. Alternatively, you can click Choose Files to add audio files. The sends are assigned automatically for each file, but can be changed by clicking in the Sends column and typing in new channel numbers. Multiple Wild Tracks files can be assigned to the same channels.
Tip
Drop a file directly onto a meter to automatically assign the file to that channel.
As files are added, they appear in the timeline view as green bars. Drag the green bars to move them forwards or backwards in time within the deck.
You can fine-tune the timing by editing the Play Offset value for each file. This value determines the point in the deck's timeline where the file will start playing. Level is set to 0 dB by default; this can also be edited to balance out the mix within that deck. Additionally, different levels can be assigned for each track in the audio file, separating the values with commas (for instance: –10,–5). If volume envelopes are added, this value will be replaced with envelope values.
To loop part or all of a file, set the Loops value to the number of times the file should be looped, or type –1 for infinite looping. See “Regions, Loops, and Vamping” on page 180 for more information.
After adding files and arranging them in the deck timeline, Click the Select Deck button.
Press the F4 key to open the Capture window. The selected deck is listed in the Channel Selects area.
If the deck is the only thing you are capturing into the cue, make sure that all other sub- cues types are unchecked, then click the checkbox next to Wild Tracks Deck.
Click to Capture New to capture the cue.
Editing a Wild Tracks Subcue
Wild Tracks parameters captured by CueStation can be directly edited in the subcue window.
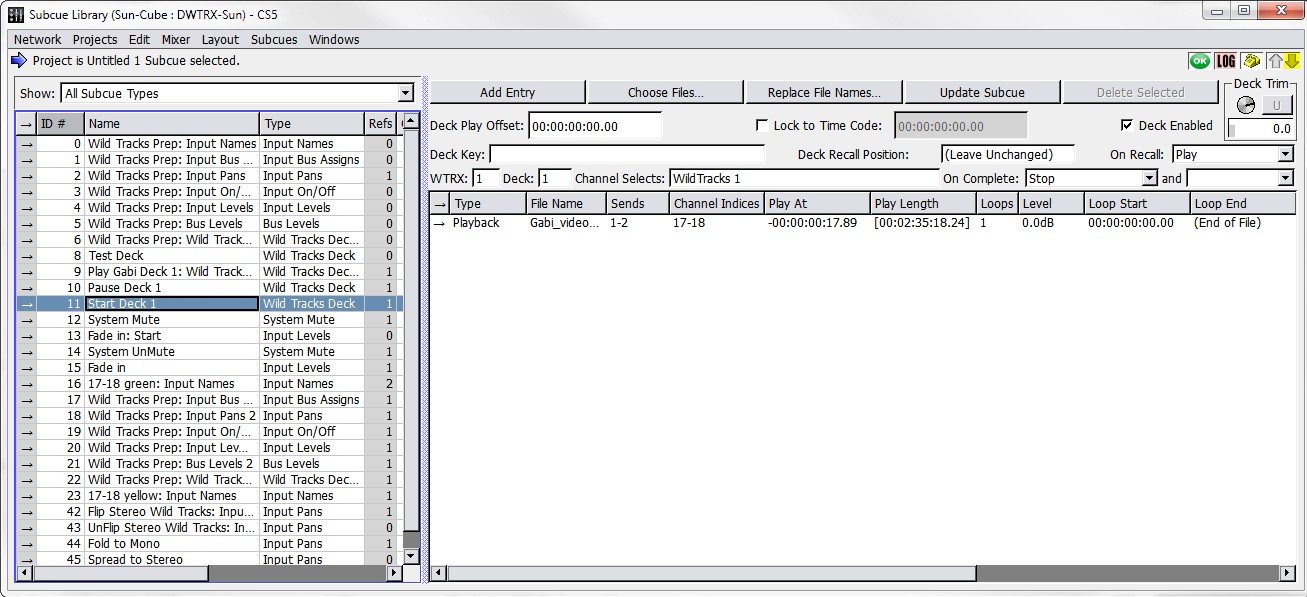 |
Subcue Library Window, Details for a Wild Tracks Subcue Displayed
Wild Tracks subcues can also be created entirely within the Subcue Library. Use Subcues > New Subcue > Wild Tracks Deck to create a new subcue. Controls are similar to those described in “Wild Tracks Window” on page 153, with several additional options. The following values constrain the operation of the entire deck.
Parameter | Function |
|---|---|
Deck Enabled | Normally selected, activating the deck. When not selected, the deck will not respond to automation. This allows you to easily skip specific sub- cues while designing the list. |
Deck Recall Position (hh:mm:ss:fr:sf) | Specifies the point along the deck timeline at which the deck cursor will begin playback. |
On Recall | Selects one of the following values: |
Continue | This will load in the new deck info, without affecting the playback status of the deck. If the deck was paused before the subcue was recalled, then it will remain paused. |
Stop | This stops the deck when the subcue is recalled. |
Parameter | Function |
|---|---|
Play | This loads the start of the file into the playback buffer, and then starts playing audio. |
Play from Top | This works similarly to Play, except that the Deck Recall Position is ignored and playback always starts from the beginning of the deck. |
Record | This lets you record audio from an input channel to a file on the Wild Tracks drive. |
WTRX | Specifies the Wild Tracks module used by the subcue. |
Deck | Specifies the Wild Tracks deck within that module. Enter an asterisk (*) to signify Any Deck. |
On Complete | Stop (default): When the cursor reaches the end of the last entry in the timeline, playback stops and the cursor returns to the beginning of the deck. |
Pause: The deck will pause after the last entry, with the cursor remaining in place. | |
Reset Deck: Removes all entries and resets deck parameters to default values. | |
Clear Deck: Removes all entries. | |
Disable Deck: Disables the deck. | |
Continue: The deck continues playing past the end of the last entry. | |
Continue from Top: The deck starts playing at the beginning of the deck. |
Assigning Multitrack Files to Sends
Track assignments are made in the order listed in the Sends column. The first track of a multi-track file is mapped to the first send listed, the second track to the second send listed, and so on.
For example you could specify 8,1,6,2–4, so that the file's first track will play on channel 8, the second on channel 1, the third track on channel 6, the fourth on channel 2, the fifth on channel 3, and the sixth track on channel 4.
Descending ranges are also permitted. For example, a multi-track audio file can be mapped to sends 16–1. The first track of the audio file is routed to the 16th channel, the second track is routed to the 15th channel, and so on.
Playing individual tracks
You can extract tracks out of a multi-track file by making a null assignment of the unwanted tracks. If 0 (zero) is used as a send value, the track will not be played.
For example, to play only the right-hand stream of a stereo file, specify the send as 0,1.
To send only the right channel of a stereo file to several different input channels, you could specify 0,1,0,2,0,3. For the left channel only, it would be 1,0,2,0,3,0.
To do the normal round-robin assignment mapping with the right channel only, prepend a zero to the sends. For example, 0,1–16 would cause channel 1 to play the right-hand stream, chan- nel 2 to play the left-hand stream, channel 3 the right-hand stream, and so on.
Recalling Wild Tracks subcues
When traversing through a cue list, CueStation will look ahead and preload Wild Tracks deck subcues into a buffer. When the cue is recalled, the playback of audio files will begin as soon as the subcue is recalled.
Optimizing Wild Tracks
This section describes how to get the best performance for Wild Tracks playback.
File type and format
Wild Tracks supports many different formats of audio files (see “Supported Audio File Types” on page 216 for a complete list). All files must have a 96kHz sample rate.
Deck Recall Time
For a Wild Tracks deck subcue, the length time between when the subcue is recalled and when the deck starts playing can be longer than desired, especially if there are many audio files to be loaded. Therefore, it can be very beneficial to load the deck (without playback) at a time before playback is required.
When recalling cues in a cue list, CueStation will look ahead at the next cue and automatically preload Wild Tracks deck subcues. These subcues will not be visible in the Wild Tracks window; they are loaded in the background. This can reduce time-until-playback by up to 98%.
It is possible also to manually control when decks are loaded, rather than relying on the preloader algorithm to perform preloading. This technique is useful in circumstances such as when a loaded deck is going to be played by means of a remote cue recall. To manually control deck loading, you will need two cues per Wild Tracks playback: one cue to load the deck, and another cue to start playback.
Create a Wild Tracks deck subcue as you normally would, then change the On Recall action from Play from Top to Stop. This will prevent the deck from playing after it is loaded.
Take note of which deck the subcue will use.
Add this subcue to a cue in the cue list, and position it before the cue where you want to recall playback.
Arrange the CueStation windows so both the Wild Tracks and the Cue List windows are visible, and select the cue where you would like to trigger playback.
Right-click and drag the Play button in the Wild Tracks window into the list of subcues of the cue that is selected in the Cue List window. This creates a new Mixer Settings subcue, which has the following information:
Wild Tracks unit number
Deck number
Status Play.
At this point, the cue list will have a sequence of two cues to initiate Wild Tracks playback. The first cue loads the files into a deck, and the second cue triggers playback. This can significantly reduce the trigger time when recalling the second cue. If the second cue is recalled without first recalling the loading cue, playback will not work as desired. For instance, if there are other files loaded into that deck, then those files will be played instead of the ones you were expecting.
Note
Decks can also be controlled by key to control the playback of a pre- loaded deck. For more information, see “Control Decks by Key” on page 182
Caution
It is possible to trigger multiple decks on one Wild Tracks Unit, such that more than 216 tracks are playing simultaneously. In this situation, audio dropouts are highly likely to occur, and warning messages will be printed to the log. When attempting to play more than 250 tracks, the most recently triggered deck(s) will automatically Hold until manually reset.
Regions, Loops, and Vamping
In Wild Tracks, you can create regions within an audio file. These regions allow you to loop a section of a file infinitely or a certain number of times. You can also change the number of remaining loops while the deck is playing to create a vamp-until-triggered effect.
Command-drag (Mac) or Ctrl-drag (Windows) in a green bar in the Wild Tracks timeline to specify a section of the playback region. The specified section will be highlighted in blue. Once the selection is made, Command-click and drag (Mac) or Ctrl-click and drag (Windows) either end of the blue selection bar to adjust the area it covers. Right-click the green bar and choose Select Entire Track as Track Region to make the blue selection area match the entire length of the audio track.
Loops
Wild Tracks can loop an entire file, or a region within a file. To loop an entire file:
Enter a number for the Loops value:
To loop the file a set number of times, enter a whole number greater than zero.
To loop the file infinitely, enter –1.
To create a loop for a region within a file:
Create a region by control-dragging the mouse over the part of the file. The region is high- lighted in blue.
Right-click the region and choose Set Track Loop Region. This command will change the Loop Start and Loop End times for the selected file to match the selected region. These values can be edited manually to fine-tune the timing of the regions.
Enter a number for the Loops value:
To loop the region a set number of times, enter a whole number greater than zero.
To loop the region infinitely, enter –1.
Vamping
Vamping is used to loop a region of an audio file continuously until it is triggered to continue, at which point it will finish playing the current region and then continue on to the next region.
To accomplish this in Wild Tracks, use the following procedure:
Create a region as described in the previous section.
Set Loops to infinite by typing –1 or inf in the Loops column.
Capture the deck into a cue called Start Vamp. This will be the setup cue that starts the vamping sequence. Note the deck number and the ID for the looping playback entry.
Open the Subcue Library and create a new Commands subcue with a Type of Wild Tracks and a Command of Set Loop Counter.
For Target Deck:, enter the number of the deck used in the Wild Tracks subcue.
For Target Track:, enter the ID number of the Wild Tracks playback entry.
Create a new cue that includes the External Commands subcue, and name it End Vamp.
Add both cues to the Cue List.
The Start Vamp cue will begin Wild Tracks playback, and loop indefinitely until End Vamp is recalled.
Note
If the End Vamp cue is recalled less than two seconds before the end of the region, an extra loop will be played. This is because part of the next loop has already been loaded into the Wild Tracks audio buffer. If the looped region is less than two seconds, it could result in several extra loops after the loop counter is reset.
Advanced techniques
This section lists some advanced techniques for using or controlling Wild Tracks.
Mixer Settings subcues
Mixer Settings subcues can be used to control transport actions on a deck or set of decks. Mixer Settings subcues can be created for any control point in CueStation by right-clicking the control and dragging it into the cue or subcue library. For example:
Open the Wild Tracks window and the Cue Library window, arrange them so both are visi- ble.
In the Wild Tracks window, in Deck 1, right-click and drag the Stop button into the Cue Library.
A new cue will be created, containing a Mixer Settings subcue.
If you click the subcue, you will see Wild Tracks 1 Deck 1 Status in the Control Points col- umn. You can change the value of the deck. For example, you might enter a value of Deck 1–5 to stop a range of decks at the same time.
In the Value column, you will see the word Stop. This can be changed to Play, Pause, etc. The Wait and Fade times are not valid for this type of control point, and the Enabled col- umn shows whether or not the control point(s) are enabled.
Control Decks by Key
Mixer Settings subcues can only control decks if you know which decks will be in use. For subcues assigned to Any Deck, the deck number depends on which other decks are in use. However, it is still possible to automate control of these decks, using deck keys. There is a Wild Tracks external subcue, Control Decks by Key, which allows you to control a set of Wild Tracks Decks that share the same pre-assigned key. To use this feature:
Create a Wild Tracks Deck subcue with a sine wave entry, and set the Deck to * (Any Deck).
For the Deck Key, type cue1.
In the Subcue Library window, go to Subcue > New Subcue > Commands, and name the command Pause cue1 Decks.
In the area to the right, click Add Entry.
For the new subcue, change the Type to Wild Tracks and change the Command to Control Decks by Key. For the subcue parameters:
Deck Key: cue1.
Action: Pause.
Set Deck Position: remain at default.
Match Only These Decks: remain at default.
Recall the Wild Tracks Deck subcue, and check the Wild Tracks window to see that it is playing (most likely on deck 32).
In the Subcue Library window, recall the Pause cue1 Decks subcue. The deck used by the Wild Tracks subcue should now be paused.
You can even change the deck number in the subcue, and the Pause subcue will still work. If you create more Wild Tracks Deck subcues with the same key, then the Pause subcue will pause all of those decks, if they have been loaded when the subcue is recalled.
Using Wild Tracks offline
CueStation allows you to edit Wild Tracks deck subcues while connected to VirtualD-Mitri.
Create a virtual drive (dmitriDisk file), which will contain information about the files and directories on the hard drive you are using.
While connected to the D-Mitri system, choose Windows > Wild Tracks to open the Wild Tracks window.
Click Drive Setup and choose the Drive Setup tab.
Highlight the drive you wish to use, then click Create Virtual Drive File.
When prompted, save this file in the same directory as VirtualD-Mitri.
Choose Network > Connect, then select Launch VirtualD-Mitri.
Choose Windows > Wild Tracks to open the Wild Tracks window.
Choose Display > Browse Virtual Drive, then navigate to the saved dmitriDisk file.
After opening the dmitriDisk file, a window opens, displaying the contents of the virtual drive. You can drag files directly from the virtual drive into a Wild Tracks deck, draw enve- lopes, and capture Wild Tracks Deck subcues as if you were connected to an actual Wild Tracks module.
Batch Files
Wild Tracks supports the use of batch files, or scripts to be executed. Here are the contents of an example batch file:
# This batch file appears in WTRX window like any other audio file file=makehaste.wav # Play this first
file=BirdOwl.wav # Then this
file=Congo.wav loops=5 # then play this one in a loop 5 times file=PalindromicMessage.aiff backwards # Play the palindromic message backwards source=tone pitch=440 length=1s # generate 440Hz tone for 1 second file=Romeo.wav loops=10 offset=1m length=2m # play 1–minute segment, 10 times file=another_batch_file.bat loops=3 # you can even do "subroutines" file=yet_another_batch_file.bat random # execute batch file in random order(!)
When the user specifies a batch file in the Wild Tracks window, it works like an audio file that is the group of all the items specified in the batch script. The following is an example batch file that spans across drives:
# This is a batch file that lets us span drives file=/mnt/wtdrives/left/wtrxaudio/FirstPartOfReallyLongFile.wav file=/mnt/wtdrives/right/wtrxaudio/SecondPartOfReallyLongFile.wav
If each filename is unique, it is not necessary to specify full file paths. Instead, the files can be identified by name and extension only:
# Same as above, but works with any IDs file=FirstPartOfReallyLongFile.wav file=SecondPartOfReallyLongFile.wav file=ThirdPartOfReallyLongFile.wav
Wildcard operators can also be used when specifying file names in batch files:
# Using wildcards file=First* file=Second* file=Third*
Tip
Batch file scripts can also be typed directly into a Wild Tracks Deck Playback entry without the need to create an external file. In this case, lines of script should be separated by semicolons.
Changing the File Path with a Subcue
The file search path defines where Wild Tracks will look for its files.
The default path is: /tmp/supportfiles:/mnt/wtdrives/*/wtrxaudio:~/wtrxau- dio
There are four sections, each separated by a colon (:). Each section represents a search path. A search path is a list of directories each separated by a slash (/).
Media Path Subcue
It is possible to create a subcue to change the File Search Path in the Wild Tracks window. Create a new Commands subcue, change the Type to Wild Tracks, and set the Command to Adjust Wild Tracks Media Path. There are several options for this command:
From the Path to Modify drop-down menu, choose either File Search Path or File Record Path.
From the Action drop-down menu, choose Set Path Clauses, Add Path Clauses, or Remove Path Clauses.
In the Path Clauses text box, type in the paths to be added or removed.
Understudy Voice Over
Since you can use the Commands subcue to change the File Search Path, it is possible to have a setup cue that changes what version of a file will be used for a show without having to create duplicate Wild Tracks subcues with different file versions.
For example, if you had offstage voice-overs that were delivered by a principal character, and there were two understudies for that part, then you need to match the actor for the perfor- mance to the specific voice-over files. Since understudies often go in with short notice, it would be good to automate the selection so that a change was not missed in a voice over cue.
The simple way to do this is to put the voice over files for each actor in a separate directory. These directories need to be located on the Wild Tracks drives at the same level as the /wtrx- audio directory and not inside the wtrxaudio directory where you would typically put files.
For example, audio pertaining to voiceover for one principal and two understudies would require three directories, VO_Principal, VO_Understudy1, and VO_Understudy2.
So for the drive example in the preceding section on file search path, you would see a list of directories for the drive that would include:
wtrxaudio
VO_Principal
VO_Understudy1
VO_Understudy2
In each directory we put the voice over files for that actor. These might be named with the voice over number and the actors name. Perhaps VO1-Principal.wav, VO1-Understudy1.wav, and VO1-Understudy2.wav.
In order to make it possible to use the same Wild Tracks cue work for any of the actors we need to duplicate each of the actors files and use the same name for the duplicate. For our example we could name each of the duplicates VO1.wav. To do this, you can use the drag- and-drop method of creating a Wild Tracks subcue file entry without having to edit the file name.
For this process to work, add a file search path that includes the directory for the chosen actor. If Understudy1 is going on, we add a file search path to the VO_Understudy1 directory. This can be added as another entry to the path:
In the Adjust Wild Tracks Media Path command, set the Path to Modify to File Search Path.
Set the Action to Add Path Clauses.
For Path Clauses:, type /mnt/*/VO_Understudy1.
At the end of the system check-out cue list we could insert three cues that set the path for each of the three actors: Principal, Understudy1, and Understudy2. When you know which actor will be going on, the cue for that actor can be executed and the file search path will be set to use that actor's files for all voice overs.