CueStation mixer controls
Using CueStation’s mixer windows requires familiarity with a set of common interface control elements. This section describes these control elements in the context of their use in the various CueStation mixer windows.
Inputs window
CueStation input channel strips can include a broad array of controls. These controls vary with the active CueStation configuration.
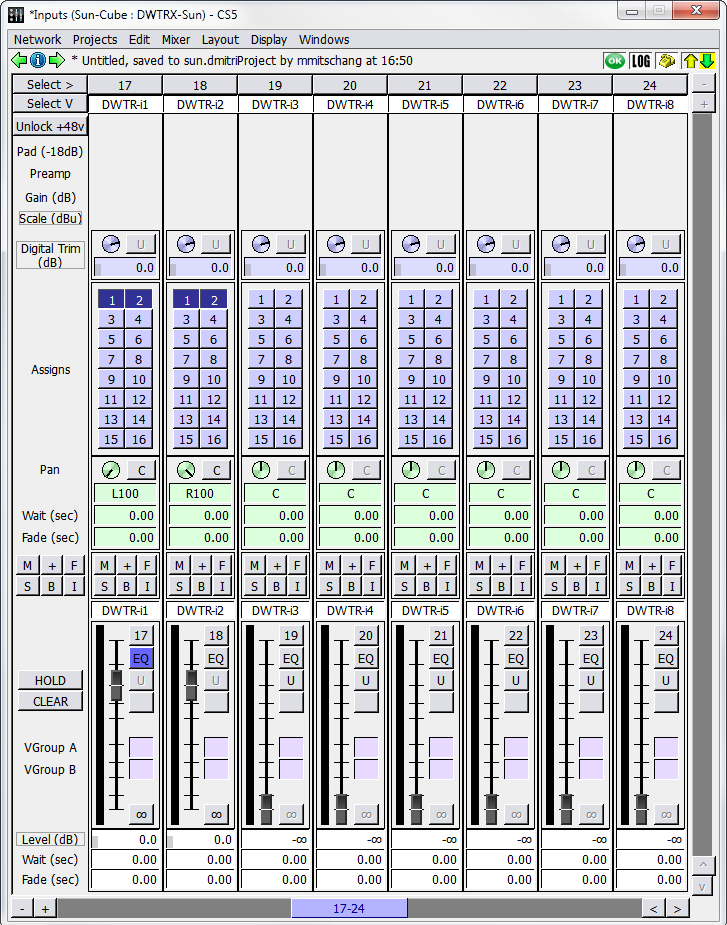
Inputs Window
Input channel strips include the following controls.
Control | Function |
|---|---|
Channel Select button | The Channel Selects button is labeled with its channel number (assigned when system was initially configured). It has a function for both automation and mixing. When capturing cues, the selection of channels can be used to constrain the range of channels captured into subcues. More information on using Channel Selects can be found in CueStation Automation. |
Fader Label text box | Faders can be automatically labeled when configuring the mixer, or manually labeled by typing a new label in the box. |
Auxiliary Send level or pan box | This control appears only when the mixer is configured for auxiliary sends and Display > Show Aux Sends is selected. |
Pre-Fader Listen Button | The pre-Fader Listen button is displayed if Control Points for PFL have been mapped. |
+48v Phantom power enable button | The phantom power setting can only be changed after clicking the Unlock +48v button on the far left. |
Pad (-18db) button | Reduces signal levels by 18 dB. |
Preamp button | Toggles the built-in preamplifier on or off. |
Gain knob | This knob controls Analog gain. |
Scale display | This display shows the signal scaling factor from the combination of Pad, Preamp, and Gain values. This control is active only for analog input or output channels. |
Trim knob | Drag Trim knobs or their associated value boxes to adjust the value. Values can also be typed directly in the associated text box. The adjacent Unity button resets the control. These trims can be used to adjust the relative levels of the automated mix during a performance without interfering with the overall contour of the automation. |
Bus Assign channel buttons | These buttons are arranged in paired (left/right) columns. To select a bus with a higher number than what is listed, right-click the buttons and select an available bus from the context menu. |
Pan control knob | Drag the knob to adjust the value, type a value into the associated text box, or click the text and drag up and down. The adjacent Center button resets the control. |
Wait and Fade timing boxes | The Fade time specifies how long it should take for the pan control to reach the desired position. The Wait time specifies how much time passes before the fade begins. A set of automation controls, supporting Mute, + (polarity), Flip (restores Level control when swapped with Aux, Trim, etc.), Solo, EQ Bypass, and Isolate. A master set of controls to the far left of the fader strips provides global control, toggling or resetting all buttons simultaneously. |
Fader level control | Fader for controlling channel level. See Fader Level Control, for more information. |
Scroll Bar | Drag to change the currently displayed channels. Addition and Subtraction buttons adjust the number of simultaneously displayed channels. Arrow buttons bank the displayed channels left and right. Right-click the scroll bar to choose the first displayed channel from the channel selection grid. |
CueStation provides a set of keyboard modifiers to use when changing settings across a selection of several inputs or outputs. Using these modifiers, channels can be controlled in stereo pairs or as larger selections.
To apply changes to a stereo pair on an absolute basis, select one channel of the pair, and hold the Shift key while making changes.
To apply changes on an absolute basis to all selected channels, hold Command (Mac) or Ctrl (Windows) while making changes.
To apply changes to a stereo pair in a relative fashion, such that the channels adjust uniformly while maintaining their differences, hold Shift+Option (Mac) or Shift+Alt (Windows) while making changes.
To apply changes to selected channels in a relative fashion, such that channels with different settings adjust uniformly while maintaining their differences, hold Command+Option (Mac) or Ctrl+Alt (Windows) while making changes.
Fader level control
The fader controls are similar across all mixer windows.
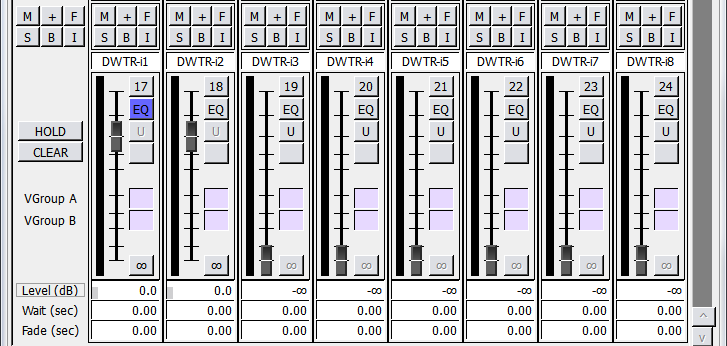
Fader Section (Mixer Windows)
The fader control section contains the following elements.
Element | Function |
|---|---|
Mute button | Mutes the signal present on the channel. |
Invert button | Inverts the polarity of the signal present on the channel. |
Flip button | Enables the fader to switch between controlling Channel level, Aux level, and Trim level. The destination and value of the fader control is indicated in the Level field directly below the fader. |
Solo | Solos the signal present on the channel. Right-click the Solo button and choose Enable Solo-Safe to prevent a channel from muting when another channel has Solo-in-place engaged. |
EQ Bypass | Bypasses all EQ settings of the channel. |
Isolate | Isolates the channel from automation. |
Signal Meter | The signal meter shows the level of the signal. It appears to the immediate left of the fader slider. |
Fader Slider | Drag this slider up and down to adjust the level. |
Channel Number | The channel number appears at the top-right of the control, corresponding to the channel number at the top of the channel strip. Click the channel number to disable the channel completely. |
EQ shortcut button | Opens the EQ window. It is enabled only when the system is configured to allow signal processing. |
Unity (0 dB) shortcut button | Provides a shortcut to set the channel level to unity. |
Listen button | A Listen button is enabled only when a Listen output is configured. The listen button can be mapped to a Listen output or to a set of Listen outputs using a set of checkboxes that become available when Listen output is configured. When a listen channel is enabled in the Master Output section, listen channel number is indicated on the button of each channel. An asterisk indicates multiple overlapping assignments. |
VGroup boxes | Enter a number or drag the box to assign a channel to a VGroup. When the channel is assigned to a VGroup, its fader shows a green scaling bar along the fader track, indicating the scaling factor being applied to the fader level. If the scaled level is above 0 dB, it is shown with a yellow bar (orange when using the Dark color scheme). When using two VGroups, the scaling factor is the product of the VGroup levels (multiplicative, not additive). |
Off (-inf dB) shortcut button | Provides a shortcut to set the channel level to -infinity. |
Level Wait, Fade value boxes | Meters and value can be dragged, and values can be typed directly. |
Global controls
Along the far left of the control panel, adjacent to and outside the channel strips, are some controls and labels. These controls are listed in the following table from top to bottom, with variations dependent on the mixer configuration.
Control | Function |
|---|---|
Master Channel Select button | This indicates whether any channel has been selected and toggles the Channel Select for all faders simultaneously. |
Auxiliary Select button | The Auxiliary Select button is labeled with the Auxiliary Number, and a text box for the Auxiliary Label. These controls appear only when the mixer is configured for aux- iliary sends and Display Show Aux Sends is selected. Double-click the label to flip the Aux Fader and Channel Fader controls. |
Unlock +48v button | Makes the +48v Phantom power enable button accessible on each channel. |
Digital Trim button | When double-clicked, Digital Trim flips the Trim and Level controls. The label text changes to indicate which type of control the adjacent pan pot adjusts. To switch back, click the F button. |
Master set of automation controls | These controls include Mute, + (polarity), Flip (restores Level control when swapped with Aux, Trim, etc.), Solo, EQ Enable, and Isolate. These buttons allow the settings to be toggled globally for all inputs. |
Two global Auxiliary Select buttons | Each button is labeled with its Auxiliary Number. |
HOLD button | When enabled, multiple PFL buttons can be activated simultaneously. When disabled, only one PFL can be activated at a time. |
Checkboxes | These checkboxes, between the HOLD and CLEAR buttons, select which Listen outputs have audio routed to them when the CLEAR button is selected on each channel. |
CLEAR button | The button turns off any Listen buttons. |
Level (dB) button | After the Digital Trim button has been clicked up above, these buttons switch places—Digital Trim becomes Level (dB), and vice-versa. Double-click to flip the trim and level controls back to their original positions. |
Tip
Right-click within the master set of buttons along the left side of the window to disable the global control buttons in the mixer windows. Mute, + (polarity), Solo, EQ Bypass, and Isolate buttons can be disabled for all channels.
Adjusting settings across multiple channels
There are several ways to apply changes to more than one channel at a time, either by entering new settings with the keyboard alone or by using the mouse in combination with keyboard modifier keys and key combinations.
Changing channel settings by entering field data
When changing channel settings by typing data into channel strip fields, changes can be applied to channels in stereo pairs, or to broader channel selections. Changes can be made either on an absolute or a relative basis.
Hold the shift key while changing a control point to make changes in stereo pairs.
Use Shift-Enter after typing in a new control point value (such as a Fade time) to make changes in stereo pairs.
With multiple channels selected, hold Command (Mac) or Ctrl (Windows) while changing control points to make proportionate changes to all selected channels.
Press Command + Enter (Mac) or Ctrl+Enter (Windows) after typing in a control point value to change that value for all selected channels.
Press Command+middle-click (Mac) or Ctrl+middle-click (Windows) to change control points for all selected channels in the window.
Changing multiple channel settings by mouse
CueStation also provides a set of keyboard modifiers when working with a mouse to change settings across a selection of several inputs or outputs. Using these modifiers, channels can be altered in stereo pairs or in larger groups.
Right-click-drag (Windows) or Ctrl-drag (Mac) to copy control values from one channel to another. This technique can be used to copy the entirety of settings from one channel to another, or just a particular section of the channel strip, such as the bus assigns or the fader level.
To apply changes to a stereo pair on an absolute basis, hold Shift while making changes to either channel of the pair.
To apply changes on an absolute basis to all selected channels, hold Command (Mac) or Ctrl (Windows) while making changes.
To apply changes to a stereo pair in a relative fashion, such that the channels adjust uniformly while maintaining their differences, hold Shift+Option (Mac) or Shift+Alt (Windows).
To apply changes to selected channels in a relative fashion, such that channels with different settings adjust uniformly while maintaining their differences, hold Command+Option (Mac) or Ctrl+Alt (Windows).
AUX flipping
The fader slider, because of its length and orientation, provides a finer level of mouse control than the rotating control knobs. When many fine adjustments are made to a Trim or Aux Level control, flip it to the fader slider.
Click the channel’s Flip button.
Click the Flip button again to restore normal fader control. To flip a control for all channels in a window:
Click the Global Flip button.
Click the Global Flip button again to restore normal fader control.
To flip all faders to a row of Aux Levels, double-click the appropriate Aux Level row label at the left edge of the Aux Row. After editing Aux Levels, double-click the Aux Sends label (at the left edge of the window) to return to normal Trim/Level flipping.
The F9 and F10 keys flip through auxiliary channel rows, backward and forward, respectively.
Bus Master faders
The Bus Master faders control the audio signal mixed from the input channels assigned to each bus before it reaches the matrix.

Bus Masters Window
Bus channel strips feature the following controls.
Control | Function |
|---|---|
Channel Select button | Channel Select is labeled with the associated bus number. Click to select a channel. |
Bus Label text box | This text box is used to change the name of the bus label. Any labeling changes made here are also reflected in the Matrix window. |
Digital Trim knob | Adjusts the trim. The adjacent U button resets the knob to unity. |
Set of automation controls | These controls are explained in Inputs Window. |
Set of fader controls | These controls include a fader slider, Unity button, Virtual Group assigns, HOLD and CLEAR buttons, and Level, Wait, and Fade value boxes. |
Output Masters
The Output Master faders control the audio signal mixed from the matrix channels assigned to each output.
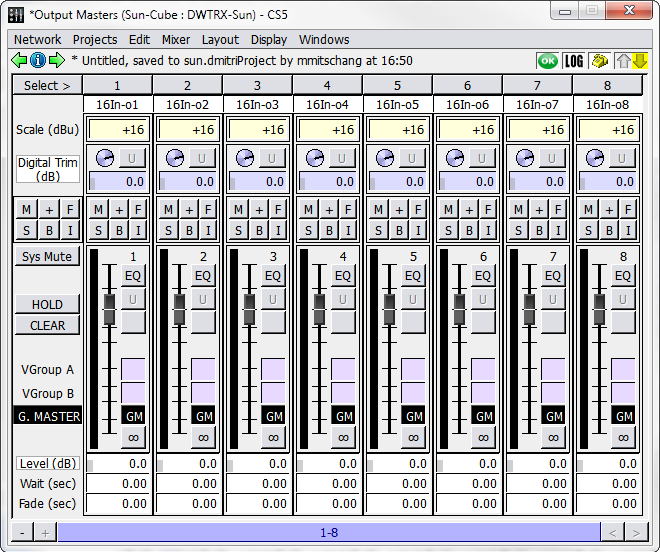
Output Masters Window
The Output Masters controls contain the following.
Control | Function |
|---|---|
Channel Select button | Channel Select is labeled with the associated output number. Click to select a channel. |
Output Label text box | This text box is used to change the name of the output label. Any labeling changes made here are also reflected in the Matrix window. |
Analog Scale setting | This adjusts the scale of the output signal. |
Digital Trim knob | Adjusts the trim. The adjacent U button resets the knob to unity. |
Set of automation controls | These are explained in Inputs window. |
Set of fader controls | These are described in Fader level control. |
G. Master button | When enabled, the Output Master is controlled by the Grand Master. When disabled, the Output Master remains independent. |
AUX Masters
The Aux Masters window displays controls for auxiliary output channels:
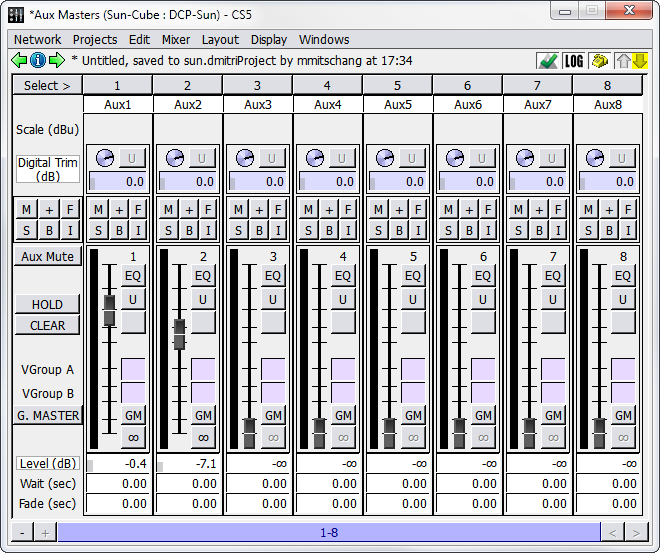
Aux Masters Window
The auxiliary output channel controls contain the following.
Control | Function |
|---|---|
Channel Select button | The button is labeled with the aux output number. |
Aux Output Label text box | Shows the aux output location. |
Analog Scale setting | Adjusts the scale of the output signal. |
Digital Trim knob | Adjusts the trim. The adjacent U button resets the knob to unity. |
Set of automation controls | These are explained in Inputs Window. |
Set of fader controls | These are described in Fader Level Control |
G. Master button | When enabled, the Output Master is controlled by the Grand Master. When disabled, the Output Master remains independent. |
Listen Masters
The Listen Masters window displays controls for Listen output channels.
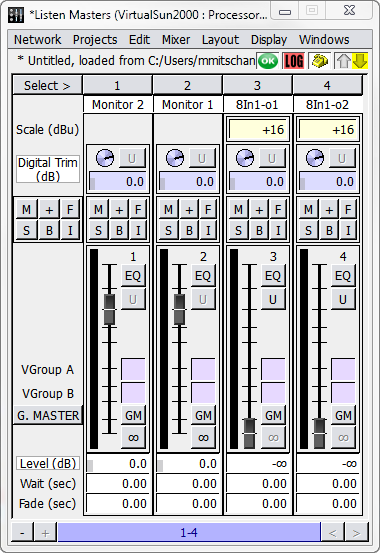
Listen Masters Window
The Listen Masters controls contain the following.
Control | Function |
|---|---|
Channel Select button | The button is labeled with the aux output number. |
Listen Name text box | Shows the Listen output location. |
Analog Scale setting | This is to adjust the scale of the output signal. |
Digital Trim knob | Adjusts the trim. The adjacent U button resets the knob to unity. |
Set of automation controls | These are explained in Inputs window. |
Set of fader controls | These are described in Fader level control. |
G. Master button | When enabled, the Output Master is controlled by the Grand Master. When disabled, the Output Master remains independent. |
Virtual Groups
The values of arbitrary groups of faders can be scaled by Virtual Group faders, also known as VGroups. A single Virtual Group fader can be assigned to control many types of faders at the same time. Any number of Input faders, Bus Master faders, Output Master faders, and Aux Master faders can be assigned to the same Virtual Group fader. Each fader can be assigned to two Virtual groups, allowing even more control.
The Virtual Groups window provides controls for VGroups.
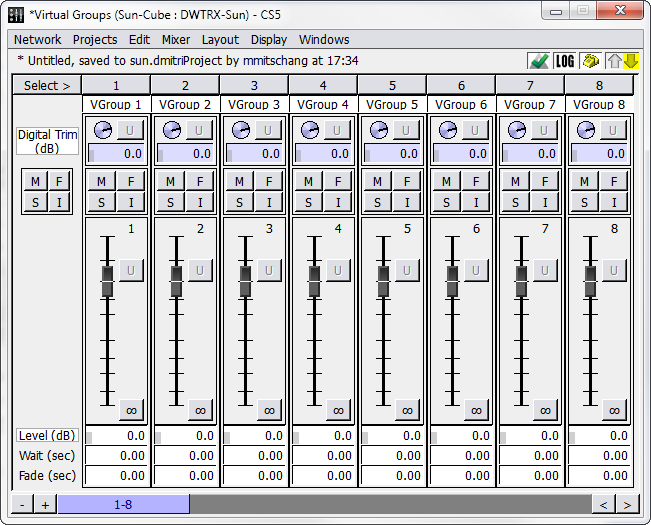
Virtual Groups Window
The Virtual Groups window contains the following controls.
Control | Function |
|---|---|
Channel Select button | The button is labeled with the VGroup number. |
VGroup Label text box | Shows the associated virtual group. |
Digital Trim knob | Adjusts the trim. The adjacent U button resets the knob to unity. |
Set of automation controls | These are explained in Inputs window. |
Set of fader controls | Includes a fader slider, Unity button, and Level, Wait, and Fade controls. |
Grand Master
The Grand Master is the final set of gain stages within CueStation. It controls the level of all outputs that have the GM (Grand Master) button engaged.
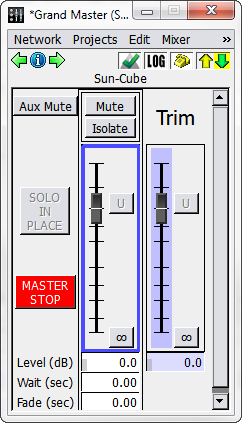
Grand Master Window
The Grand Master window contains the following controls.
Element | Description |
|---|---|
Aux Mute button | When active, mutes all Aux sends. |
SOLO IN PALCE button | Turns green whenever a solo is active. Click the button to clear the solo. |
MASTER STOP button | MASTER STOP has the same function as the Master Stop button in the Transport window: click the button to stop all automation, including Wild Tracks, SpaceMap trajectories, fades, wait times, and autofollows. |
Mute button | Mutes the audio on all main output channels. |
Isolate button | Isolates the Grand Master level, trim, and mute from automation. |
Grand Master fader | Provides Unity and -inf shortcut buttons |
Level, Wait, and Fade value boxes | These apply to the Grand Master fader. |
Trim fader | Provides Unity and -inf shortcut buttons. |
Level value box | For the Grand Master fader. |