CueStation automation
CueStation mixer automation governs the movement of mixer controls over time. It provides transition automation, which allows for fades and other changes over time, as compared to simple snapshot automation, which typically sets all controls instantaneously.
CueStation offers a graphical interface for various mixer control points. A control point is any adjustable mixer control, such as a fader, pan knob, or EQ setting. The values for a set of control points are contained in a subcue and a set of subcues can be captured to create a cue. These cues can be placed in a cue list. During a show, the cues in the cue list can be recalled manually, automatically in sequence, at a certain time point, or via a controller external to the system.
Control hierarchy
The subcue, cue, and cue list structure provides a system for defining control automation. The complete CueStation data hierarchy, from the bottom up, is as follows:
Control Points
A control point in CueStation is defined in a general sense as any parameter that can be adjusted manually or by the automation system. As with physical consoles, a lot of the control points are associated with faders, knobs, and switches. Some control points address signal processing parameters, such as equalization and delay, while other control points, like isolate, affect the operation of the automation system itself.
For example, Input faders have three control points: Level, Wait, and Fade. Level sets the target fader value, and Fade sets how long the fader takes to move to the target value. Wait sets the delay between recalling the cue and the start of the fader movement. This allows one to program a cue that starts a three-second fade to unity one second after recall. All three control points are contained in each Input Level subcue.
Subcues
A Subcue is a collection of control points. The automation structure in CueStation is based on absolute destinations. Control points contained in subcues dictate the state the mixer once the recall of that subcue is complete, regardless of what those control points were set to when the subcue was recalled. For example, if a subcue is recalled with the information Input 10 Level: -20.0 dB Fade: 5 Wait: 0, the fader moves from its current position to -20 dB over five seconds.
Control points can be set as relative values within the subcue structure definition. For exam- ple, a subcue can be defined that increases or decreases an input level. This is achieved by entering the value using a prefix to indicate the relative increase or decrease. The prefix for specifying a relative increase is ++, and the prefix for specifying a relative decrease is --.
Cues
A Cue in CueStation refers to a list of subcues that are recalled as a group. A cue could contain many different types of subcues, or only one subcue. If a subcue has a wait time associated with it, that information is also stored as part of the cue. The same Subcue can appear multiple times in a Cue, and in multiple Cues.
Cue Lists
A Cue List is an indexed collection of cues that are intended to be recalled in a certain order. Like a cue, a cue list does not have any control point data in itself. It merely contains references to the cues associated with it. A cue list can also have recall and timing information associated with each cue (see Building a Cue List). The same Cue can appear multiple times in a Cue List, and in multiple Cue Lists.
Project File
The Project File is the container that stores all automation data. A project file also contains the configuration of the hardware, layout information, and connection settings. Any of the data in a project file can be merged into another project; this provides a method for importing cues, cue lists, or any other automation data. Project files can be saved to a client computer's hard drive, or to the flash memory inside a D-Mitri. Projects saved to a hard drive have a dmitriProj- ect extension.
Note
D-Mitri's flash memory saves only one file across all the processor modules in the system. Choosing Projects > Save Project to Flash overwrites any existing project file already saved in the flash memory of D-Mitri processor modules.
Cue-based automation
Control point settings are stored and organized through the automation editing windows. These windows support the creation and management of subcues, cues, and cue lists. Subcues contain the control data for all mixer functions and external device commands.
CueStation stores discrete states, target values, and time intervals, and calculates the continuous transformations from cue to cue on the fly. Such efficiency is essential for large configurations. The flexibility of cue automation is also critical in live performance where timing and order can not be accurately determined ahead of time.
Automation basics
This section summarizes the process of capturing cues into a cue list. Each of these steps is explained in more detail in subsequent sections.
Set Control Points. The first steps in creating a cue are determining what the cue should do and setting the control points on the mixer accordingly. Because of the way automation works in CueStation, set the mixer to the state it should be in once the cue is complete. For example, to program an input fader to fade from 0 to -20 dB over five seconds, set the fader to -20 dB, then set the fade time to 5.
Select Channels. Once the mixer is set to the desired state, use Channel Select to filter which parts of the mixer to capture into the cue. For instance, to achieve a fade out of input channels 5 and 6 without changing the level of the other input channels, select only channels 5 and 6. Channel Select is described in more detail in Channel Select.
Open Capture Window. When the control points have been set and the appropriate channels have been selected, press the F4 key to open the Capture window. In the Capture window, enter a name and comment for the cue. The cue-capturing process is described further in Capturing Cues.
Select Subcue Types. The next step is determining which parts of the selected channels to capture. In the middle of the Capture window there are several lists of subcue types; place a check mark next to each subcue type to be captured, and leave the rest unchecked. For example, to capture the input levels while leaving the input labels unchanged, check the box next to Input Levels and uncheck the box next to Input Labels.
Capture Cue. Once all the relevant subcue types have been selected, click the button in the lower right corner labeled Click to Capture New. A new cue is created with the chosen name, referencing the subcues that were selected. The new cue is appended to the current Cue List, and also appears in the Cue Library. The new subcues appear in the Subcue Library.
Build a Cue List. After cues have been created, they can be organized into a Cue List within the Cue List window. To add more cues from the Cue Library window, right-click them and drag them into the Cue List. Right-click and drag to change the order of existing cues in the Cue List. Cues can be set to recall manually or by timecode from within the Cue List window or by auto-following a previous cue by a certain length of time. See Building a Cue List for more information.
Edit Cues. There are several ways of editing cues after they have been captured. One way is through the Capture window, in Capture Differences mode. Instead of creating a new cue with the selected control points, it amends the changes to the most recently recalled cue, or any other selected cue. Another way to change a cue is to edit the values of the control points manually, by viewing the contents of the subcues. These methods are described more fully in Editing Cues.
Channel select
Each of the mixer windows displays a group of channels or controls that are all of the same type, whether they are input channels, output channels, Wild Tracks Decks, SpaceMap buses, etc. All the information can be captured from all the channels at once in a single subcue. By using Channel Select, only information from the channels that need to change is captured in a particular cue.
The mechanics of Channel Select also apply to Wild Tracks Deck and SpaceMap trajectories. For a cue that starts an audio file playing in one deck, capturing only that deck prevents the cue from interrupting other decks.
Using Channel Select in each window
At the top of or beside all channel, bus, and virtual group controls, CueStation offers a button labeled Select, adjoined by an arrow pointing across the channel strip columns to the right. Click this Master Select button to select all channels in the window, highlighting the channels.
 |
Master Select Button (Inputs Window Shown)
For greater convenience in selecting large numbers or non-contiguous ranges of channels, right-click the Master Select button to open the Selects dialog, as shown below.
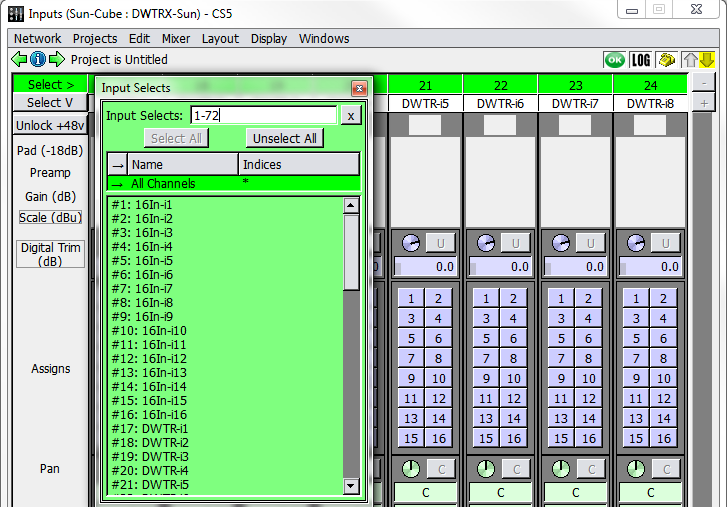 |
Selects Dialog (Input Selects Shown)
Channels can be selected from this list without having to scroll through the window to choose channel strips through mouse selection. Click a channel in the list to select it, or enter channel numbers in the text field above the list. The text field recognizes both individual channels and ranges of channels. Ranges of channels are specified by separating the first and last channels of the range with a dash.To input multiple selections, separate them using commas. For example, entering 1-7,12,24-29 selects channels 1 through 7, channel 12, and channels
24-29.
The Capture window has controls that further refine Channel Select. To show which channels are being captured, click the Use Channel Selects button. Each type of channel has a check- box that can be deselected to capture all channels instead of just the selected ones.
When a cue that uses Channel Select is captured, the new subcues that are created only con- tain information about those controls that were selected. Later, when that cue is recalled, only those selected channels are affected. All other controls continue to do whatever they were doing. If a channel is in mid-fade, it continues to fade; if at rest, it remains at rest.
Using Channel Select in the Capture window
It is also possible to edit channel selects from within the Capture window. This is especially useful when for selecting multiple channels from different areas (Wild Tracks, SpaceMaps, Aux, etc.).
Right-click the Channel Selection area (see “Channel Selection” on page 85), To the right of the Channel Select buttons, to open the pop-up editor.
 |
Select the channel type from the list to bring up the control dialog.
 |
Select the channels to capture, then click the close box in the upper right corner to close the dialog.
Repeat the process for every different channel type to capture. The channels are now selected in the Capture window.
Channel select capture logic
In most mixer windows, control points for all channels are captured if no channels are selected. For example, capturing an Input Level subcue while no Input channels are selected results in a captured subcue that includes the levels of all Input channels.
There are a few exceptions:
If the Wild Tracks Deck subcue type is selected, but no Wild Tracks Deck is selected, then only Deck 1 on Unit 1 is captured into the cue.
If the SpaceMap Trajectory or Position subcue type is selected, but no SpaceMap bus is selected, then the captured SpaceMap subcue contains no control points.
If the Cue List Player subcue type is selected, but no Cue List Player is selected, then the captured Cue List Player subcue contains no control points.
Follow Channel Selects
When Mixer > Follow Channel Selects is enabled, recalling a cue that contains Channel Selects automatically selects the associated channels in the mixer windows.
Note
This function is enabled only on a per-client basis, and assists with troubleshooting programmed automation. It is recommended to leave this function off, as it can sometimes cause a cue to capture a different set of items than intended.
Capturing cues
The Capture window is where the actual cue and subcue creation takes place. The Capture window controls make it easy to limit the control points and channels to be captured, and to create a new set of subcues corresponding to only those control points that have been changed.
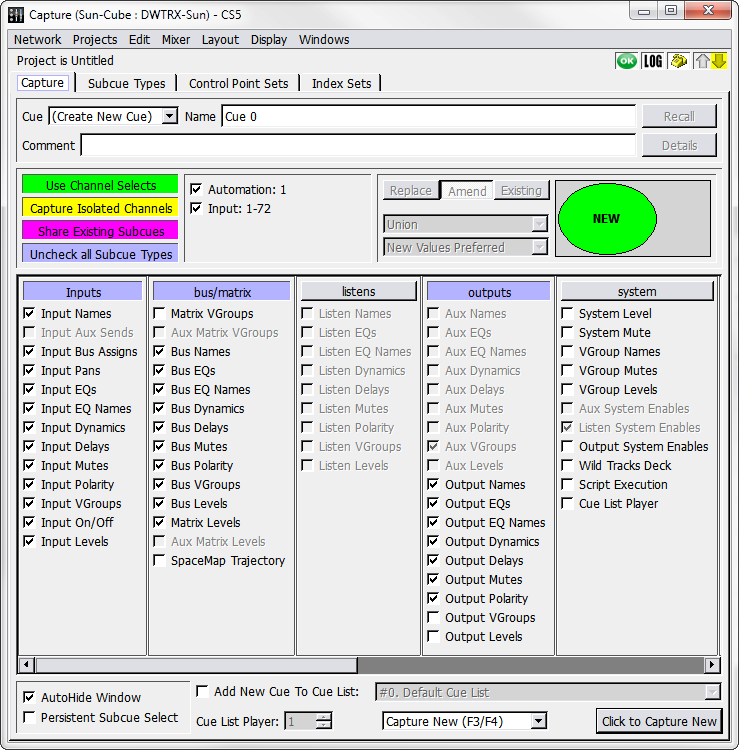
Capture Window
Capture window controls
The Capture window has four tabs: Capture, Subcue Types, Control Point Sets, and Index Sets. The latter three tabs allow customization of the set of control points captured for a subcue, or create new subcue types. These tabs are detailed in Capture Window Tabs.
The Capture tab is the main working window for cue creation. There are five groups of controls:
A Cue Selection area, which identifies the source cue for Capture Differences or shows (Create New Cue) for Capture New. It also shows the new cue’s name and description.
A Channel Selection area, for selecting which channels are captured.
Capture Differences controls, active in Capture Differences mode, specify how new control points are integrated with the cue's current subcues.
A Subcue Types Selection area, identifying the set of mixer component controls to be captured.
A Capture Controls area, with options relating to the behavior of the Capture window and how the cues are captured.
Cue Selection
The Cue Selection area provides a set of controls to create new cues, update existing cues, or recall settings on which to base a new cue.
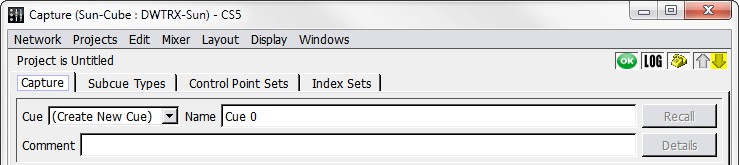
Capture Window, Cue Selection Area
The Cue Selection area contains the following controls.
Control | Function |
|---|---|
Cue drop-down box | Shows (Create New Cue) by default. By selecting an existing cue from the drop-down box, the subcues can be updated or replaced. |
Name text box | Shows the name of the selected cue. A name can be entered for the new cue, or edited for the selected cue. |
Recall button, | Triggers the cue, moving its control points to their previously-saved values. |
Comment text box | A place to type any comments regarding the cue. Comments are saved with the cue and are visible from the Cue Library, Cue List, and Transport. |
Details button | Opens the Cue Library to show the current cue’s subcues. |
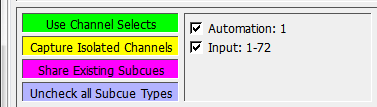
Channel selection
The Channel Selection area controls the selection of channels to be included in the cue.
Capture Window, Channel Selection Area
The Channel Selection area contains the following.
Control | Function |
|---|---|
Use Channel Selects | Button specifies whether the captured subcues include values for all channels, or only selected channels. |
Channel Selection Range | Checkboxes appear to the right of Use Channel Selects. The channels selected via Channel Select are shown, some of these sets can be turned off to further refine the channels that are included in the subcues. |
Capture Isolated Channels | Button specifies whether channels that are isolated are to be captured or not. |
Share Existing Subcues | Share Existing Subcues is active by default. When inactive, new cues never use the existing subcues. Instead, a new subcue is created for every checked subcue type. |
Uncheck All Subcue Types | Unchecks all subcue types in the Subcue Types Selection area below. |
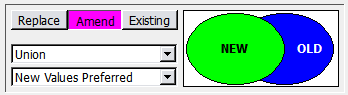
Capture Differences controls
This section is only active for Capture Differences or Update Subcues, and controls how the intersection between the new and old subcues is handled.
Capture Window, Capture Differences Section
The Capture Differences area contains the following.
Control | Function |
|---|---|
Mode buttons | These buttons, Replace, Amend, and Existing, toggle between the three most fre- quently used update modes. |
Capture-Operator | This box offers four options: New Control Points Only, Intersection, Union, and Old Control Points Only. |
Capture-Precedence | This box offers three options: New Values Preferred, Old Values Preferred, and New Values Always. |
Venn Diagram | Provides a graphical depiction of how the subcues are updated. |
These controls are described in detail in Capture Differences and Update Subcues.
Subcue Types Selection
The Subcue Types Selection area controls the selection of subcue types to be included in the cue.
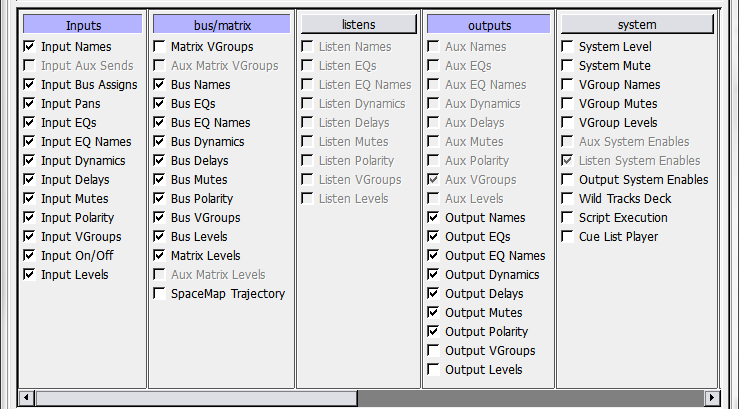 |
Capture Window, Subcue Types Selection Area
This is divided into sections by category. Each section contains:
Category labels, such as Inputs or Trim. Clicking a label selects or deselects all the subcue check boxes within that category.
A list of Subcue Types. Each selected subcue type is included in the cue.
The lists are grouped according to their subcue type category, as defined on the Subcue Types tab.
Capture controls
At the bottom of the Capture window are additional options that modify the behavior of the Capture operation.
Option | Function |
|---|---|
AutoHide Window checkbox | If this checkbox is checked, then the Capture window closes automatically when the Capture button is clicked. The window can be restored by pressing the F4 key, or by selecting Windows Capture. |
Persistent Subcue Select checkbox | If this checkbox is checked, then the last subcue types captured are automatically selected the next time the Capture window is opened. |
Add New Cue to Cue List checkbox and a Cue Lists selector | When the checkbox is enabled, the captured cue is added to the selected cue list in addition to the cue library. |
Capture Type menu | Capture New captures a new cue according to the set parameters (cue name, channel automations, and subcue types). |
Capture Differences causes new subcues of the same types included in the selected cue to be created and referenced in the cue. | |
Update Subcues causes the information in existing subcues to be changed, thus allowing global changes to be made. |
The Capture Differences and Update Subcue functions are described in Editing Cues.
Note
The function keys F1 through F4 open the Capture window. Each key opens the window in a different mode:
F1 opens the Capture window in Update Subcues mode, and selects the last cue that was recalled.
F2 opens in Capture Differences mode, with the last cue recalled selected.
F3 opens in Capture New mode, but does not add the new cue to the cue list.
F4 opens in Capture New mode, and adds the cue to the cue list.
When pressing the Fn key while viewing the Cue List or Cue Library window, Capture opens to the currently-selected cue. Otherwise, it opens the most recently recalled cue. Using F4 sets some of the capture controls automatically.
Capture windows tabs

Capture Window Tabs
The Subcue Types tab
The Subcue Types tab lists a number of basic subcue types and custom subcue types.
Note
Modifying the default subcue types is not recommended. It is safer to use the Duplicate button and modify the duplicate copy instead.
Each of the standard subcue types captures a single control point set for all applicable chan- nels: the Input Level subcue captures the Input Level control set, the Aux Sends subcue cap- tures the Aux Sends control set, and so on.
Specialized subcue types can be created that capture any combination of control point settings on any number of channels. This is an advanced task, accomplished through the use of control point sets and index sets.
This tab has four main components: a set of command buttons, a list of subcue types, a list of control point sets, and a list of index sets.
Command buttons
The command buttons create or delete subcue types.
Button | Function |
|---|---|
New | Creates a new subcue type from scratch. The subcue type can be named, its category specified, its control point sets selected, and its index sets defined. |
Duplicate | Creates a new subcue type based on the selected subcue. The subcue type can be named, its category, parameter, and index sets can be fine-tuned. |
Delete | Deletes the selected subcue type. Any subcues that made use of this subcue type are changed, which in turn affect all cues that use that subcue. |
Subcue Types List
Click a column label to sort the entries alphabetically by the contents of that column. Click it again to sort them in reverse order. The format of the ID and Created dates are compatible with alphabetical sorting.
Column Data | Description |
|---|---|
ID | A system-assigned number that cannot be changed. |
Name | The subcue type value. The name can be changed by selecting it and typing a new name; subcues that used this subcue type also show the change. |
Category | Sorts the names according to type. Right-click the entry to select from the available types, or type a new name to create a new category. |
Display Order | The number determines the order in which the subcue types appear in the Capture pane of the Capture window. |
Comment | This field can contain any text. |
Created | Provides date of creation, and cannot be changed. |
Modified | Provides modification date, and cannot be changed. |
Enabled | Shows whether a subcue type has been enabled or disabled. Disabled subcue types do not appear in the Capture pane of the Capture window. Right-click the entry to toggle between enabled and disabled states. |
Locked | Shows whether a subcue type is locked or unlocked. |
Control Point Sets List
When a subcue type is selected, the control point sets associated with it are listed to its right.
Click the associated checkboxes to select control point sets to be included in the subcue. For control point set definitions, see The Control Point Sets tab.
Index Sets List
An index set is listed for each control point set that is selected. The column labels for this list can be clicked to sort the list alphabetically.
Right-click an Index Set entry to choose between Manual and any applicable custom index sets that have been defined.
When a Manual index set is selected, a list of channels can be typed in the Channels entry. Channels can be separated with a space or comma, ranges of channels can be selected by using a dash between numbers (1–4,6,8). To select all channels, use an asterisk (*).
The Control Point Sets tab
The Control Point Sets tab lists the standard preset control point sets and any custom control point sets that have been designed.
The Control Point Set is used by Subcue Types to identify which CueStation mixer compo- nents are captured in a subcue. The standard control point sets cover every common combi- nation of components. Input Levels, for instance, captures the channel invert, input level, and input mute settings.
Specialized Control Point Sets can be created that capture any imaginable combination of controls.
This tab has three main components: a set of command buttons, a list of Control Point sets, and a list of mixer control points.
Command buttons
The command buttons create or delete Control Point Sets or add to or remove Address Pat- terns from selected control points.
Command | Function |
|---|---|
New | Creates a new control point set from scratch. The new control point set can be renamed and its list of Address Patterns can be modified. |
Duplicate | Creates a new control point set based on the selected subcue. The new control point set can be renamed and its list of Address Patterns can be modified. |
Delete | Deletes the selected control point set. |
Add Pattern | Adds a new Address Pattern to the list. Right-click the entry to select from an extensive list of common Address Patterns. |
Delete Selected Patterns | Removes any selected Address Patterns from the list. |
Control Point Sets List
Click a column label to sort the entries by the contents of that column. Click it again to sort them in reverse order.
Column Data | Description |
|---|---|
ID | A system-assigned number that cannot be changed. |
Name | The subcue type value. The name can be changed by selecting it and typing a new name. |
Comment | This field can contain any text. |
Created | Provides date of creation, and cannot be changed. |
Modified | Provides modification date, and cannot be changed. |
Enabled | Shows whether a shows whether a set has been enabled or disabled. Right-click the entry to toggle between enabled and disabled states. |
Locked | Shows whether a set is locked or unlocked. |
Control Points List
When a control point set is selected, the Address Patterns associated with it are listed to the right.
Right-click an Address Patterns entry to choose from an extensive list of commonly-used patterns.
The command buttons above this are previously described in Command buttons.
Index Sets tab
The Index Sets tab shows a list of common index sets and any custom index sets that have been designed.
The Index Set is used by Subcue Types to identify which channels of a particular Control Point Set to capture. Each of the standard Index Sets captures all channels for a particular mixer component.
Specialized Index Sets can be created that limit the subcue capture to a specific set of chan- nels for any of the CueStation mixer components.
This tab has two components: a set of command buttons and a list of Index Sets.
Command buttons
The command buttons create or delete Index Sets.
Command | Function |
|---|---|
New | Creates a new index set from scratch. The index set can be named, and the mixer component and channels it uses can be defined. |
Duplicate | Creates a new index set based on the selected subcue. The index set can be renamed, and its mixer component and channels can be fine-tuned. |
Delete | Deletes the selected index set. Any subcues that made use of this index set are changed, which in turn affects all cues that use that subcue. |
Index Sets List
Click a column label to sort the entries alphabetically by the contents of that column. Click it again to sort the entries in reverse alphabetical order. The format of the ID and Creation dates are compatible with alphabetical sorting.
Column Data | Description |
|---|---|
ID | A system-assigned number that cannot be changed. |
Name | The index set name, which can be changed by selecting it and typing a new name. Subcues that used this Index Set show this change. |
Index Type | Right-click the box to select the mixer component used by this Index Set. |
Default Indices | Type a list of channels in the box to select the default subset of channels for this Index Set. You can separate channels with a space or comma, or select a range of channels by using a dash between numbers (1-4,6,7). To select all channels, use an asterisk (*). Note that if there are any channels selected in the mixer window, those channels are used instead of the ones specified here. |
Allowed Indices | Constrains the indices to a particular range. For instance, to change the Index Set to include only the first four Input channels, enter 1-4. Otherwise, use an asterisk (*). To select no channels, type None. Note that any indices that are not specified in the Allowed Indices column are not used, even if those indices have been selected manually in the mixer window. |
Comment | This field can contain any text. |
Created | Shows the time stamp of creation, and cannot be changed. |
Modified | Shows a time stamp of modification, and cannot be changed. |
Locked | Shows whether a set is locked or unlocked. |
Custom subcue types
This section is for advanced users who wish to create their own subcue types, for more customizable automation. Creating custom subcue types is not necessary for normal CueStation operations. However, it can make some advanced cue capture functions more accessible.
Control Point Addresses
In CueStation every control point in the system is assigned a unique Control Point Address. This address unambiguously identifies that control with an intuitive, human-readable string. For example, the control point address of the first input channel’s mute control is Input 1 Mute. The fader level of the third output channel is Output 3 Level.
To find out what a given control’s address is, make sure Layout > Tooltips Enabled has been selected. When Tooltips are enabled, hovering the cursor over a control displays that control’s address.
A typical setup has thousands or even hundreds of thousands of valid control point addresses. The Capture Window has been made to be extremely flexible, and can be used to capture the current state of all controls in the system, or just a few, or any of a number of sub- sets of the controls.
When creating cues and subcues, the first problem that the Capture window must solve is which control points to capture. The Capture Window determines which control points to cap- ture (and where to save the data) using a hierarchical system consisting of Index Sets, Control Point Sets, and Subcue Types.
Index Sets
The simplest specifier is the Index Set. An index set is merely a convenient way to assign a name and type to a group of channel numbers. An index set contains a set of numbers and an Index Type tag that indicates what sort of system parameter is related to those numbers. The index type value is chosen from a small, predefined set of possible values. These include Inputs, Outputs, Auxes, VGroups, and a few other types.
All the index sets known to the system can be viewed by opening the Capture window and choosing the Index Sets tab.
The default index sets are sufficient for many projects, but custom index sets can be created if necessary. For example, an index set that refers to the first eight inputs in the system can be created by adding an entry in the index sets table with the cells filled out as follows:
Name: First Eight Inputs
Index Type: Input
Default Indices: 1-8
Allowed Indices: 1-8
An index set that refers to just a few specific input indices can be created. For example, the input channels of three vocalists can be created as follows:
Name: The Three Tenors
Index Type: Input
Default Indices: 23,47,59
Allowed Indices: 23,47,59
Index sets can also be created that include specific values in addition to value ranges:
Name: Fancy Index Set
Index Type: Input
Default Indices: 3-7,23,40,42-47,59-62
Allowed Indices: 3-7,23,40,42-47,59-62
Predefined entries in the index sets table don’t have any numeric values in their Allowed Indices field. Instead, they all have an asterisk. This asterisk indicates all valid channels of the given type in the system, as specified in the Mixer Configuration window. For example, in a 64-input, 32-output system, the asterisk in the All Channels/Input index set would be interpreted to mean 1 through 64, whereas the asterisk in the All Channels/Output index set would be interpreted to mean 1 through 32 (both inclusive).
This special logic is very useful, because otherwise it would be necessary to re-define new index sets every time the Mixer Configuration changed. This way, a single set of predefined index sets is sufficient to handle most things.
Control Point Sets
A Control Point Set specifies one or more patterns of control point addresses.
As with Index Sets, the default project comes with a number of predefined, non-editable control point sets, but custom Control Point Sets can be created. The control point sets known to the system can be viewed by opening the Capture window and choosing the Control Point Sets tab.
Each control point set consists of one or more Control Point Address Patterns, which resemble the Control Point Addresses described in Control Point Addresses except that some parts of the addresses can be left unspecified. For example, switching to the Control Point Sets tab and selecting the Input EQs control point set will show the following Control Point Address Patterns:
Input * EQ * Type Input * EQ * Level Input * EQ * Frequency Input * EQ * Q
Input * EQ * BandBypass
These patterns refer to control point addresses relevant to the EQ portion of the Input Pro- cessing window, but the numeric portions of the addresses have been replaced by asterisks. The asterisks indicate that it is up to the system to determine the variables based on the Sub- cue Type. When capturing a cue, the asterisks expand out to concrete numbers, as in this example:
Input 1-8 EQ 1-4 Type
Input 1-8 EQ 1-4 Level
Input 1-8 EQ 1-4 Frequency
Input 1-8 EQ 1-4 Q
Input 1-8 EQ 1-4 BandBypass
Subcue Types
Subcue Types are the top-level specifiers in the Capture window. Subcue Types correlate a group of control point sets with the appropriate index sets in such a way that together there is enough information to fully specify the set of control point addresses to capture into a subcue. The default project comes with a number of predefined, read-only subcue types, but custom subcue types can be created.
Subcue Types can be viewed by opening the Capture window, choosing the Subcue Types tab, and selecting an entry. The area to the right of the list shows the contents of the selected subcue type. The center list, labeled Control Point Sets, lists the control point sets that are specified by the selected subcue type. The area on the right contains a list of index sets used by the subcue type. The column headings for this list are at the bottom of the screen: Index Type, Index Set, and Index Values. The Capture window automatically determines which types of index set are relevant to the subcue type. Many subcue types only contain a single control point set.
For example, the Matrix Levels subcue type specifies only the Matrix Levels control point set, which contains only the following Address Patterns:
Output All Channels Bus All Buses
The Capture window determines how to expand the asterisks in those patterns; one index set with IndexType=Bus, and one index set with IndexType=Output.
These items appear in the right sub-pane, in the Index Type column. The first item describes how to expand asterisks that represent buses, and the second describes how to expand asterisks that represent Outputs. In the example, they are set to All Buses and All Channels, respectively. The corresponding Index Values entries show the actual interpretation of these values: that for buses, the asterisk represents channels 1-32, and for Outputs, the asterisk represents channels 1-8.
This rather complex, detailed analysis of the address pattern is interpreted as Bus 1-32 Output 1-8 Level
The subcue captures the complete state of the Matrix. If the subcue type were editable, it could be modified to specify other index sets instead of All Buses and All Channels. To create an editable subcue type, click Duplicate (near the upper left of the Subcue Types tab), then right-click in the Index Set column of the window area on the right to choose a new index set for buses and/or outputs. Note that there is also a Manual option, which can reference indices directly instead of referencing a predefined index set.
Each subcue type has attributes called Category, Display Order, and Comment. These attri- butes can be viewed and/or edited via the table at the left-hand side of the Subcue Types tab. Note that these attributes do not affect which control point addresses are captured: the only thing they affect are how the subcue types appear on the Capture tab. In the Capture tab, each subcue type’s name appears with a checkbox next to it. Subcue types are grouped sep- arately by category—for example, in the default project all the Input subcue types get grouped together in one area of the Capture tab, and the subcue types in the outputs category get their own separate section. Custom categories can also be created. Display Order gives some measure of control over the order in which subcue types are listed within their category in the Capture tab. Subcue types with smaller Display Order values appear before subcue types with larger Display Order values. The Comment field provides a place to enter a comment about the subcue type. Comments do not appear on the Capture tab.
Building a Cue List
The Cue List is a sequence of cues used to control the show. Each cue can automatically follow a previous cue, be recalled by a timecode value, or be recalled manually.
The Cue List window
Cue list management is handled through the Cue List window.
 |
Cue List Window
The Cue List area of the window shows an ordered sequence of cues. These are the cues that are recalled during show control. They are always sorted according to their Index sequence. Cues can be dragged from the Cue Library to the Cue List and new Cue List entries can be created. Right-click new entries to select a cue. Note that new cues cannot be created in the Cue List window; new Cue List entries only references cues that already exist.
The columns of the Cue List pane control a range of cue automation details. When selecting a cue in the cue list, the Subcue Library pane is displayed to the right. Selecting a subcue causes the Control Point pane to be displayed beneath the other two panes.
Creating a new Cue List
When starting a new project, a Defaults cue list is created automatically, and all newly cap- tured cues are added to this list. To create another cue list, click the Cue Lists button and select New Cue List.
Additional cue lists can be used to create speaker check cue lists, different versions of a show cue list for different performers, or even cues for system testing and diagnostics.
The Cue Lists drop-down menu contains commands to select, rename, duplicate, delete, or assign new IDs to Cue Lists.
Adding Cues to a Cue List
Choose Windows > Capture. To create a new cue, check the box next to the Add New Cue To Cue List and then select a cue list. Once complete, the cue is created and added to the cue list indicated in the Capture window.
Press F3 to capture a new cue. Once complete, the cue is created. By default, using F3 does not enable Add New Cue to Cue List. If Add New Cue to Cue List is enabled manually when the Capture window is displayed, the cue is created and added to the cue list indicated in the Capture window.
Press F4 to capture a new cue. Once complete, the cue is created and added to the cue list indicated in the Capture window.
Choose Windows > Cue List and Windows > Cue Library. Drag cues with right-click from the Cue Library directly into the Cue List. A green line indicates the cue’s destination in the list. Multiple cues can be added at the same time.
Choose Windows > Cue List, and then choose Cue Entries > New Cue Entry to create an empty cue entry. Right-click in the Cue ID column to select a cue to add.
Moving Cues within a Cue List
Right-click the Cue Index number of a cue and drag it to a different position in the list. This also works when multiple cues are selected.
Cue List Timing and Automation
CueStation's cue automation allows you to set up timed sequences of cues that recall automatically, using either autofollow or timecode. This kind of automation is particularly useful when the timing of a sequence is known and unchanging (to match video playback, for instance), and can greatly reduce the need for manual cue recalling.
Timecode in Forward-Only mode
There are two options for how cues are recalled by timecode. The TC-Fwd ONLY option matches the original design of the software: only those Timecode cues after the current cue-on-deck in the Transport window are recalled by timecode. The alternative option, labeled simply Timecode, is to allow any Timecode cues in the cue list to be recalled by timecode, regardless of whether they are listed before or after the current cue-on-deck.
AutoFollow
AutoFollow is controlled by two parameters: the identity of the cue to be recalled, and the time delay before this recall happens. The automatically-recalled cue can be Next, which allows the creation of linear sequences of cues, or it can point to any cue in the list, which allows a variety of looping and branching strategies.
Right-click in the AutoFollow column for the first cue in the sequence. This cue can still be recalled manually.
Choose Next, or the index value for the cue that follows it.
Set a time in the Wait column. This is the time between the recall of the first cue and the second.
Repeat for subsequent sequential cues.
Note
To recall a sequence of cues at the same time, set an AutoFollow of 0.0 seconds for each cue in the sequence.
AutoFollow delays are cumulative because AutoFollow cues are organized in a sequential list. The time between the recall of the first cue in a sequence and the last is the sum of all the AutoFollow delays. In a sequence of five linked AutoFollow cues with 1-second delays, the final cue is recalled four seconds after the first cue.
AutoFollow techniques
AutoFollow can be used to loop a sequence of cues indefinitely by pointing the last cue in a sequence back to the first cue (or back to itself in the minimal case). This can be useful for a vamping sort of structure, where a sequence of events must repeat for an indeterminate period. It is always possible to break out of such a loop by manually recalling a cue that is not in the loop. More information about vamping in CueStation can be found in Regions, Loops, and Vamping.
AutoFollow can also be useful if you prefer to build up automation sequences in functional chunks by defining some cues as Console only, others as Matrix only, and so on. This is espe- cially true for External Command subcues, like the recall of MIDI Machine Control Locate fol- lowed by a sequence of Play commands.
Timecode
To recall a cue by timecode:
Right-click in the Trigger column of a cue, and choose either Timecode or TC-Fwd ONLY.
Enter the timecode in the Time column for the cue.
Cues recalled by timecode can be arranged into very complex and precisely timed sequences. Timecode has the advantage of much finer control over the timing of a sequence, down to a single frame. It is possible to change the timing of one cue without affecting the timing of all of the subsequent cues.
Transport window
The Transport window provides an interface for recalling cues while running a show.
 |
Transport Window
Transport window overview
The Transport window displays the Cue List Players, and provides controls for recalling cues and navigating through the cue lists. The columns shown are exactly the same as those in the Cue List window, including the cue index, ID, name, and other details. The active cue and cue-on-deck for each cue list are shown at the top of each cue list player. At the top of the window is a timecode display and a Master Stop button. At the bottom of each cue list player are five control buttons, to stop, rewind, move to previous, move to next, and go.
The Stop button on each cue list player stops only automation and playback recalled by that cue list player. The Master Stop button stops all automation and playback, regardless of ori- gin.
Tip
The Master Stop can be invoked at any time with Shift+Com- mand+Option+M (Mac) or Shift+Ctrl+Alt+M (Windows).
Selecting a Cue List
Each cue list player has a cue list menu next to the transport controls. To create or edit cue lists, use the Cue List window, as described in “Building a Cue List” on page 98.
Navigating the Cue List
At the top of the Cue List window, the name of the active cue is displayed, along with its cue index number (reflecting its position in the cue list). Directly below it is the name of the cue-on-deck. The active cue is the cue that was most recently recalled by the Go button, timecode, auto-follow, or external control. The active cue is highlighted with a green background in the Transport window.
The cue-on-deck is the cue that is recalled when the Go button is clicked. At that point, the cue-on-deck moves to the active cue position, and the next cue in the list becomes the cue-on-deck. The cue-on-deck is highlighted with a yellow background.
The cue-on-deck can also be set by double-clicking a cue in the Transport window.
The yellow buttons at the bottom of the window change the cue-on-deck without recalling cues. Click the Rewind button to set the first cue in the cue list as the cue-on-deck. Click the Previous button to step backward by one cue button. Click the Next buttons to step forward by one cue.
Recalling cues
Open the Transport window.
Select a cue list from the Cue Lists menu. By default, the first entry in the list of cue lists is the cue-on-deck.
Click Go to recall the cue-on-deck. It becomes the active cue, and the next cue in the list becomes the new cue-on-deck.
If the cue has any wait or fade times associated with it, the Go button becomes a status bar, with the percent complete matching the countdown (in seconds) on the Go button. The count-down time is based on subcue durations, wait times, and autofollow wait times. Wild Tracks and SpaceMap Trajectory times are not included.
Recall Filtering
Subcue recalls can be filtered by type in the Transport window. Filtering provides fields for specifying subcue types to exclude from cue recalls. This provides the ability to mask the recall of parts of a subcue, while allowing the other control points or channels to be recalled. Subcue addresses can also be filtered.

Transport Window, Recall Filtering Section
Timecode and AutoFollow
Cues recalled by timecode are recalled automatically when the timecode marker is reached. At the top of the window is a timecode display, which shows the current time and frame rate. The Enable Time Code Triggers button toggles whether timecode is online or offline.
If the Enable Time Code Triggers button is green, and the box next to it checked, timecode is enabled and D-Mitri receives timecode normally.
If the Enable Time Code Triggers button is gray, and the box next to it not checked, timecode is disabled and D-Mitri ignores any timecode it receives.
The timecode display can be hidden by deselecting Show Time Code in the Display menu. This does not affect the online/offline state.
Tip
Clear a Cue List player’s Enable Cue List Player checkbox to disable it. Dis- abled Cue Lists are indicated by a pink background and do not recall any cues.
Disabled Cue Lists ignore external triggers, timecode triggers, and autofollows.
Track-From-Top
CueStation has a Track-From-Top function similar to that used in many lighting consoles. Track-From-Top is a powerful command that quickly skips to a different point in the cue list, while setting all of the control points as though the preceding cues had all been recalled in order.
To use Track-From-Top:
In the Transport window, double-click the cue to be recalled next. The cue is highlighted in yellow and the name appears as the cue-on-deck.
Choose Mixer > Track from Top. Click Yes in the confirmation window. CueStation updates all control points as if every previous cue had been recalled in order, with a few exceptions:
Wild Tracks Deck subcues are loaded, but not played.
External subcues are not recalled unless specifically enabled (or keyed) for each subcue.
A status window shows the progress of the Track-From-Top operation, as well as the status of each DCP. When the Track-From-Top is complete, the cue that was originally selected is still the cue-on-deck, ready to be fired as needed.
Track-From-Top can be initiated from any window, but if the Cue List window is active, then Track-From-Top tracks to the cue selected in the cue list. Otherwise, Track-From-Top uses the cue-on-deck in the Transport window.
Track-From-Top: External Commands
For subcue types other than External Commands, the control point addresses act as a key so that only the last one in a sequence is used. This makes Track-From-Top more efficient: instead of recalling hundreds of input level control points at one time, only the most recent level for each channel is recalled. Commands have three different Track-From-Top settings, which are assigned default values automatically when they are created. Right-click inside the TrackFromTop column in the subcue detail section to edit the Track-From-Top settings.
Yes
The Command is set to always be recalled during Track-From-Top.
No
The Command is set to never be recalled during Track-From-Top.
Key [string]
The Command is only recalled if it is the last external with the assigned key. For example, if cues 1, 3, and 5 each have a Command that is assigned to Key: A, and cues 2 and 4 each have a Command that is assigned to Key: B, only the Commands in cues 4 and 5 are recalled.
Right-click a key and choose Reset to reset the Track-From-Top setting back to the default.
Commands saved in older projects are assigned default Track-From-Top values.
Keyboard commands
The Transport window allows for some keyboard shortcuts to select and recall cues.
Command | Function |
|---|---|
Home | Selects the first cue in the cue list (top of list). |
End | Selects the last cue in the cue list. |
Arrow keys | Select the previous or next cue in the cue list (step back and step forward). |
Enter | Recalls the Cue-on-Deck (Go). |
Cue List Players
Through the use of Cue List Players, the Transport window can have multiple active cue lists. Each Cue List Player has its own set of transport controls, and can be used to create complex sequences of automation running in parallel.
Configuring Cue List Players
The number of Cue List Players is configured in the Mixer Configuration window, just like Virtual Groups, Buses, and Bus Assigns.
At the bottom of the Mixer Configuration window, enter the number of Cue List Players to use.
Choose Configuration > Send Configuration.
Open the Transport window, and use the vertical blue scroll bar to page between Cue List Players.
Controlling Cue List Layers
Cue List Players can be captured into cues. A Cue List Player type subcue contains the value of the cue list ID, and the cue-on-deck index.
In the Cue List Player to be captured, select the appropriate cue list.
Optionally, select a cue in the cue list to be the target cue-on-deck.
Click Select on the left of the Cue List Player.
Open the Capture window using F4.
In the System Subcue Type Selection area, add a check in the box next to Cue List Player.
In the Name text box, type a name for the cue.
Click the Click to Capture New button in the lower right to capture the cue.
When the cue is recalled, the selected Cue List Player switches to the chosen cue list, with the chosen cue as the cue-on-deck.
Editing cues
In the ever-changing environment of show control, it is frequently necessary to revise cue settings. In cutting-edge design, there are times when cues will need to be built manually.
There are several different methods for editing cues. Most changes can be performed without needing to recall the cue, but sometimes it can be easier to set the mixer to the desired values and re-capture the cue with new settings.
Capture window: Capture differences
The first method of editing cues uses the Capture window and requires that changes be made live to the mixer.
Open the Mixer window and recall the cue to be edited.
Select the correct channels and make the necessary adjustments to the control points.
Use the F2 key to open the Capture window in Capture Differences mode. Make sure that the correct cue is listed in the top left drop-down box; otherwise the changes might be applied to the wrong cue.
In the Capture-Operator and Capture-Precedence boxes, assisted by the Venn (overlapping circles) diagram, choose the combination that modifies the correct set of subcue control points.
Amend Mode is the default, and is appropriate for most situations. These settings are explained in detail Capture Differences and Update Subcues.
Select the types of subcues that should be updated, or that should have subcue types added. Subcue types that are already present in the cue are underlined.
Click the Click to Capture Differences button. The subcues in the cue are updated with the new control point values.
Capture window: Update subcues
When updating a specific subcue using Update Subcues, all cues that reference that subcue are updated to use the new settings.
Tip
Use caution, as this allows easy global changes. See Working with shared subcues, for more information.
Recall a cue that contains the subcue to be updated, then adjust control points as needed.
Use the F1 key to open the Capture window in Update Subcues mode. Make sure the correct cue is listed in the top left drop-down box.
In the Capture-Operator and Capture-Precedence boxes, assisted by the Venn diagram (overlapping circles), choose the combination that modifies the correct set of subcue control points. Amend Mode is selected by default. A detailed explanation of these settings is provided in CueStation keyboard shortcuts: Capture window.
Select the types of subcues to be updated.
Click the Click to Update Subcues button. All subcues are updated but retain their original name. All cues that use this set of subcues are updated using the new settings.
Editing subcue control points
Using either of the Library windows, select the subcue that needs to be updated.
The control points associated with the subcue are shown in the lower pane. To use the cue or subcue mixer control settings as a starting-point, double-click the arrow to the right of the ID number to instantly recall the cue or subcue.
The mixer controls move to the settings specified by the subcue(s).
Set the mixer controls to the desired settings.
In the control point settings area of the window, click the Update All Rows or Update Selected Rows button as appropriate. Update All Rows update all the control points in the subcue; Update Selected Rows update only the rows that are currently selected.
Control point values in a subcue can also be edited by changing the values listed in the Value column. See the following section for more information on editing control point values.
Using the Preview Subcue feature to edit Control Points
Preview Subcue button can be used to edit control points in a subcue.
Using either of the Library windows, select a subcue to edit.
Click the Preview Subcue button at the top of the subcue editor pane. A yellow-bordered preview window appears, displaying the contents of the subcue as a mixer window.
Modify the enabled controls in the yellow-bordered preview window. This updates the sub- cue, without requiring changes to the actual audio mix.
Close the yellow-bordered preview window to finalize the changes.
Adding control points
Control points can be added or removed from a subcue. This is a particularly useful way of creating subcues that contain combinations of control points that are not easily selected through the Capture window.
Click Add Entry. A new, blank control point is added at the bottom of the list.
Type the exact name of the control point in the Control Points column. This name must correspond to an existing name in the Control Point Sets tab of the Capture window. You can add a channel range to the name. Channels are separated with a space or comma, ranges of channels are indicated by using a dash between numbers. For example, 1– 4,6,8 indicates channels 1 through 4, plus channels 6 and 8.
Using either the CueStation graphical interface, or by typing values directly, set the value, wait, and fade parameters for the control point.
To have the changes immediately take effect, double-click the arrow to the right of the ID number.
Control points can be added using the Capture window by selecting additional channels in the mixer windows and then selecting Amend Mode.
Removing control points
To remove control points, select the control point(s) and click Delete Selected.
Control points can also be removed from a subcue when using the Capture window. When a Capture Differences is performed in Replace Mode, only those channels which are selected at the time are included in the subcue. For example, if a subcue originally contains control point values for inputs 1–4, and channels 3–6 are selected for Capture Differences, the resulting subcue contains control point values for 3–6.
Copy-On-Write
A shared subcue is a subcue that is referenced by multiple cues. Updating a shared subcue in the Subcue Library window is a global change; all cues that reference it are updated to use the new control point values. However, when updating a shared subcue within the Cue Library or Cue List, Copy-On-Write is implemented. The control points for the current cue are changed, but all other cues retain the original control point values.
Copy-On-Write effects the following changes when a subcue is updated in the Cue Library:
A copy of the original subcue is created with a new ID number. All other cues are edited to reference the new subcue ID number.
The original subcue (which is then no longer shared) is changed to reflect the new control point values.
Note
If the project includes External Commands that recall subcues, the subcue ID numbers stored in an External Command subcue are changed as necessary when this process occurs.
Working with shared subcues
CueStation provides two commands in the Edit menu to assist in working with shared sub- cues.
Command | Function |
|---|---|
Individualize Subcues | This command converts all subcues to unique copies, so that no subcue is refer- enced by more than one cue. After the operation, all subcue names include the name of the cue that references it. |
Share Subcues | This operation is the converse of Individualize Subcues. When initiated, any sub- cues that have the same set of control points and values are combined into one subcue, and referencing cues are updated to reference one subcue. |
Searching cues and subcues
Search for cues and subcues by using the Find command in the Edit menu of the Cue List, Cue Library, and Subcue Library windows. A dialog box is displayed with the following controls:
A drop-down box to choose between Select Only (to clear any current selections first), Select More (to add to the current selection), or Deselect (to deselect items matching the search parameters).
A drop-down box to select the parameter type (name, ID, type, etc.).
A drop-down box to select between is or is not.
A drop-down box to select the type of matching: Equal To, Containing, Less Than, etc.
A text box to enter parameter terms, such as a subcue ID number or channel number.
A Do it button to perform the search.
Items selected by the search have their text rendered in bold, so the selection can be changed without losing the search results. To reset the text to normal, close and reopen the window.
Search and replace
Control points in cues can be batch-edited to save time. For example, with a sequence of cues that include System Level subcues, follow these steps to change the level for the entire sequence to –3 dB:
Choose Windows > Cue List, and then select all of the cues in the sequence to be changed.
Tip
Instead of selecting cues manually, use the Find command to select a particular subset of cues to change.
Choose Edit > Batch Modify Control Point Entries to open the Batch Modify dialog box.
In the first drop-down box on the left, select Set.
In the next drop-down box, select Match. In the subsequent text entry box, enter the control points that will be affected.
Enter System Level. In the last text entry box, enter the value the control points should be set to.
Enter –3. At this point, the dialog box should read: Set any control points that match System Level to –3
Click Do It to make the changes.
Examining cues and subcues
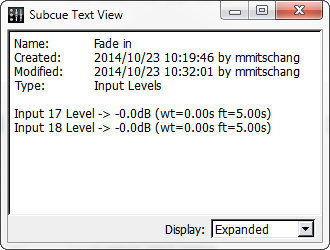
One or more cues or subcues can be examined to show their contents. Examining cues and subcues displays more specific information than shown in various columns of the Cue Library and Subcue Library windows. The Examine command is also used to compare multiple Cues and Subcues and identify their differences.
Choose Windows > Cue Library or Windows > Subcue Library.
Select a Cue or Subcue from the list.
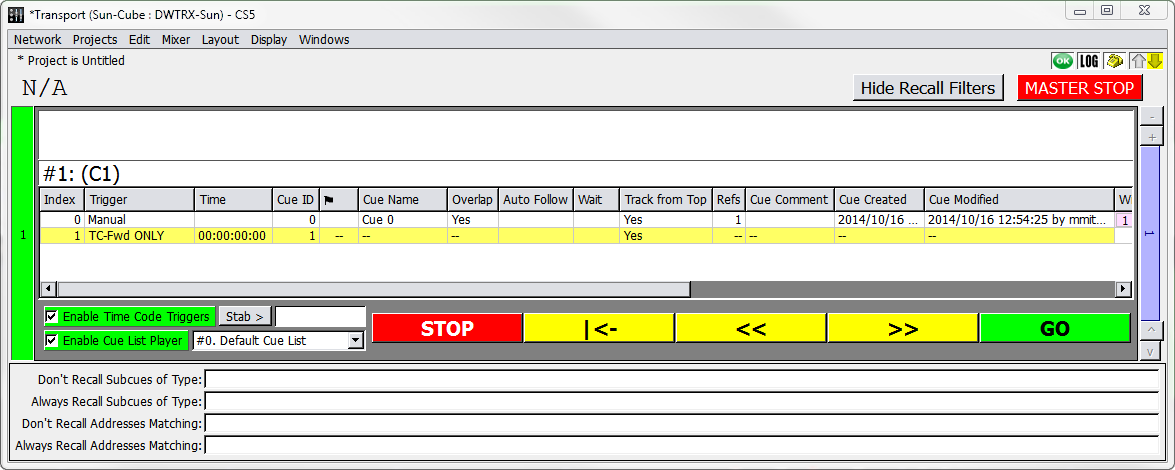
Choose Edit > Examine. The Subcue Text View window displays the contents and information pertaining to the Cue or Subcue.
Subcue Text View Window
Choose Windows > Cue Library or Windows > Subcue Library.
Select multiple Cues or Subcues from the list.
Choose Edit > Examine. The Subcue Text View window displays the contents and information pertaining to the Cue or Subcue.
Choose Show Diffs. Text view expands to Diff view, displaying two items in separate panes. Differences are highlighted, and the number of differences is shown at the bottom of the window. The items selected in the Left and Right columns correspond to the two panes.
Subcue Text Diff View Window
When Show Diffs is used with more than two items, choose the item to be shown in each pane by selecting an item from the Left column and an item from the Right column. Each number corresponds to the Cue or Subcue ID.
Additional Examine commands
Additional commands are available from Diff view.
Command | Function |
|---|---|
Show Matching Lines | Displays lines that are identical between the two compared items. |
Display | Choose Expanded to parse all control point number ranges and display a verbose listing of all control points. Choose Compact to reduce the control point display by combining ranges. |
Capture Differences and Update Subcues
CueStation has unique controls for Capture Differences and Update Subcues commands. These controls will affect the capture process only if they are visible when the capture operation is executed.
Replace, Amend, Existing
These buttons provide shortcuts to the most commonly used settings. When the Capture window is opened, Amend is selected by default.
Button | Function |
|---|---|
Replace | Sets Capture-Operator to New Control Points Only, and sets Capture-Precedence to New Values Preferred. |
Amend | Sets Capture-Operator to Union, and sets Capture-Precedence to New Values Preferred. |
Existing | Sets Capture-Operator to Old Points Only, and sets Capture-Precedence to New Values Preferred. |
Operator and Precedence options
These boxes specify how the newly captured data should be combined with the data that is already present inside subcues during Capture Differences and Update Subcues operations. These controls are not relevant during Capture New operations and are therefore disabled when Capture New (F3 or F4) is selected.
There are two sets of data, shown with a Venn diagram that visually demonstrates the result of the operation:
NEW is the set specified by the Subcue Type definition, the currently-selected Channel Selects, etc. It contains control point addresses values which are to be captured from the current state of the system. The NEW set is represented in the Venn diagram by the green circle on the left.
OLD is the set of control point addresses that are already present in the pre-existing subcue. The control points of the OLD set can overlap those of the NEW. For example, the sets contain different control points if the Channel Selects differ between the sets.
The Operator setting specifies which control point addresses should end up in the resulting subcue. It has four possible states.
State | Description |
|---|---|
New Control Points Only | Discards the OLD set of control point addresses and replaces them with the control point addresses from the NEW set. This is the logic used when Advanced Mode is not active. |
Intersection | Retains only those control point addresses that are present in both the OLD and NEW sets. Control point addresses appearing in only one of the two sets will not be present in the resulting subcue. |
Union | Retains the control point addresses that exist in the OLD set and adds the control point addresses from the NEW set. |
Old Control Points Only | Replaces the existing OLD set of control point addresses with the corresponding NEW set, discarding all NEW control point addresses that were not already present in OLD set. |
The Precedence setting specifies what happens to control points that are present in both NEW and OLD sets. The Precedence setting has the following states.
State | Description |
|---|---|
New Values Preferred | Replaces the existing value with the corresponding NEW value. This is the most com- monly used setting and is the logic used when Advanced Mode is not active. |
Old Values Preferred | Retains the OLD set’s value, discarding the NEW value. This mode is useful for filling in additional control point addresses in a subcue without changing any of the subcue’s existing values. |
New Values | Always is especially interesting, because it affects not only how value-conflicts are resolved, but also which control point addresses are captured. In this mode, every specified control point address will be updated with a newly-captured value, including control point addresses that are only part of the OLD set! |
Capture Differences example
This is an example update-subcue scenario and the results from the operation with each possible combination of Operator and Precedence settings.
A pre-existing cue contains an Input Mute subcue, containing the following data:
Input 1–6 Mute = false
To demonstrate the control point status visually, channels will by listed in order with T for True and F for False. The following represents a subcue with input mutes 1–6 as false and does not contain mutes 7–8.
OLD: [FFFFFF..]
Capture Differences is used while Channel Selects specify Input Mutes 3–8 only, and all the system’s Input Mutes are active (muted) when capture takes place. The NEW set is:
Input 3–8 Mute = true
Or graphically:
NEW: [..TTTTTT]
Since there are four possible Operator states and three Precedence states, a total of twelve operations are possible.
New Control Points Only
Operator set to New Control Points Only; Precedence set to New Values Preferred.
Set | Value | Interpretation |
|---|---|---|
Old | [FFFFFF..] | Input 1–6 Mute = false |
New | [..TTTTTT] | Input 3–8 Mute = true |
Result | [..TTTTTT] | Input 3–8 Mute = true |
Operator set to New Control Points Only; Precedence set to Old Values Preferred.
Set | Value | Interpretation |
|---|---|---|
Old | [FFFFFF..] | Input 1–6 Mute = false |
New | [..TTTTTT] | Input 3–8 Mute = true |
Result | [..FFFFTT] | Input 3–8 Mute = false; Input 7–8 Mute = true |
Operator set to New Control Points Only; Precedence set to New Values Always.
Set | Value | Interpretation |
|---|---|---|
Old | [FFFFF..] | Input 1–6 Mute = false |
New | [..TTTTTT] | Input 3–8 Mute = true |
Result | [..TTTTTT] | Input 3–8 Mute = true |
Intersection
Operator set to Intersection; Precedence set to New Values Preferred.
Set | Value | Interpretation |
|---|---|---|
Old | [FFFFF..] | Input 1–6 Mute = false |
New | [..TTTTTT] | Input 3–8 Mute = true |
Result | [..TTTT..] | Input 3–6 Mute = true |
Operator set to Intersection; Precedence set to Old Values Preferred.
Set | Value | Interpretation |
|---|---|---|
Old | [FFFFF..] | Input 1–6 Mute = false |
New | [..TTTTTT] | Input 3–8 Mute = true |
Result | [..TTTT..] | Input 3–6 Mute = false |
Operator set to Intersection; Precedence set to New Values Always.
Set | Value | Interpretation |
|---|---|---|
Old | [FFFFF..] | Input 1–6 Mute = false |
New | [..TTTTTT] | Input 3–8 Mute = true |
Result | [..TTTT..] | Input 3–6 Mute = true |
Union
Operator set to Union; Precedence set to New Values Preferred.
Set | Value | Interpretation |
|---|---|---|
Old | [FFFFFF..] | Input 1–6 Mute = false |
New | [..TTTTTT] | Input 3–8 Mute = true |
Result | [..TTTT..] | Input 1–2 Mute = false; Input 3–6 Mute = true; Input 7–8 Mute = false |
Operator set to Union; Precedence set to Old Values Preferred.
Set | Value | Interpretation |
|---|---|---|
Old | [FFFFFF..] | Input 1–6 Mute = false |
New | [..TTTTTT] | Input 3–8 Mute = true |
Result | [FFFFFFTT] | Input 1–6 Mute = false; Input 7–8 Mute = true |
Operator set to Union; Precedence set to New Values Always.
Set | Value | Interpretation |
|---|---|---|
Old | [FFFFF..] | Input 1–6 Mute = false |
New | [..TTTTTT] | Input 3–8 Mute = true |
Result | [TTTTTTTT] | Input 1–8 Mute = true |
 NOTE: In this mode, control point values can be changed for channels that are not selected. For this example, we are assuming that all input channels are
muted on the mixer.
Old Control Points Only
Operator set to Old Control Points Only; Precedence set to New Values Preferred.
Set | Value | Interpretation |
|---|---|---|
Old | [FFFFFF..] | Input 1–6 Mute = false |
New | [..TTTTTT] | Input 3–8 Mute = true |
Result | [FFTTTT..] | Input 1–2 Mute = false; Input 3–6 Mute = true |
Operator set to Old Control Points Only; Precedence set to Old Values Preferred.
Set | Value | Interpretation |
|---|---|---|
Old | [FFFFFF..] | Input 1–6 Mute = false |
New | [..TTTTTT] | Input 3–8 Mute = true |
Result | [FFFFFF..] | Input 1–6 Mute = false |
Operator set to Old Control Points Only; Precedence set to New Values Always.
Set | Value | Interpretation |
|---|---|---|
Old | [FFFFFF..] | Input 1–6 Mute = false |
New | [..TTTTTT] | Input 3–8 Mute = true |
Result | [TTTTTT..] | Input 1–6 Mute = true |
Cue and Subcue Libraries
CueStation contains two windows to display libraries of all cues and subcues in a project.
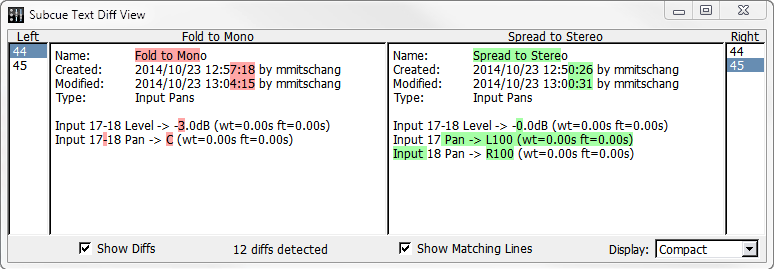
Cue Library window
The Cue Library provides access to the cues that have been captured or constructed for the project. The Cue Library window has three areas: Cue Library, Subcue, and Control Point list.
Cue Library Window
Selecting a cue shows the subcues it references, and selecting a subcue shows the control points it uses.
Note
These controls are different for Wild Tracks subcues. For more information, see Editing a Wild Tracks Subcue
Cue Library area
The Cue Library area of the window, in the upper left corner, shows the set of all cues in the project. These can be sorted by any of the column headings.
Column Data | Description |
|---|---|
ID | A unique number assigned to the cue. Show control systems recalling a cue must refer to it by its ID. |
Name | The cue name. If the cue is renamed, that change is reflected in the Cue List. |
Overlap | Indicates whether pending cue actions such as delayed subcues are completed (Yes) or canceled (No) when the cue is recalled. Yes is the default setting. |
Refs | Shows how many times the cue is referenced by a cue list. Right-click in the Refs column to see which cue lists reference the cue. |
Comment | Provides a place to type a comment. |
Created | A value indicating the date and time the cue was created. |
Modified | Shows the time and date that the subcue was last edited. |
Enabled | Shows whether a cue is enabled or disabled. Right-click to toggle between states. |
Locked | Shows whether a cue is unlocked (editable) or locked. Right-click to toggle between states. |
Wild Tracks Channel Assignments | Shows which channels are used by Wild Tracks in that cue, indicated by a green background. Right-click and drag the numbers to change the channel assignments. |
Subcue and Control Point list areas
When selecting a cue in the Cue Library window, the subcues are listed on the right, and the control points are listed in the lower pane of the window. For the most part, the subcue and control point areas of this window function like those of the “Editing Cues” on page 108, with the following exceptions:
The Update All button does not change the subcue globally. If the subcue is referenced by other cues, Copy-On-Write is used instead. More information about this process can be found in “Editing Cues” on page 108.
Update Selected works similarly to Update All, but only for the selected control points.
Building Cues
In the Cue Library window, choose Cues > New Cue. A new blank cue is shown in the appropriate list. The cue is created with the name Cue X. However, a new name can be typed immediately after the cue is created, without having to highlight it.
Choose Subcues > New Subcue Entry.
Right-click in the ID column of the subcue entry and select a subcue from the list.
Note
Subcues can be added to a cue by right-clicking and dragging them from the Subcue Library into the Cue Library and dropping them in the Subcue List area. A cue can also be created by selecting several subcues in the Subcue Library and dropping them directly into the Cue List area.
Cues menu
The Cues menu contains commands specific to the Cue Library window.
Command | Function |
|---|---|
Recall Cue | Recalls the selected cue. |
Instant Recall Subcue | Recalls the selected cue, but ignores all wait and fade times. |
New Cue | Create a new cue. |
Duplicate Cue | Duplicates the selected cue (or cues). |
Delete Cue | Deletes the selected cue (or cues). |
Subcue Entries menu
The Subcue Entries menu contains commands specific to subcues shown in the Cue Library window.
Command | Function |
|---|---|
| Recalls the selected subcue entry. |
Instant Recall Subcue Entry | Recalls the selected subcue entry, but ignores all wait and fade times. |
New Subcue Entry | Create a new subcue entry. |
Duplicate Subcue Entry | Duplicates the selected subcue entry (or entries). |
Delete Subcue Entry | Deletes the selected subcue entry (or entries). |
Capture Differences | Create a duplicate of the selected subcue, except with the current mixer val- ues. |
Update Subcues | Capture the current mixer state into the selected subcue. All other cues that reference the subcue are updated to include the updated values. |

Subcue Library window
The Subcue Library window provides access to all the subcues that have been captured or built manually for the project, and allows the creation of new subcues.
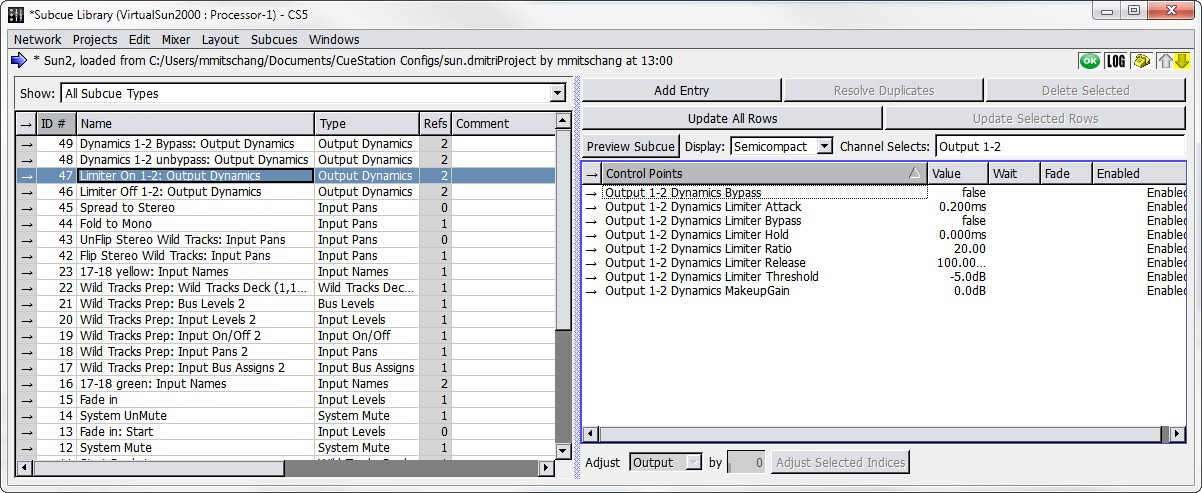 |
Subcue Library Window
Selecting a subcue shows the control point values associated with it. Control points can be added, removed, or changed as needed.
Note
These controls are different for Wild Tracks subcues. For more information, see “Editing a Wild Tracks Subcue” on page 176.
There are two major components in the Subcue Library window: the Subcue List, to the left, and the Subcue Parameters List to the right.
Subcue List Area
This area has two control areas: a subcue type selection box on top, and a subcue list beneath.
Subcue Type selection box
The Show selection box allows you to limit the types of subcues listed. You can choose All Subcue Types, which lists all known subcues, or a specific type of subcue can be chosen.
The subcue types are maintained using the Subcue Types tab of the Capture window.
Note
If a specific type of subcue is selected, Subcues > New Subcue creates a new subcue of that same type. For example, if Mixer Settings are selected as the filter, Subcues > New Subcue creates a new Mixer Settings subcue.
Subcue List
The subcues can be sorted by any of the column headings.
Column Data | Description |
|---|---|
ID | A system-assigned number. It is user-modifiable. |
Name | The subcue name. When subcues are created by capturing, they are given the same name as that of the cue, with the subcue type appended to the name. When a subcue is renamed, any cues that reference it are updated to use the new name. |
Type | Identifies the subcue type. New subcue types can be created using the Capture window. |
Column Data | Description |
|---|---|
Refs | Shows how many times the subcue is used (referenced) by a cue, or by another subcue. Right-click in the Refs column to display a list of all of the cues (or other subcues) which reference it. |
Comment | Provides a place to type a comment. |
Created | A timestamp showing the date and time the cue was created. |
Modified | A timestamp showing the last time the cue was edited. |
Enabled | Shows whether the subcue is enabled or not. Disabled subcues are highlighted in pink, and are not recalled, even where they belong to cues that are recalled. |
Locked | Shows whether or not the subcue is locked. Locked subcues are highlighted in gray. |
Tip
If a subcue is disabled globally within the Subcue Library, it also appears as disabled within any of the cues that reference it (i.e. in the Cue Library and Cue List windows).
Subcue Parameters List area
The Subcue Parameters List area displays control points associated with any selected sub- cue. This area has two collections of controls: Command Buttons on top, and Control Point List underneath.
Tip
Subcue command types are annotated with help text, which is visible at the bottom of the Command editing area of the Subcue Library window.
Command buttons
The command buttons create, remove, update, and analyze the control points.
Command | Function |
|---|---|
Add Entry | Adds a new, blank control point to the list. When the control point is named, that name must correspond exactly to an existing name in the Control Point Sets tab of the Capture window. |
Resolve Duplicates | Enabled when one of a set of duplicated control points is selected. All dupli- cates of the selected control point are deleted, and if there are other sets of duplicate entries, only the most recently created one is saved. |
Delete Selected | Deletes a control point from the list. |
Update All Rows | Sets all of the subcue’s control points to the values of the graphical mixer controls. |
Update Selected Rows | Sets only the selected control points to the values of the graphical mixer con- trols. |
Preview Subcue | Opens a window of the selected subcue type and allows the subcue to be viewed without recalling the settings on the hardware. The window has a yel- low background. Its active controls match those that are part of the subcue, and can be used to adjust the subcue. |
Display | Determines how much detail is displayed in the Control Point List. There are three options:
|
Channel Selects | Shows which channels were selected on the latest capture. |
Adjust Selected Indices box | Shows a list of all subcue types used in that subcue, and it allows changes to the index for all types at the same time instead of having to edit each one by hand. |
To adjust an index:
Select the control points to be edited.
Choose the control point type from the Adjust Selected Indices box.
For the Adjust by value, type in the difference between the current value and the desired value. For example, if the value is 4, type 2 to change the value to 6. To reduce that 6 value back to 3, type –3.
Click the Adjust Selected Indices button to make the changes.
NOTE: In subcues with over 10,000 control points (such as a bus assign subcue affecting all input channels), the Expanded view still shows a semi-compact
view, to improve performance. To override this setting, re-select the Expanded option to view all control points individually.
Control Point List
With the exception of the Control Points column, click a column label to sort the entries alphabetically by descending order. Click the column again to sort them in reverse order. Click Control Points to toggle between different sorting methods. The first method is the traditional way of sorting by type and then by channel; all the entries of one type display first, then all the entries of the next type, and so on. The second method sorts strictly alphabetically by channel, so types alternate in the display instead of being grouped together.
Column Data | Description |
|---|---|
Control Points | Identifies a specific set of control points by name. These names correspond to those available in the Control Point Sets tab of the Capture window. A new name can be entered, but it is invalid if it does not exactly correspond to an existing name. Use the Capture window to create new control point sets. |
Value | Sets the destination value for the control point. The values can be decibels, text labels, true/ false, and so on. |
Wait | Sets the delay between recalling the subcue and the actual start of movement for the control point. This value is measured in seconds. |
Fade | Sets the length of time it takes the control point to reach its destination value. This value is measured in seconds. |
Enabled | Shows whether the control point is enabled or not. Disabled control points are also highlighted in pink, and is not recalled as part of the subcue recall. |
Caution
Duplicate control points are highlighted in red. These conflicting control point value assignments must be resolved: two identical control points can- not be played at the same time within a subcue. The only way to resolve such a conflict is to remove one of the control points.
Creating new Subcues
Choose Windows > Subcue Library to open the Subcue Library window.
Choose Subcues > New Subcue [subcue type]. Choose a subcue type appropriate for the type of control points that are to be used. A name is automatically created for the subcue depending on the type. (For some types, control points are automatically included as well.)
Add and update control points as needed.
Subcues menu
The Subcues menu contains commands specific to the Subcue Library window.
Command | Function |
|---|---|
Recall Subcue | Recalls the selected subcue. |
Instant Recall Subcue | Recalls the selected subcue, but ignores all wait and fade times. |
New Subcue > [subcue type] | Select a subcue type from the list to create a new subcue of that type. |
Duplicate Subcue | Duplicates the selected subcue (or subcues). |
Delete Subcue | Deletes the selected subcue (or subcues). |
Command subcues
Command subcues can be used to control external devices-like hard disk playback units and samplers connected to D-Mitri hardware. More often, however, command subcues are used to control various aspects of D-Mitri hardware.
Command Subcues are created from within the Subcue Library window. This differs from the method of creating mixer subcues, where the mixer is first adjusted and then captured. Avail- able commands range from simple MIDI commands to elaborate CueConsole configuration settings.
Creating a Command Subcue
Open the Subcue Library window.
Choose Subcues > New Subcue > Commands.
A new subcue appears in the subcue list in the Subcue Library window.
In the area to the right, click Add Entry.
Right-click the Type and Command entries to select from a list of available options. Type specifies the category of command, and Command selects the specific command.
Select External Control as the command type.
Type a Wait time as desired.
For most commands, parameters can be manually configured. These fields vary depending on the command that is specified. Beneath the parameter configuration area is the byte sequence that is transmitted, shown by a string of hexadecimal pairs.
Tip
String entry boxes in Command subcues support aliases in their values.
Aliases are specified with a dollar sign, followed by the alias label. CueStation expands these aliases when recalling the commands that contain them. Alias contents are specified in the Alias tab in the CueStation Mixer Configuration window (see Aliases tab for more information).
Command example
For this example, a Multi-Media Control (MMC) compatible video machine is connected to the system by an RS-232 cable. It is to be controlled through the Transport window as part of an overall audio-visual show. Specifically, to start the video at one point in the show and stop it at another point.
Create a new Command subcue and click Add Entry.
Right-click in the Type column, and select MMC.
Right-click in the Command column, and select Play.
In the left pane, name the subcue Play Video.
Repeat the above steps, but choose Stop as the command, and name the subcue Stop Video.
Either subcue can now be added to a cue. When the cue is recalled (via the Transport, time-code, CueConsole, or other means), the MMC-aware video machine starts and stops the video. If there is an option to rewind the video to the start location, a rewind subcue can also be created to use at the start of the show during initialization.