User Guide — Nebra
Software tools platform

In this guide:
Get started with Nebra
Nebra software is free to download from software.meyersound.com. To get started using Nebra:
1. Download and install Nebra software
2. Connect to a network switch
1. Download and install Nebra software
Open https://software.meyersound.com/nebra, then click Download.

Locate the downloaded
.zipfile in Finder (usually in Downloads), then select it to expand the.zipfile.Select the
Nebra-2.x.x.pkginstaller file to open the installer.Select Agree to the terms of the software license.
Select Install to use the default file path, or select another location.
When the installation completes, select Close, then open Nebra from Applications.
Notice
If you have macOS 15 (Sequoia), update Local Network Privacy:
Open System Settings > Privacy > Security > Local Network.
Enable (or toggle on if already enabled) all instances of Nebra.

Locate the downloaded
.msifile in Explorer (usually in Downloads, then select it to show the contents.Select the
Nebra-2.x.x.msiinstaller file to launch the installer.Progress through the Nebra Setup Wizard and accept the End-User License Agreement (EULA).
Click Next to install the software in the default file path or select another location.
Select Yes to allow the app to make changes.
A pop-up may appear if Nebra does not find the AVDECC driver. Select OK to install the driver.
A notification may open asking for permission to make changes to osascript. Allow the change, then select OK.
2. Connect to a network switch
You'll need a standard 100bT, IPv6-enabled Ethernet switch to transport device telemetry data. An Avnu-certified AVB network switch is not required.
For Milan digital audio transport, an Avnu-certified AVB network switch is required. These switches support Milan functions. A list of Avnu-certified hardware, including network switches, is available on the Avnu Alliance website.
For more information about network switches, see Recommended Network Switches for Milan AVB Systems
3. Open Nebra
Ensure your computer is connected to the Internet and to the same network as the Milan AVB devices.
Launch the Nebra application and enter your meyersound.com login credentials.
Nebra will automatically discover the devices connected to the network, including:
Avnu-certified network switches
Galileo GALAXY processors
Milan endpoint loudspeakers
For more information about Meyer Sound Milan AVB-enabled devices, see User Guide — Managing AVB Networks.
Manage devices
Devices — Apply product integration
Use Meyer Sound product integration to ensure optimal phase response and maximum performance, essential for the correct alignment of different Meyer Sound loudspeaker models.
 Set product integration prior to adjusting output channel settings.
In
 Processing Overview , select
 View Settings .
Turn on Show Product Integration
In the output channel Product Integration column, click Off, select a Loudspeaker Model that matches the connected device, Phase Correction, and Processor Starting Point (if available), then click OK.
To apply the proper phase correction, select the lowest common phase for all loudspeakers in the system.

Devices — Change a device name
When Nebra is launched, it will discover all available devices and assign them a default name.
In
 Devices, double-click a device Name.
Edit the name, then select Enter.
Devices — Change multiple devices at once
Select multiple devices to change them simultaneously.
In
Processing Overview, select multiple input letters or output numbers or hold Shift to select a consecutive range.Make changes to any device to affect all selected devices.
Note
Level changes will be relative, unless Option is held while entering a value.
Batch control actions will not apply to differing device or channel types. For example, if all inputs and outputs of a GALAXY are selected, clicking MUTE on any input will mute all inputs, but will not affect Outputs.
Tags with Auto-SEL toggled on is an easy way to save and repeat custom selection ranges. See Tags — Filter | auto-select.
Search can filter the displayed devices and channels. With the view filtered, you can use the buttons at the top of the application to select all inputs, outputs, or processed loudspeakers. This will only select all devices visible at the time.
Devices — Identify (wink) a device
You can identify Meyer Sound devices using the wink function, which flashes LEDs on the front or rear panel.
In
Devices, right-click a device to identify and check Wink. Repeat to wink multiple devices.To turn off Wink, right-click the device again and uncheck Wink.
Devices — Update firmware
Nebra can update the firmware for all Meyer Sound loudspeakers and devices, including:
GEN-1
Nadia
GALAXY
MEP
MPS-X
Bluehorn GALAXY
CAL
RMServer
There are two ways to update the firmware of connected Meyer Sound Milan AVB devices using Nebra:
Automatic download
Manual install
Automatic download
When you open Nebra, it automatically downloads the latest firmware versions.
If a newer firmware version is available for a device that needs updating, a notification banner displays at the top of the application window.
Select View Details in the firmware notification banner.
Select Install for each device, or Install All to install the current version of device firmware.
Manual install
If you have a firmware file, use the following procedure to individually update devices manually.
Copy the firmware file to the computer running Nebra.
In
Devices, right-click a device, then select Manual firmware install.Choose the firmware file, then select Open.
Manage networks
Meyer Sound networks include the following audio hardware components:
Meyer Sound NADIA processors
Meyer Sound Galileo GALAXY processors
Meyer Sound Milan Endpoint (MEP)
Meyer Sound loudspeakers equipped with a Type 3P input card with GEN-1 technology
Third-party Milan AVB network switches
For more information on switches and network configuration, see Recommended Network Switches for Milan AVB Systems and User Guide — Managing AVB Networks
Networks — Connect Milan AVB devices
In
 Connections Graph, choose the Select tool, then click and drag devices to connect onto the grid.
Choose the Connect
 tool. Click and drag between the two devices to connect.
Click the cross point to make a connection between a talker channel and a listener channel.
When connected, the cell will display a green background with a white check mark. The top left corner of a cell indicates the state of the connection on the primary network. The bottom right corner of a cell indicates the state of the connection on the secondary network.
Networks — Disconnect Milan AVB devices
In
Connections Graph, right-click the device to disconnect, then choose Delete connections.Choose Delete.
Networks — Edit and search Milan group names
Use Milan groups to label and organize Milan devices.
For example, create a Milan group called Subs for all loudspeakers or channels related to subwoofers. Then search for Subs to show device and channel names containing Subs. This also makes it easier to identify newly auto-discovered devices by their default Milan group name.
In
Devices, Double-click a Milan group name, type a new name (Subs, for example), then select Enter.In
 search, type Subs.
Click X in search to clear it.
Networks — Set up a secondary network for failover from primary
Use redundant network connections for automatic failover between primary and secondary networks, with audio flowing on two separate networks at all times
In
 Settings, select AVB Network.
In Operate on AVB Network, select 1 & 2 Primary and Secondary Network.
In
Connections Graph, select network 1 and network 2 icons in Show network. The connection lines will show two numbers separated by a slash (i.e. 4/4, or 16/0). The first shows the number of channels connected on the primary network, and the second shows the number of channels connected on the secondary network.When connecting devices in the Connection Matrix, select network 1 and network 2 icons in Operate on Network.
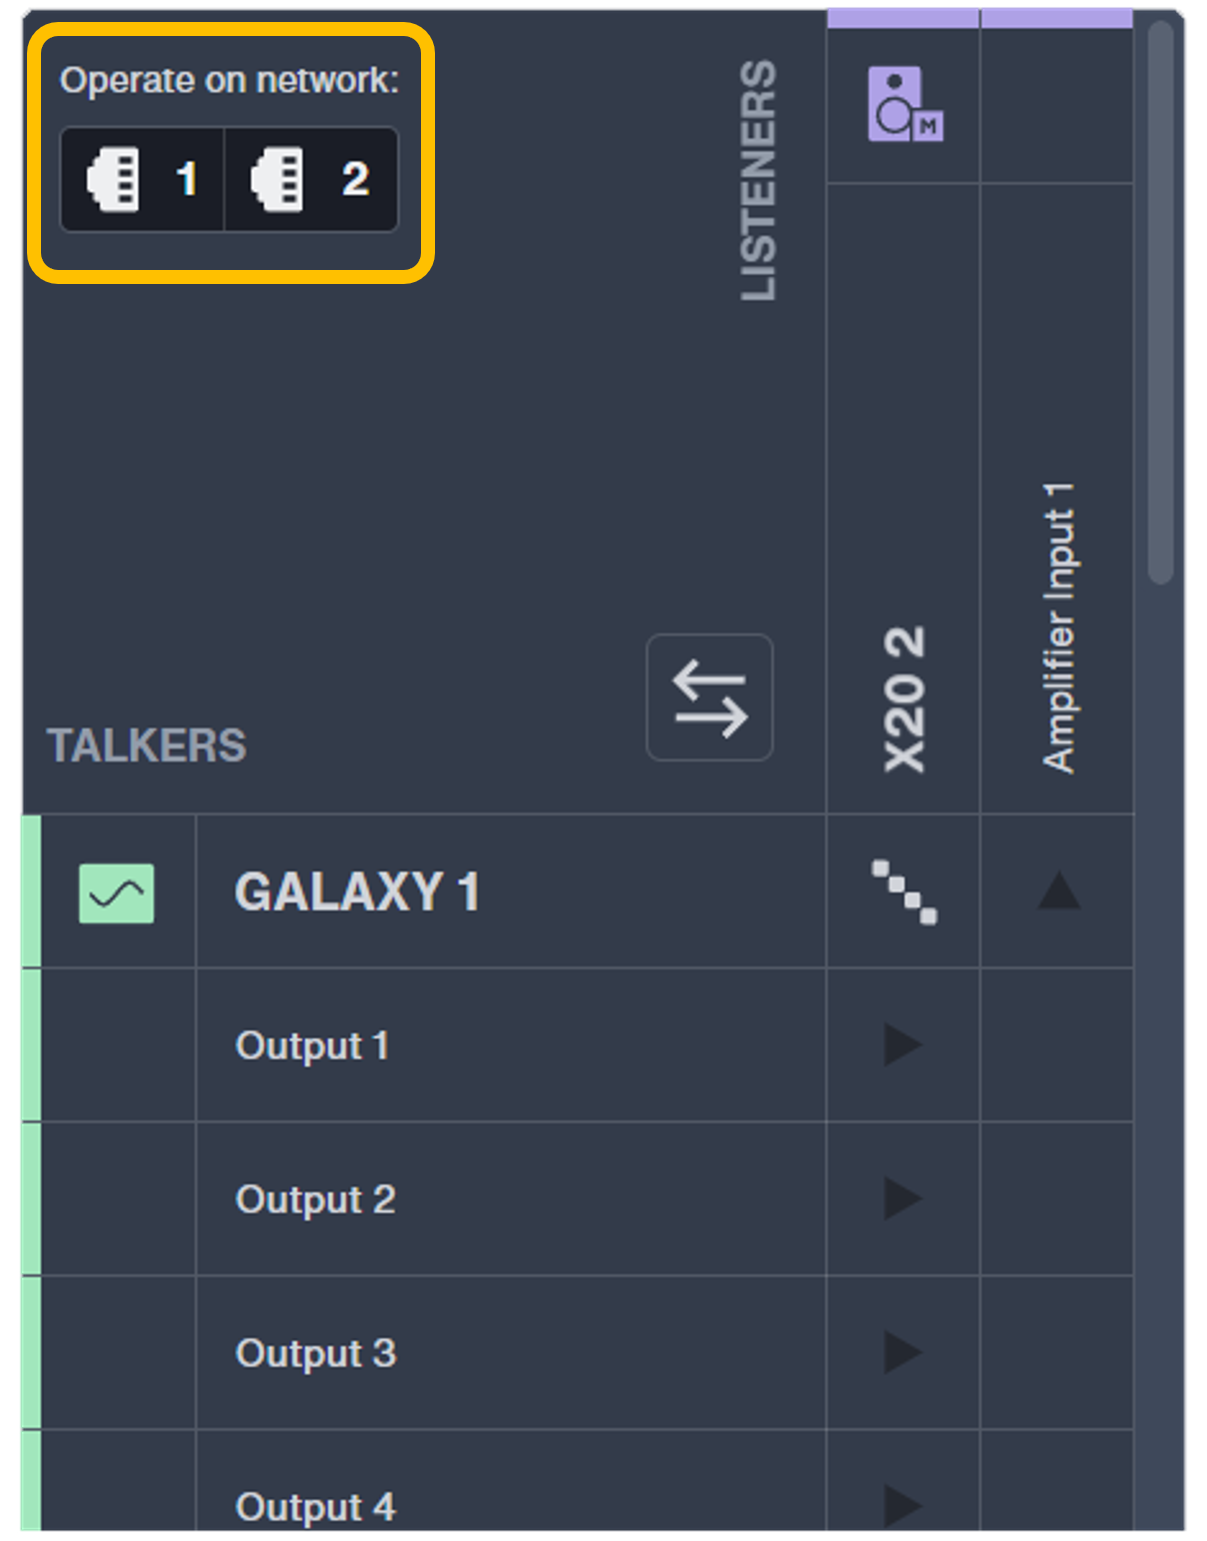 In each cell of the matrix, the top left corner of the cell indicates a connection on the Primary network, and the bottom right corner of the cell indicates a connection on the Secondary network.
Networks — Designate a device as the media clock for the system
In
Settings, select Media Clock. If no media clock has been created, click Set Media Clock. If additional media clocks are being added, select Add Media Clock.Select Set Media Clock, or Add Media Clock, if you are adding another.
Select the media clock device to use, check All devices follow the selected Media Clock , then click Apply.
Networks — Troubleshoot device auto-discovery
Use the following procedure when expected devices do not display in Nebra.
Power on loudspeakers, processors, power supplies, and network switches.
Connect the missing device to the same network as the Nebra computer.
Use an Ethernet cable tester or replace network cables between the computer, the network switch, and the missing device.
Replace or reconfigure the network switch.
For more information on switches and network configuration, see Recommended Network Switches for Milan AVB Systems and User Guide — Managing AVB Networks
Manage tags
Use tags to organize and control groups of input channels, output channels, and GEN-1 loudspeakers. Tags appear in Processing Overview and I/O Processing. You can edit multiple channel tags at once by selecting the channels and then clicking the tag icon  .
.
Tags are stored in the hardware, but colors are stored in the snapshot. To save tag colors, be sure to create a snapshot.Tags — Add | remove
In
Processing Overview, click the tag of the channel to add, then click the tag(s) to apply.Click the x on individual tags to remove them, or click Clear to unapply all tags.
Tags — Create | assign
In
Processing Overview, click .In New Tag type a name, then click +.
Click the new tag to make it active.
Click anywhere outside of the Add Tag window to exit.

Tags — Delete
In
Processing Overview , click a tag, then select Manage Tags.Click the trashcan icon of the tag to delete, then click Delete.
Click X to close Manage Tags.
Tags — Edit
In
Processing Overview, click a tag, then select Manage Tags.Click the tag's pencil icon to edit.
CHOOSE COLOR and/or edit Tag Name, then Save (or BACK to cancel).
Click X to close Manage Tags.

Tags — Filter | auto-select
In
Processing Overview, click Filter.Uncheck the Channel Type(s) you don't want to see.
Toggle Auto-SEL on.
In Filter Logic, toggle AND / OR.
- AND shows channels that have all the selected tags.
- OR shows channels that have any of the selected tags.
Click AVAILABLE tag(s) to apply the filter.
Click the x on individual tags to remove them from the filter, or click Clear to unapply all filters.
Click Filter X to close Filters.
Tags — Reorder
In
Processing Overview, click a tag, then select Manage Tags.Click and hold the 3x4 dot grid, then drag it up or down.
Click X to close Manage Tags.
Manage snapshots
Use Nebra snapshots to store system-wide settings, including speaker layouts, routing, and channel mix levels. Instantly recall, automate, or crossfade between complex spatial sound scenes in live performances or installations.
Snapshots — Recall Galileo GALAXY | GEN-1 loudspeaker settings
In
 Snapshots, choose recall.
In Recall Snapshot, under CONNECTIONS, select how to recall connections:
Replace current connections — Snapshot connections replace current connections.
Merge with current connections. Snapshot connections priority — Snapshot connections replace current connections.
Merge with current connections. Current connections priority — Current connections, remain.
Layout only — Only recalls visual layouts, including folders, switch, and RMS device naming. Connections remain unchanged.
Under PROCESSORS, turn on or off Recall settings & parameters:
Recalls all settings and parameters except connections.
Choose Recall Snapshot.
Snapshots — Save Galileo GALAXY | GEN-1 loudspeaker settings
In
Snapshots, choose + New Snapshot.In New Snapshot type a name and an optional comment.
Turn on or off Also store current parameters in internal device memory.
Snapshots — Transfer to another computer
In
Snapshots, choose Export.In Export Snapshots, select the snapshot(s) to export, choose Export, specify a destination, then click Save.
Transfer the
.zipexport file to the receiving computer.In
Snapshots, choose Import, select the exported .zip file, then click Open.
Manage folders
Use folders to group devices for easier organization and management.
Folders — Create
In
Devices, select the loudspeaker(s) to include in a new folder by holding either Shift (for consecutive devices) or Command ⌘ (Ctrl) (for non-consecutive devices).Click
 to create the new folder. Folders can only contain devices in the same category. Devices can only be assigned to one folder at a time.
Folders — Dissolve
In
Devices, right-click the folder, then select Dissolve folder/s.
Folders — Move
In
Devices, right-click the device, then select Move to folder.
Folders — Rename
In
Devices, double-click the folder name, edit the text, then select Enter.
Manage settings
Settings — Change light/dark app mode
Change the display mode for easier viewing in different lighting conditions.
In
Settings, choose Display Settings, then select Dark Mode or Light Mode in Appearance.
Settings — Change measurement units
Choose preferred units of measure for the parameters of atmospheric correction: distance and temperature.
In
Settings, choose Units, then select meter (m) or feet (ft) in Distance.In Temperature, choose °Celsius or °Fahrenheit.
Settings — Restrict Nebra functions during live performance (show mode)
In
Settings, choose Show Mode / Off.Turn on or off Restricted functions during live performance:
Change connections
Change entity /group name
MC media clock modifications
Snapshot recall
RMS discovery
Mute
Wink
Remove devices from the connection graph
Restore factory default
Manual firmware update
Automatic firmware update
Assign inventory for MPS-488HP and MPS-488X
PO: level and mute
PO: polarity, delay, input type, atmospheric correct and product integration
I/O: parametric EQ, u-shaping, HPF, LPF and all pass
Matrix: level and delay matrix
Turn on Show Mode to Active.