Operating Instructions — Acheron Designer
Screen Channel


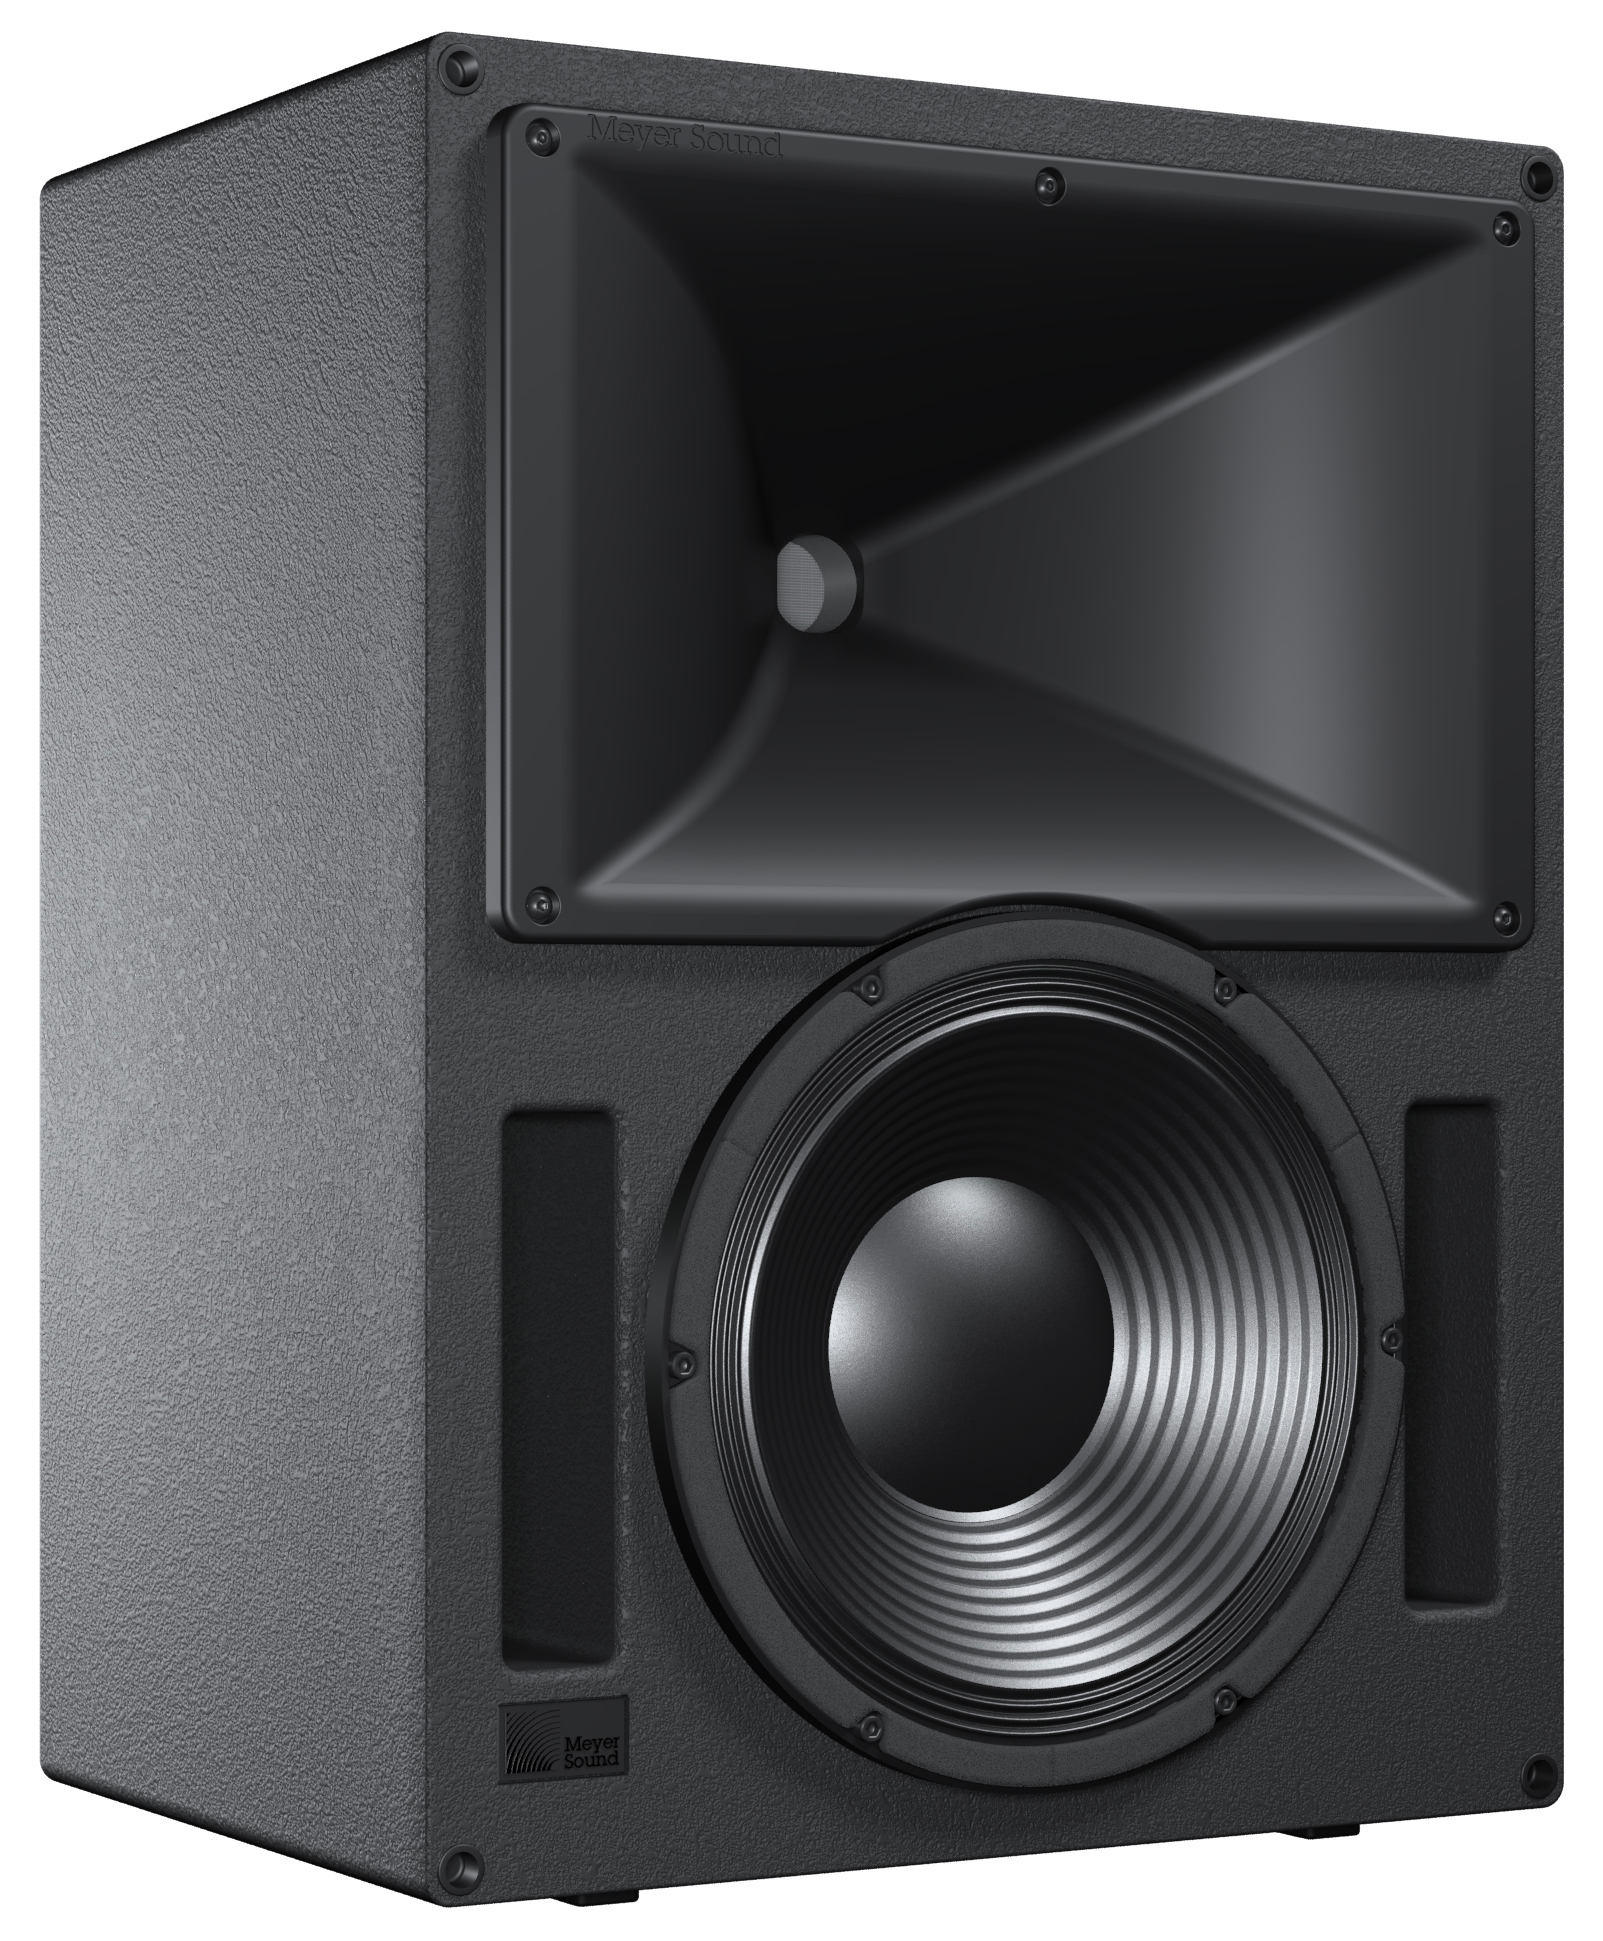
At the heart of Meyer Sound's EXP line of cinema products are the Acheron® high-performance screen channel loudspeakers. The Acheron Designer is the most compact of the Acheron models, making it an excellent choice for sound design suites, screening rooms, private theaters, and small commercial theaters. Optimized for installation behind perforated screens, the Acheron Designer combines the advantages of self-powered technology and innovative horn design to deliver exceptional, precise coverage for the left, center, and right screen channels for cinema.
Acheron Designer (without Optional Grille Frame)
The Acheron Designer uses the same patented horn technology and high-frequency compression driver as the other Acheron models, delivering the same 38 Hz to 17 kHz frequency response. This consistency of fidelity between Acheron models ensures that soundtracks monitored with the Acheron Designer translate accurately when played back in larger rooms with the Acheron 100, Acheron 80, Acheron Studio, or other calibrated cinema systems.
Specifically designed for cinema, the Acheron horn features a very soft roll-off beyond its 80-degree horizontal by 50-degree vertical coverage pattern. The extremely well-behaved horn ensures an accurate acoustic crossover and consistent vertical coverage pattern through the critical crossover range between the low- and high-frequency drivers. The optimized crossover point places most of the dialog in the horn, which is ideal for cinema applications.
Designed and manufactured at Meyer Sound's headquarters in Berkeley, California, the Acheron Designer’s drivers include one 12-inch low-frequency cone driver, housed in an optimally tuned, ported enclosure, and one high-frequency 4-inch diaphragm compression driver. The drivers yield uncompromising quality and are powered by sophisticated onboard amplification. The self-powered design ensures consistent results and simplifies installations in both new and existing rooms.
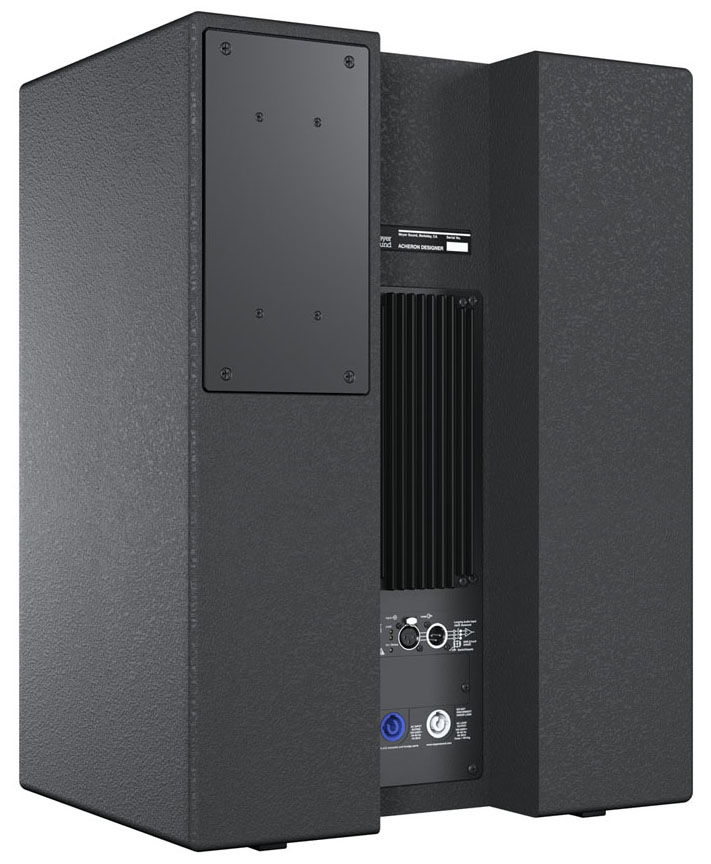 |
Acheron Designer with Recessed Heat Sink
A proprietary two-channel, Class-D amplifier powers each driver channel independently. Onboard processing includes driver protection circuitry, an electronic crossover, and correction filters, ensuring flat frequency and phase responses. The rear-mounted, recessed heat sink yields efficient convection cooling, and allows the unit to be placed flat against walls, when necessary.
The optional RMS™ remote monitoring system provides comprehensive monitoring of system parameters on a Windows®-based computer.
The Acheron Designer enclosure is constructed of premium birch plywood and coated with a low-gloss, black-textured finish. The cabinet bottom is fitted with two threaded M6 attachment points for the optional MYA-Acheron Designer cradle-style yoke, allowing the unit to be suspended from a single hanging point.
 |
Acheron Designer with Optional MYA-Acheron Designer Yoke
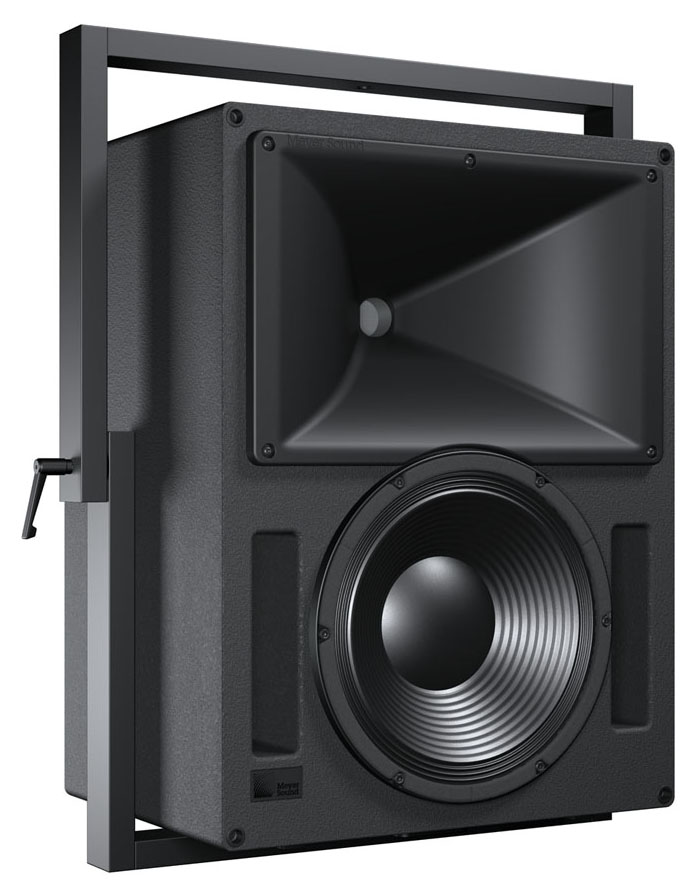
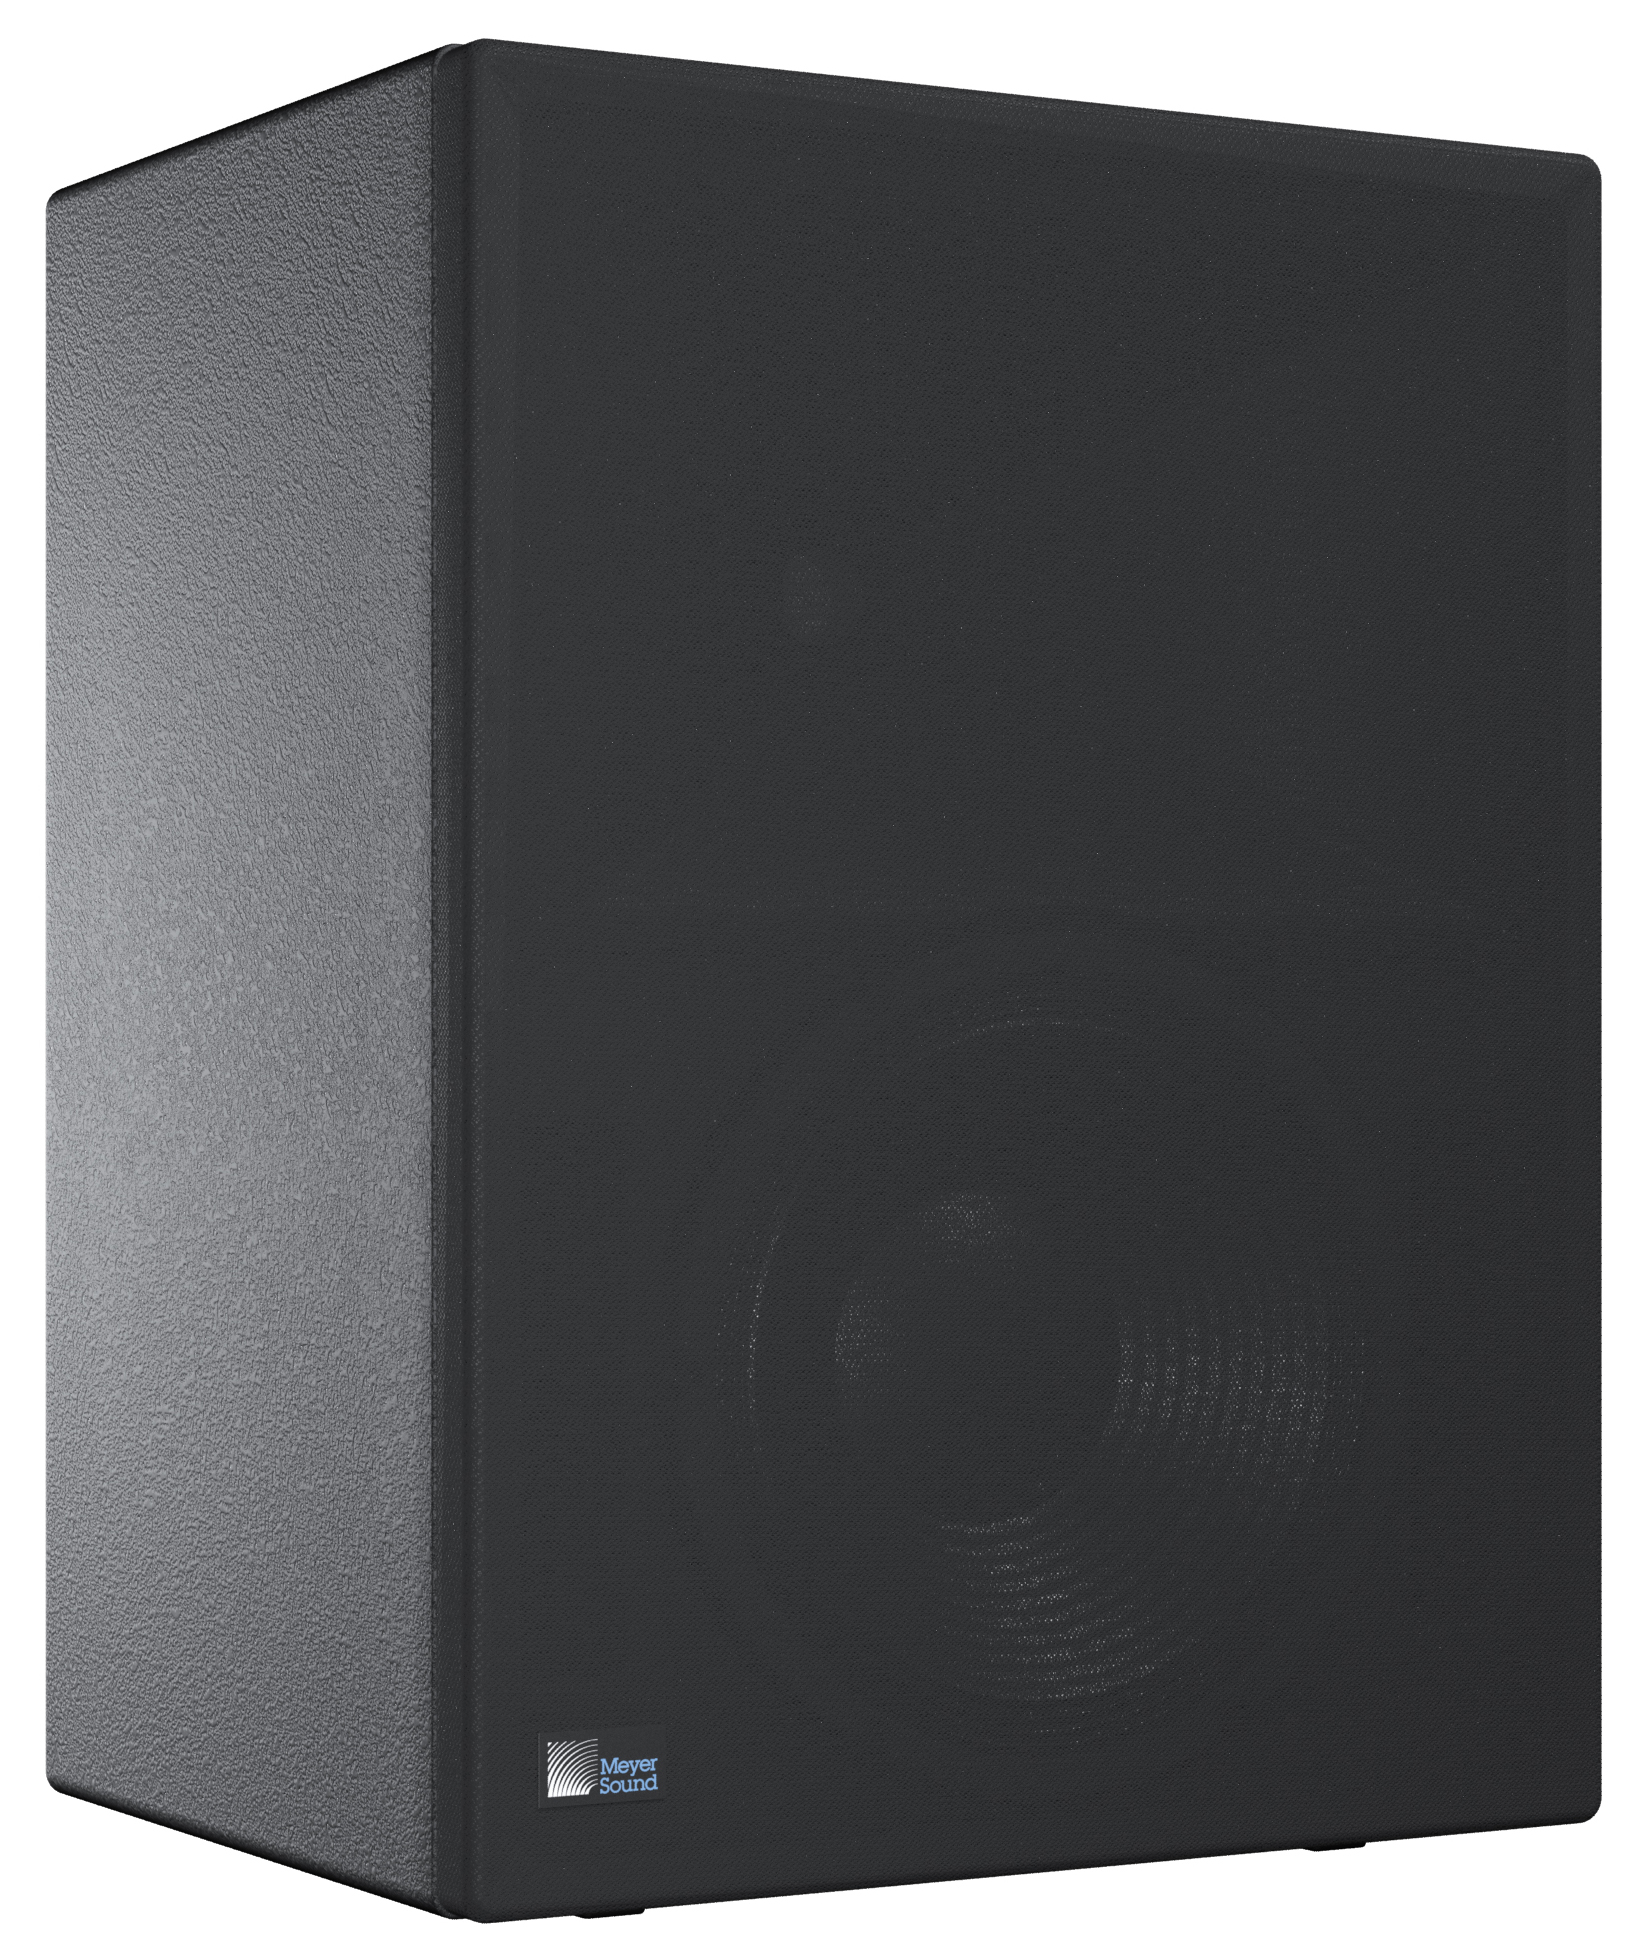
An optional, black cloth grille frame update kit is available for installations where the Acheron Designer is not placed behind a screen.
 |
Acheron Designer with Optional Grille Frame
The Acheron Designer combines advanced loudspeaker technology with equally advanced power capabilities.
Understanding power distribution, voltage and current requirements, and electrical safety guidelines is critical to the safe operation of the Acheron Designer.
Power Requirements
The Acheron Designer combines advanced loudspeaker technology with equally advanced power capabilities. Understanding power distribution, voltage and current requirements, and electrical safety guidelines is critical to the safe operation of the Acheron Designer.
AC Connectors
The Acheron Designer user panel includes 3-pole, PowerCon AC connectors, as shown in the figure below.
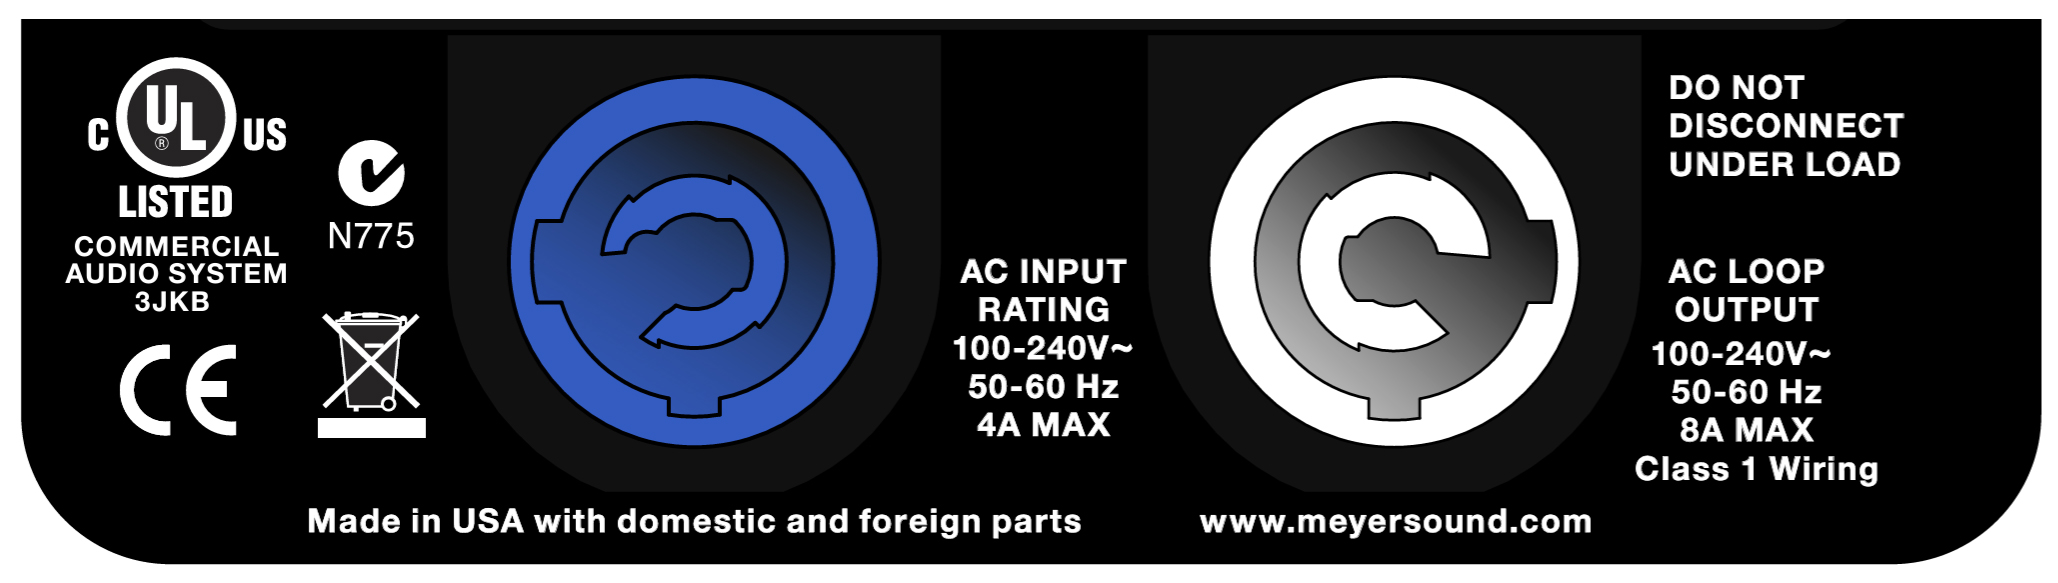 |
AC Input (Left) and AC Loop Output (Right) Connectors
AC Input Connector (Blue)
The blue AC Input connector supplies power to the Acheron Designer loudspeaker. The connector is rated at 20 amps and uses a PowerCon3 AC mains locking connector that prevents accidental disconnections. A 10-foot AC power cable, rated at 15 amps, is included with each Acheron Designer. If you replace the included AC power cable, make sure to use a cable with the appropriate power plug (on the other end) for the region in which you will operate the unit.
The AC Input connector also supplies power to any additional loudspeakers connected to the Acheron Designer’s gray Loop Output connector. Each Acheron Designer loudspeaker requires approximately 3.24 A rms maximum at 115 V AC and 1.74 A rms maximum at 230 V AC for proper operation.
Caution
When using the included AC power cable, do not loop more than three additional Acheron Designers from the AC Loop Output connector at 115 V (four total for the circuit), and not more than seven at 230 V (eight total for the circuit).
AC Loop Output Connector (Gray)
The gray AC Loop Output connector allows multiple Acheron Designers to be looped and powered from a single power source. Connect the AC Loop Output of the first Acheron Designer to the AC Input of the second unit, and so forth. The AC Loop Output uses a PowerCon3 AC mains locking connector that prevents accidental disconnections.
The maximum number of loudspeakers that can be looped from the Loop Output connector is determined by the voltage of the power source, the current draw of the looped loudspeakers, the circuit breaker rating, and the rating of the AC power cable connected to Acheron Designer.
Note
The Acheron Designer current draw is dynamic and fluctuates as operating levels change. The numbers in the table below assume that operating levels are normal and not such that the loudspeakers are constantly limiting.
Circuit Breaker/ Connector Rating | 115 V AC | 230 V AC | 100 V AC |
|---|---|---|---|
15 amps | 3 looped (4 total) | 7 looped (8 total) | 2 looped (3 total) |
20 amps | 5 looped (6 total) | 10 looped (11 total) | 3 looped (4 total) |
Each Acheron Designer ships with one AC looping connector for making AC looping cables. Assembled AC looping cables are available from Meyer Sound.
Caution
Do not exceed the current capability of the 20-amp Input connector for the Acheron Designer. When looping loudspeakers, consider the total current draw for all loudspeakers on the circuit, including the first loudspeaker.
Wiring for AC Connections
The Acheron Designer requires a grounded outlet. To operate safely and effectively, it is extremely important that the entire system be properly grounded.
When wiring international or special-purpose AC power cables and connectors, use the following wiring scheme:
 |
AC Cable Wiring Scheme
Connect the blue wire to the black terminal, or the terminal marked with an N.
Connect the brown wire to the red terminal, or the terminal marked with an L.
Connect the yellow and green wire to the green (or green and yellow) terminal, or the terminal marked with an E.
Caution
When creating AC power cables and distribution systems, it is important to preserve AC line polarity and connect the earth ground on both ends of the cable. The Acheron Designer requires a grounded connection. Always use a grounded outlet and plug. It is extremely important that the system be properly grounded to operate safely and properly. Do not ground-lift the AC cable.
AC Power Distribution
All components in an audio system (self-powered loudspeakers, mixing consoles, and processors) must be properly connected to an AC power distribution system to ensure that AC line polarity is preserved and that all grounding points are connected to a single node or common point using the same cable gauge as the neutral and line cables.
Note
Improper grounding of connections between loudspeakers and the rest of the audio system may produce noise or hum, or cause serious damage to the input and output stages of the system’s electronic components.
Caution
Before applying AC power to any Meyer Sound self-powered loudspeaker, make sure that the voltage potential difference between the neutral and earth-ground lines is less than 5 V AC when using single-phase AC wiring.
The figure below illustrates a basic three-phase AC distribution system with the loudspeaker load distributed across the three phases. All loudspeakers are connected to common neutral and earth-ground lines.
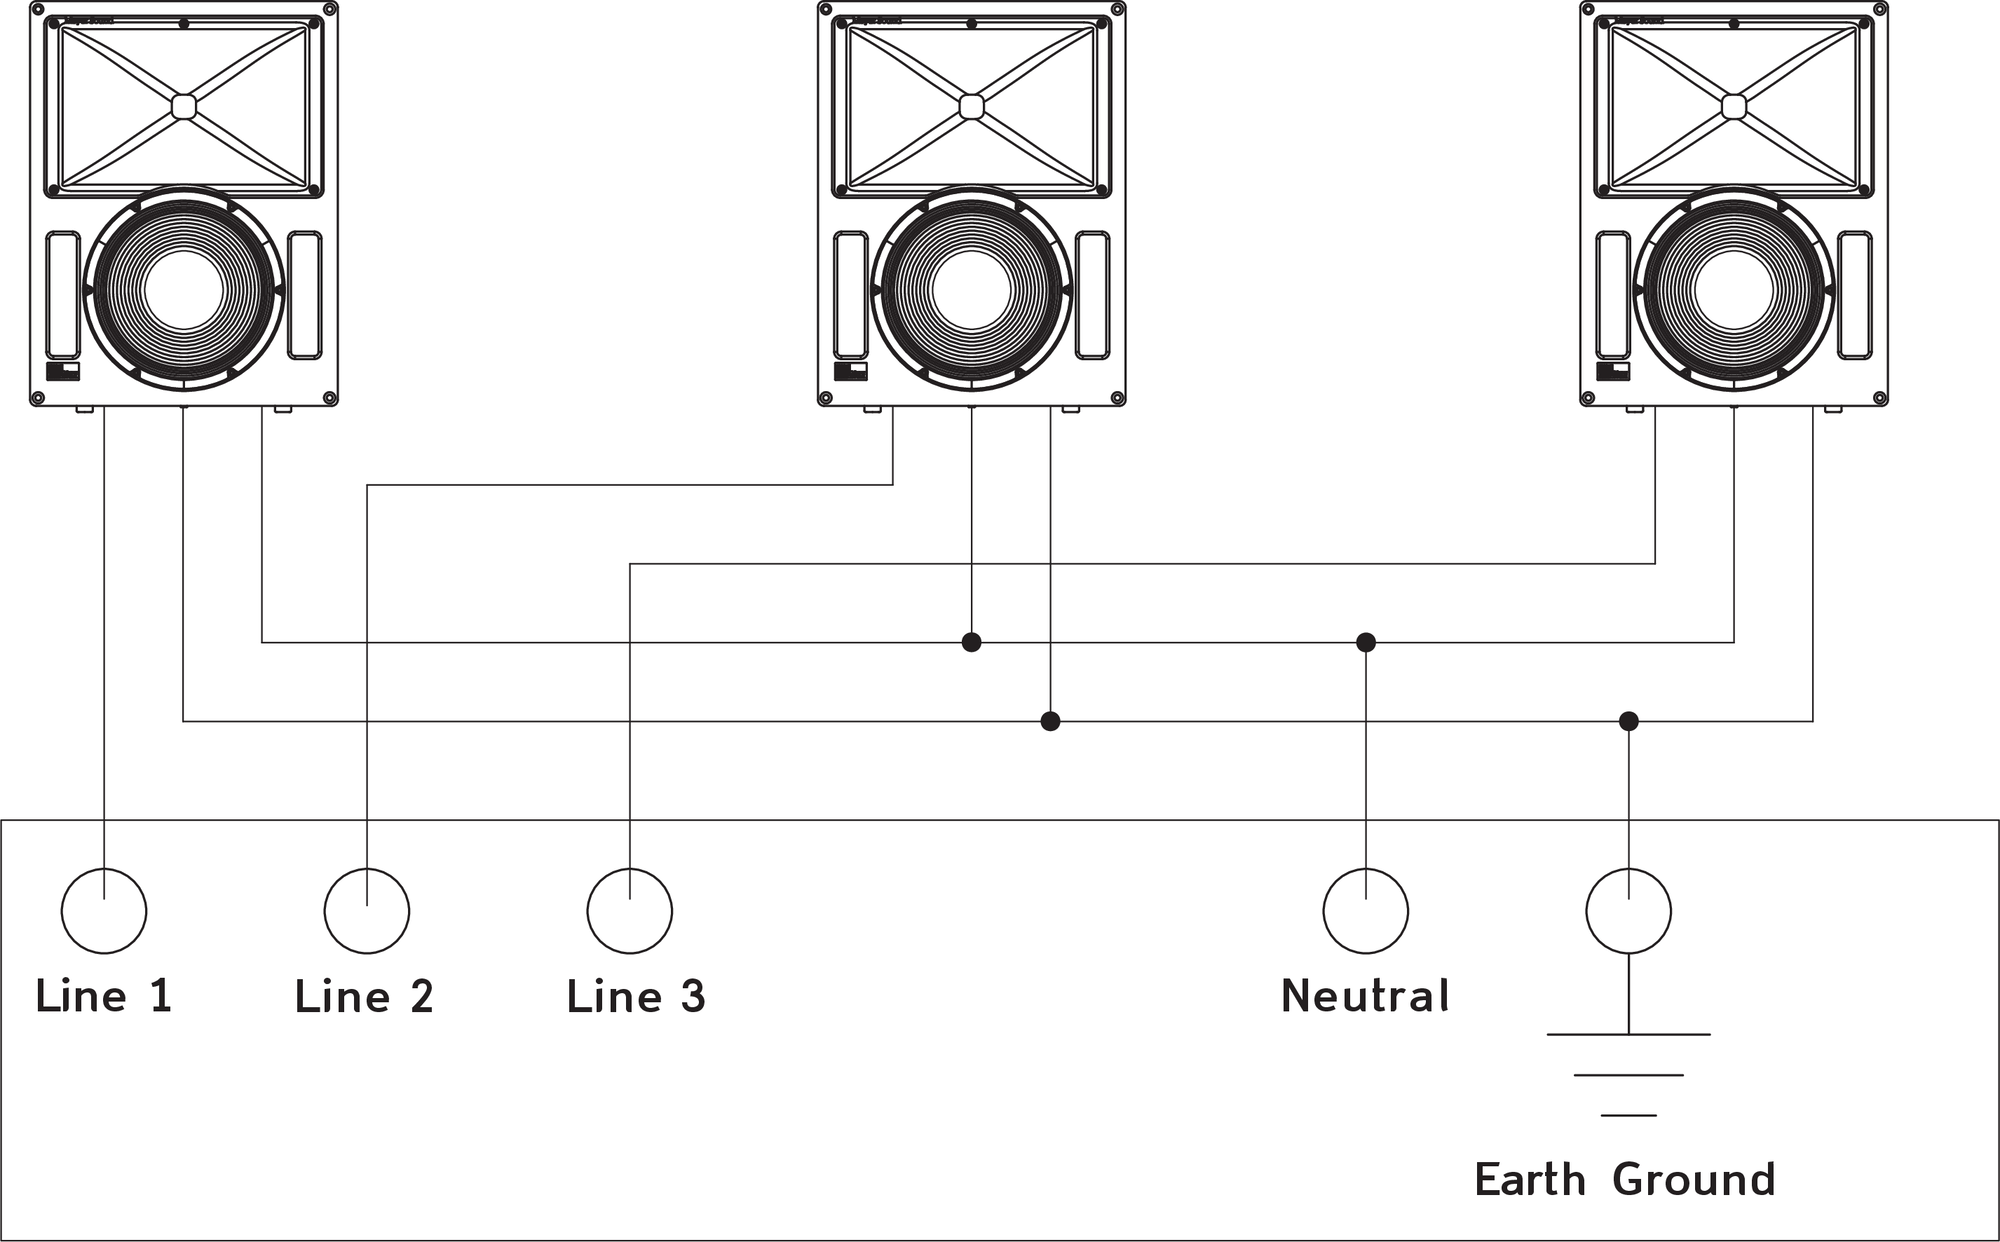
AC Power Distribution System
Acheron Designer Voltage Requirements
The Acheron Designer operates safely and continuously when the AC voltage stays within 100–264 V AC at 50 or 60 Hz. The loudspeaker can withstand continuous voltages up to 275 volts and allows any combination of voltage to GND (neutral-line-ground or line-line-ground).
If the voltage drops below 90 V (brownout), the unit uses stored power to continue operating temporarily; the loudspeaker shuts down if the voltage does not rise above the low boundary before the stored power is used.
If the voltage rises above 275 V, the power supply immediately shuts off to prevent damage to the unit.
If the Acheron Designer shuts down due to either low or high voltage, its power supply automatically powers up again after three seconds, so long as the voltage has returned to its normal operating window. If the Acheron Designer does not power up after 10 seconds, remove AC power immediately and contact Meyer Sound Technical Support.
Caution
The power source for the Acheron Designer should always operate within the required voltage range, at least a few volts from the upper and lower ranges. This ensures that AC voltage variations from the service entry — or peak voltage drops due to cable runs — will not cause the loudspeaker’s amplifier to cycle on and off or cause damage to the power supply.
Note
When voltage fluctuates within the Acheron Designer’s operating range, automatic tap selection stabilizes the operating voltage. This tap selection is instantaneous with no audible artifacts.
Tip
Since the Acheron Designer does not require a dedicated neutral line, and it can tolerate elevated voltages from the ground line, it can be connected to line-line terminals in 120 V, 3-phase Wye systems. This results in 208 V AC between lines (nominal) and therefore draws less current than when using 120 V AC (line-neutral). Make sure that the voltage remains within the Acheron Designer’s recommended operating window (100-264 V AC). The ground line must always be used for safety reasons and the line-to-ground voltage should never exceed 264 V AC (typically 120 V AC from line-to-ground).
Powering Up the Acheron Designer
When AC power is applied to the Acheron Designer, its Intelligent AC™ power supply automatically selects the correct operating voltage, allowing it to be used internationally without manually setting voltage switches. In addition, Intelligent AC provides soft-start power up, eliminating high inrush currents; suppresses high-voltage transients up to several kilovolts; filters common mode and differential mode radio frequencies (EMI); and sustains operation temporarily during low-voltage periods.
When powering up the Acheron Designer, the following startup events take place over several seconds.
Audio output is muted.
Voltage is detected and the power supply mode is automatically adjusted as necessary. The power supply ramps up.
During the power up sequence, the three-color On/Status LED flashes all three colors.
After the power up sequence and system check have completed, the ON/Status LED turns solid green, indicating the loudspeaker is ready to reproduce audio.
Caution
If the On/Status LED does not turn green, or the Acheron Designer does not output audio after ten seconds, remove AC power immediately and verify that the voltage is within the required range. If the problem persists, contact Meyer Sound Technical Support.
Acheron Designer Current Requirements
The Acheron Designer current draw is dynamic and fluctuates as operating levels change. Since different cables and circuit breakers heat up at varying rates, it is important to understand the following types of current ratings and how they affect circuit breaker and cable specifications.
Idle Current — The maximum rms current during idle periods.
Maximum Long-Term Continuous Current — The maximum rms current during a period of at least 10 seconds. The Maximum Long-Term Continuous Current is used to calculate temperature increases for cables, to ensure that cable sizes and gauges conform to electrical code standards. The current rating is also used as a rating for slow-reacting thermal breakers.
Burst Current — The maximum rms current during a period of around one second. The Burst Current is used as a rating for magnetic breakers. It is also used for calculating the peak voltage drop in long AC cable runs according to the following formula:
V pk (drop) = I pk x R (cable total)
The Burst Current can also be used to calculate the AC looping capability of Acheron Designer.
Maximum Instantaneous Peak Current — A rating for fast-reacting magnetic breakers.
Inrush Current — The spike of initial current encountered when powering on.
You can use the table below as a guideline for selecting cable gauge and circuit breaker ratings for the system’s operating voltage.
Current Draw | 115 V AC | 230 V AC | 100 V AC |
|---|---|---|---|
Idle Current | 0.23 A rms | 0.19 A rms | 0.24 A rms |
Maximum Long-Term Continuous Current | 1.58 A rms | 0.83 A rms | 1.78 A rms |
Burst Current | 3.1 A rms | 1.4 A rms | 3.6 A rms |
Maximum Instantaneous Peak Current | 12.0 A peak | 8.0 A peak | 12.4 A peak |
Inrush Current | 25 A peak | 54 A peak | 20 A peak |
The minimum electrical service amperage required by an Acheron Designer loudspeaker system is the sum of the Maximum Long-Term Continuous Current for each loudspeaker. An additional 30 percent above the minimum amperage is recommended to prevent peak voltage drops at the service entry.
Note
For best performance, the AC cable voltage drop should not exceed 10 V, or 10 percent at 115 V and 5 percent at 230 V. Make sure that even with AC voltage drops that the AC voltage always remains within the operating windows.
Electrical Safety Guidelines
Pay close attention to these important electrical and safety guidelines.
The Acheron Designer requires a grounded outlet. Always use a grounded outlet and plug.
 |
Do not use a ground-lifting adapter or cut the AC cable ground pin.
 |
Do not exceed the current capability of the 20-amp AC Input connector for the loudspeaker. When looping loudspeakers, consider the total current draw for all loudspeakers on the circuit, including the first loudspeaker.
Make sure the AC power cable for the loudspeaker has the appropriate power plug (on the other end) for the area in which you will operate the loudspeaker. In addition, the AC power cable must be rated for the total current draw of all loudspeakers looped from the power source.
Do not operate the unit if its power cable is frayed or broken.
Keep all liquids away from the Acheron Designer to avoid hazards from electrical shock.
Rigging
MYA-Acheron Cradle-Style Yoke
The Acheron Designer includes M6 threaded attachment points on the cabinet bottom, as shown in the figures below, for the optional MYA-Acheron Designer cradle-style yoke, allowing the unit to be suspended from a single hanging point.
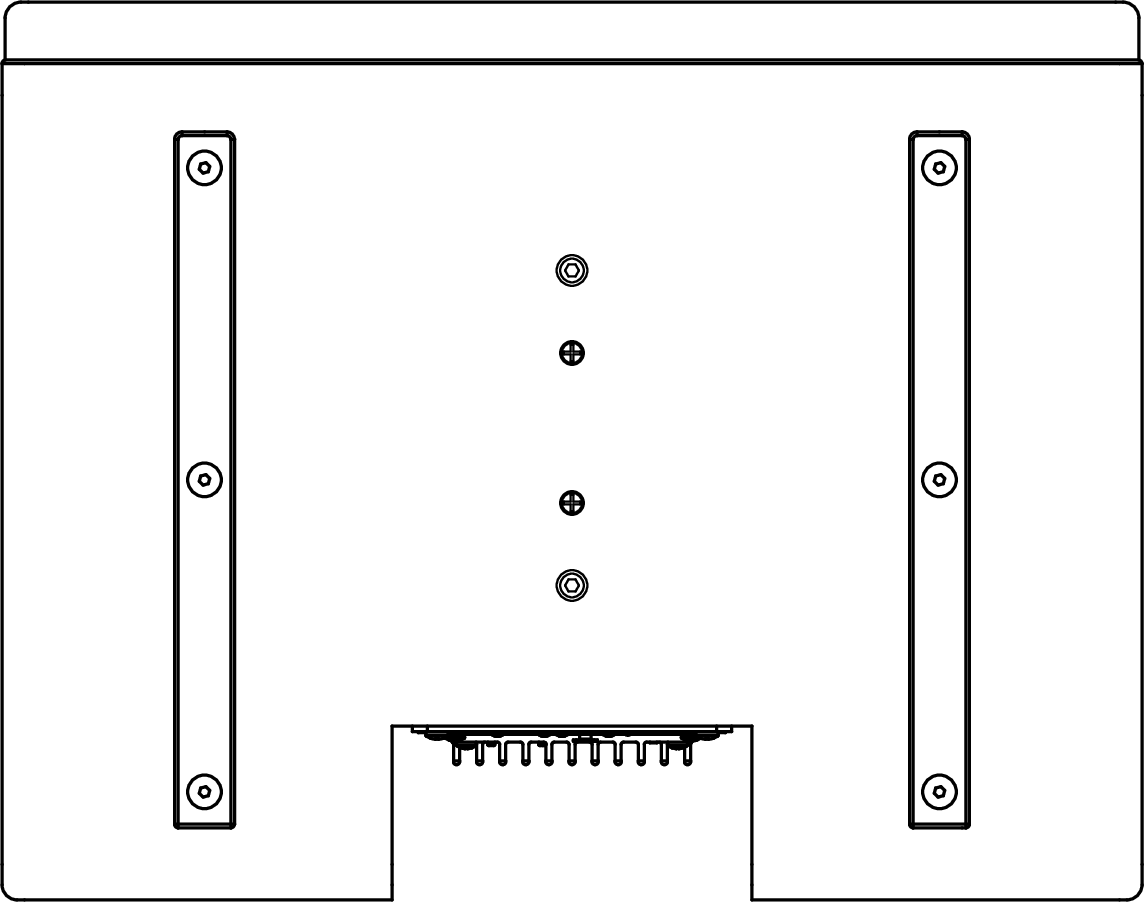 |
Acheron Designer Cabinet Bottom, M6 Threaded Attachment Points
The yoke’s cradle can be pivoted to install the loudspeaker with downtilt or uptilt. A “C” or “G” hanging clamp and steel safety cable (not included) are required to suspend the yoke.
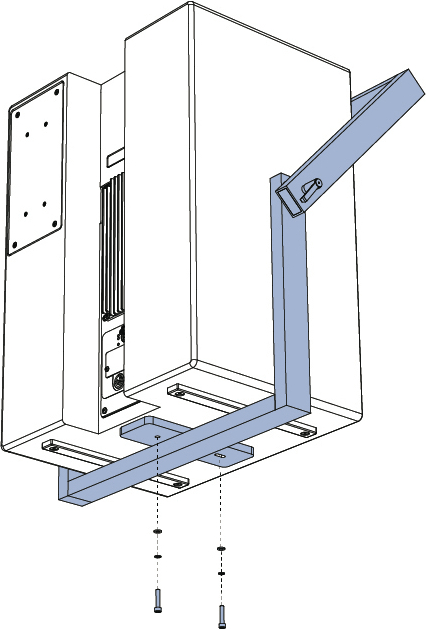 |
MYA-DES Cradle-Style Yoke, Bottom View
Caution
The MYA-Acheron Designer mounting yoke is rated for a maximum downtilt of 45 degrees.
Note
The top bar of the MYA-Acheron Designer yoke accommodates hanging clamps with standard 1/2-inch or 12 mm bolts.
For Acheron Designer dimensions and weight with the MYA-Acheron Designer yoke, see Acheron Designer Dimensions and Acheron Designer Dimensions with MYA-Acheron Designer Cradle-style Yoke
RMS Remote Monitoring System
Acheron Designer optionally includes an RMS remote monitoring system module, allowing the loudspeaker to be connected to an RMS network. RMS reports, in real time, the status and power usage of multiple Meyer Sound loudspeakers from a Mac or Windows-based computer. The RMServer™ communicates with Meyer Sound loudspeakers equipped with RMS modules. RMServer is a compact, Ethernet-based hardware unit with two FT-10 RMS data ports. RMServer stores system configurations internally, eliminating most manual data entry. Systems can be monitored from a computer at front-of-house or backstage, or from a laptop anywhere within the venue over WiFi.
Note
RMS does not control AC power.
Compass RMS Software
Compass RMS™ software provides extensive system status and performance data for each loudspeaker, including amplifier voltage, limiting activity, power output, fan and driver status, as well as mute and solo capability. Loudspeakers are added to the RMS network and assigned a node name during a one-time discovery procedure. Once loudspeakers are identified on the RMS network, they appear in Compass RMS as icons that can be customized to suit your needs, as shown in the figure below.

Compass RMS Window
Individual loudspeakers can be physically identified with the Wink option in RMS, which lights the Wink LED on the RMS module of that particular loudspeaker. Conversely, a loudspeaker can be identified in Compass RMS by pressing the Identify button on the loudspeaker’s RMS module.
Loudspeaker icons can be arranged in Compass RMS and saved as pages to represent how the loudspeakers have been deployed in the system. Multiple pages can be saved and recalled for specific performances and venues.
RMS Module
The AcheronDesigner RMS user panel, shown below, includes an Identify button, Remote Mute switch, Wink/Activity LED, and two Network connectors.
 |
Acheron Designer RMS Module
Note
The Identify button and Wink/Activity LED on the RMS user panel are used exclusively by RMS and have no effect on the acoustical or electrical activity of the loudspeaker.
Identify Button
The Identify button serves the following functions:
If the loudspeaker has not yet been discovered on the RMS network (Wink/Activity LED not lit), press the Identify button to discover it.
To remove the loudspeaker from the RMS network, press and hold the Identify button during startup (see Resetting the RMS Module).
To wink a discovered loudspeaker, press the Identify button. The Wink LED on the loudspeaker icon in Compass RMS lights up and the Wink/Activity LED on the loudspeaker’s RMS user panel turns solid green. Press the Identify button again to unwink the loudspeaker.
Tip
The loudspeaker can also be winked by clicking the Wink button on the loudspeaker icon in Compass RMS.
Wink/Activity LED (Green)
The green Wink/Activity LED indicates the status of the loudspeaker:
During startup, the LED flashes green 10 times.
If the loudspeaker has not yet been discovered on the RMS network, the LED is not lit after startup.
• If the loudspeaker has been successfully discovered on the RMS network, the LED flashes green continuously and flashes more rapidly with increased data activity.
When the loudspeaker is winked, either by clicking the Wink button in Compass RMS or by pressing the Identify button on the RMS user panel, the LED is solid green. The LED remains solid green until the loudspeaker is unwinked.
Tip
The Wink function is useful for identifying the physical loudspeaker corresponding to a loudspeaker icon in Compass RMS.
Remote Mute Switch
The recessed Remote Mute switch on the RMS module, shown in the figure below, determines whether Compass RMS can control muting and soloing of the loudspeaker. The loudspeaker ships from the factory with the switch enabled.
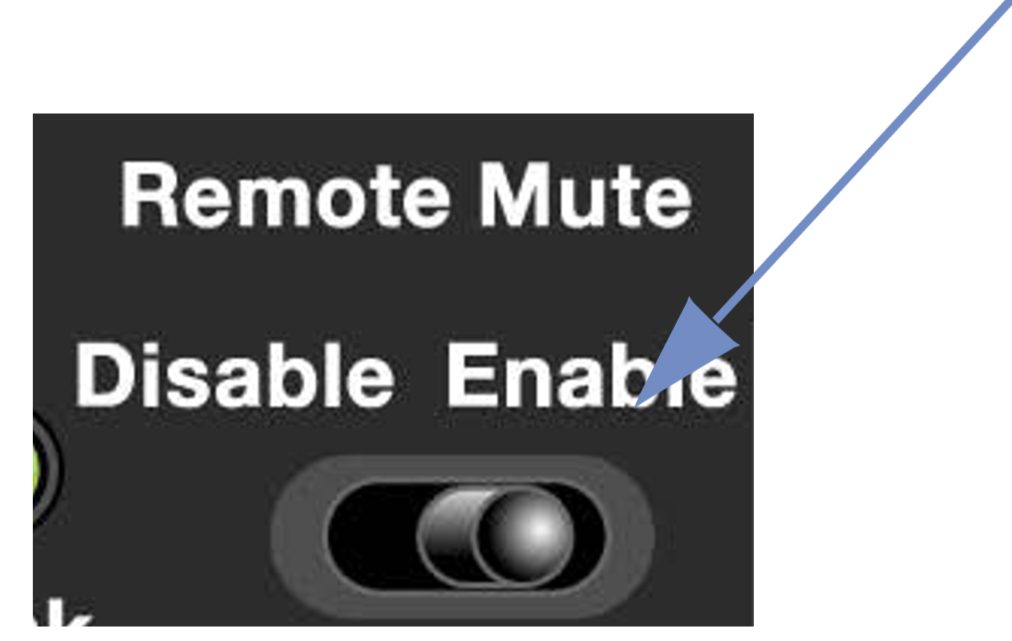 |
Remote Mute Switch
Disable: When the Remote Mute switch is set to Disable (to the left), the loudspeaker cannot be muted or soloed from Compass RMS.
Enable: When the Remote Mute switch is set to Enable (to the right), the loudspeaker can be muted and soloed from Compass RMS.
Note
Compass RMS has a preference that can be set to disable Mute and Solo functions, eliminating any possibility of accidentally muting loudspeakers.
RMS Network Connectors
The Weidmuller 2-conductor, locking connectors transfer data to and from the RMS network. Two connectors are provided to allow for easy connection of multiple (daisy-chained) loudspeakers on the network. Included with each RMS-equipped loudspeaker are RMS cable connectors and mounting blocks for constructing RMS cables. The mounting blocks allow the Weidmuller connectors to be securely attached to the RMS module with screws.
Neuron ID for RMS Module
Each RMS module has a unique 12-character Neuron ID (NID) that identifies the loudspeaker on the network. The NID is automatically detected by RMServer but can also be entered manually, if necessary when configuring RMS systems in Compass RMS without loudspeakers present. The NID label is located on the RMS user panel near the orange Network connectors.
Resetting the RMS Module
You can use the Identify button to reset the RMS module when powering on the loudspeaker. This action will cause the module to be removed from the RMS network.
Power down the loudspeaker.
Press and hold the Identify button.
While continuing to hold down the Identify button, power on the loudspeaker.
After the Wink/Status LED flashes on and off, release the Identify button. The RMS module is reset and the loudspeaker is removed from the RMS network.
System Design and Integration Tools
MAPP System Design Tool
The MAPP System Design Tool is a powerful, cross-platform application for accurately predicting the coverage pattern, frequency response, phase response, impulse response, and SPL capability of individual or arrayed Meyer Sound loudspeakers.

MAPP System Design Tool
Whether planning for fixed installations or for tours with multiple venues, use MAPP to accurately predict the appropriate loudspeaker deployment for each job, complete with coverage data, system delay and equalization settings, rigging information, and detailed design illustrations. MAPP’s accurate, high-resolution predictions ensure that systems will perform as intended, thereby eliminating unexpected coverage problems and minimizing onsite adjustments.
The key to the accuracy of MAPP’s predictions is MeyerSound’s exhaustive database of loudspeaker measurements. Performance predictions for each loudspeaker are based on 3-dimensional, 65,000+ 1/48th-octave-band measurements taken in the MeyerSound anechoic chamber. The extraordinary consistency between Meyer Sound loudspeakers guarantees that predictions from MAPP will closely match their actual performance.
MAPP software allows for configuration of MeyerSound loudspeaker systems and definition of the environment in which they operate, including air temperature, pressure, humidity, and the location of prediction surfaces. Importing both CAD (.DXF) and Sketchup (.SKP) files containing detailed venue information to act as an anchor model to the prediction surfaces and a visual aid to facilitate prediction data interpretation is also possible.
Tip
See meyersound.com for support and more information about MAPP.
MAPP Capabilities
With MAPP, you can:
Simulate different loudspeaker configurations to refine system designs and determine the best coverage for intended audience areas
Model loudspeaker interactions to locate constructive and destructive interferences so that loudspeakers can be re-aimed and repositioned as necessary
Place microphones anywhere in the Model View space and predict loudspeaker frequency response, phase response, and sound pressure levels at each microphone position
Determine delay settings for fill loudspeakers using the Inverse Fast Fourier Transform and phase response feature
Preview the results of signal processing to determine optimum settings for the best system response
Automatically calculate load information for arrays to determine necessary minimum rigging capacity, front-to-back weight distribution, and center of gravity location
Generate and export system images and system PDF reports for client presentations
Synchronize GALAXY processor output channel settings in real-time with virtual or real GALAXY units, allowing in-the-field changes to be predicted during system alignments
Galileo GALAXY Network Platform
The Galileo GALAXY Network Platform is a sophisticated loudspeaker management tool for controlling all MeyerSound speaker types. The GALAXY loudspeaker processor extends a high level of audio control in driving and aligning loudspeaker systems with multiple zones. It provides a powerful tool set for corrective equalization (EQ) and creative fine-tuning for a full range of applications from touring to cinema.
Users can readily program the GALAXY processor using Compass software running on a host computer or via the Compass Go application for the iPad. Connecting MAPP to the GALAXY processor will also allow the user to push output channel settings created in MAPP as a starting point. Compass Control Software includes custom-designed settings for each family of speakers, as well as to integrate families together. For example, the Product Integration feature matches the phase characteristics between Meyer speaker families to ensure the most coherent summation.
Processing tools for inputs and outputs include delay, parametric EQ and U-Shaping EQ. Output processing also includes polarity reversal, Low-Mid Beam Control (LMBC), atmospheric correction, and All Pass filters.
The built-in summing and delay matrices allow a user to easily assign gain and delay values, respectively, at each cross point. This capability greatly facilitates using one loudspeaker to satisfy multiple purposes.
Front panel controls let a user intuitively and quickly operate a GALAXY processor without a computer during live use.
The GALAXY 408, GALAXY 816 and GALAXY 816-AES3 processor versions have the same audio processing capability with different I/O. See www.meyersound.com to locate their datasheets for more information.
Acheron Designer Dimensions
Weight without Grille Frame | 76.0lb (34.5kg) |
Weight with Grille Frame | 78.0lb (35.4kg) |
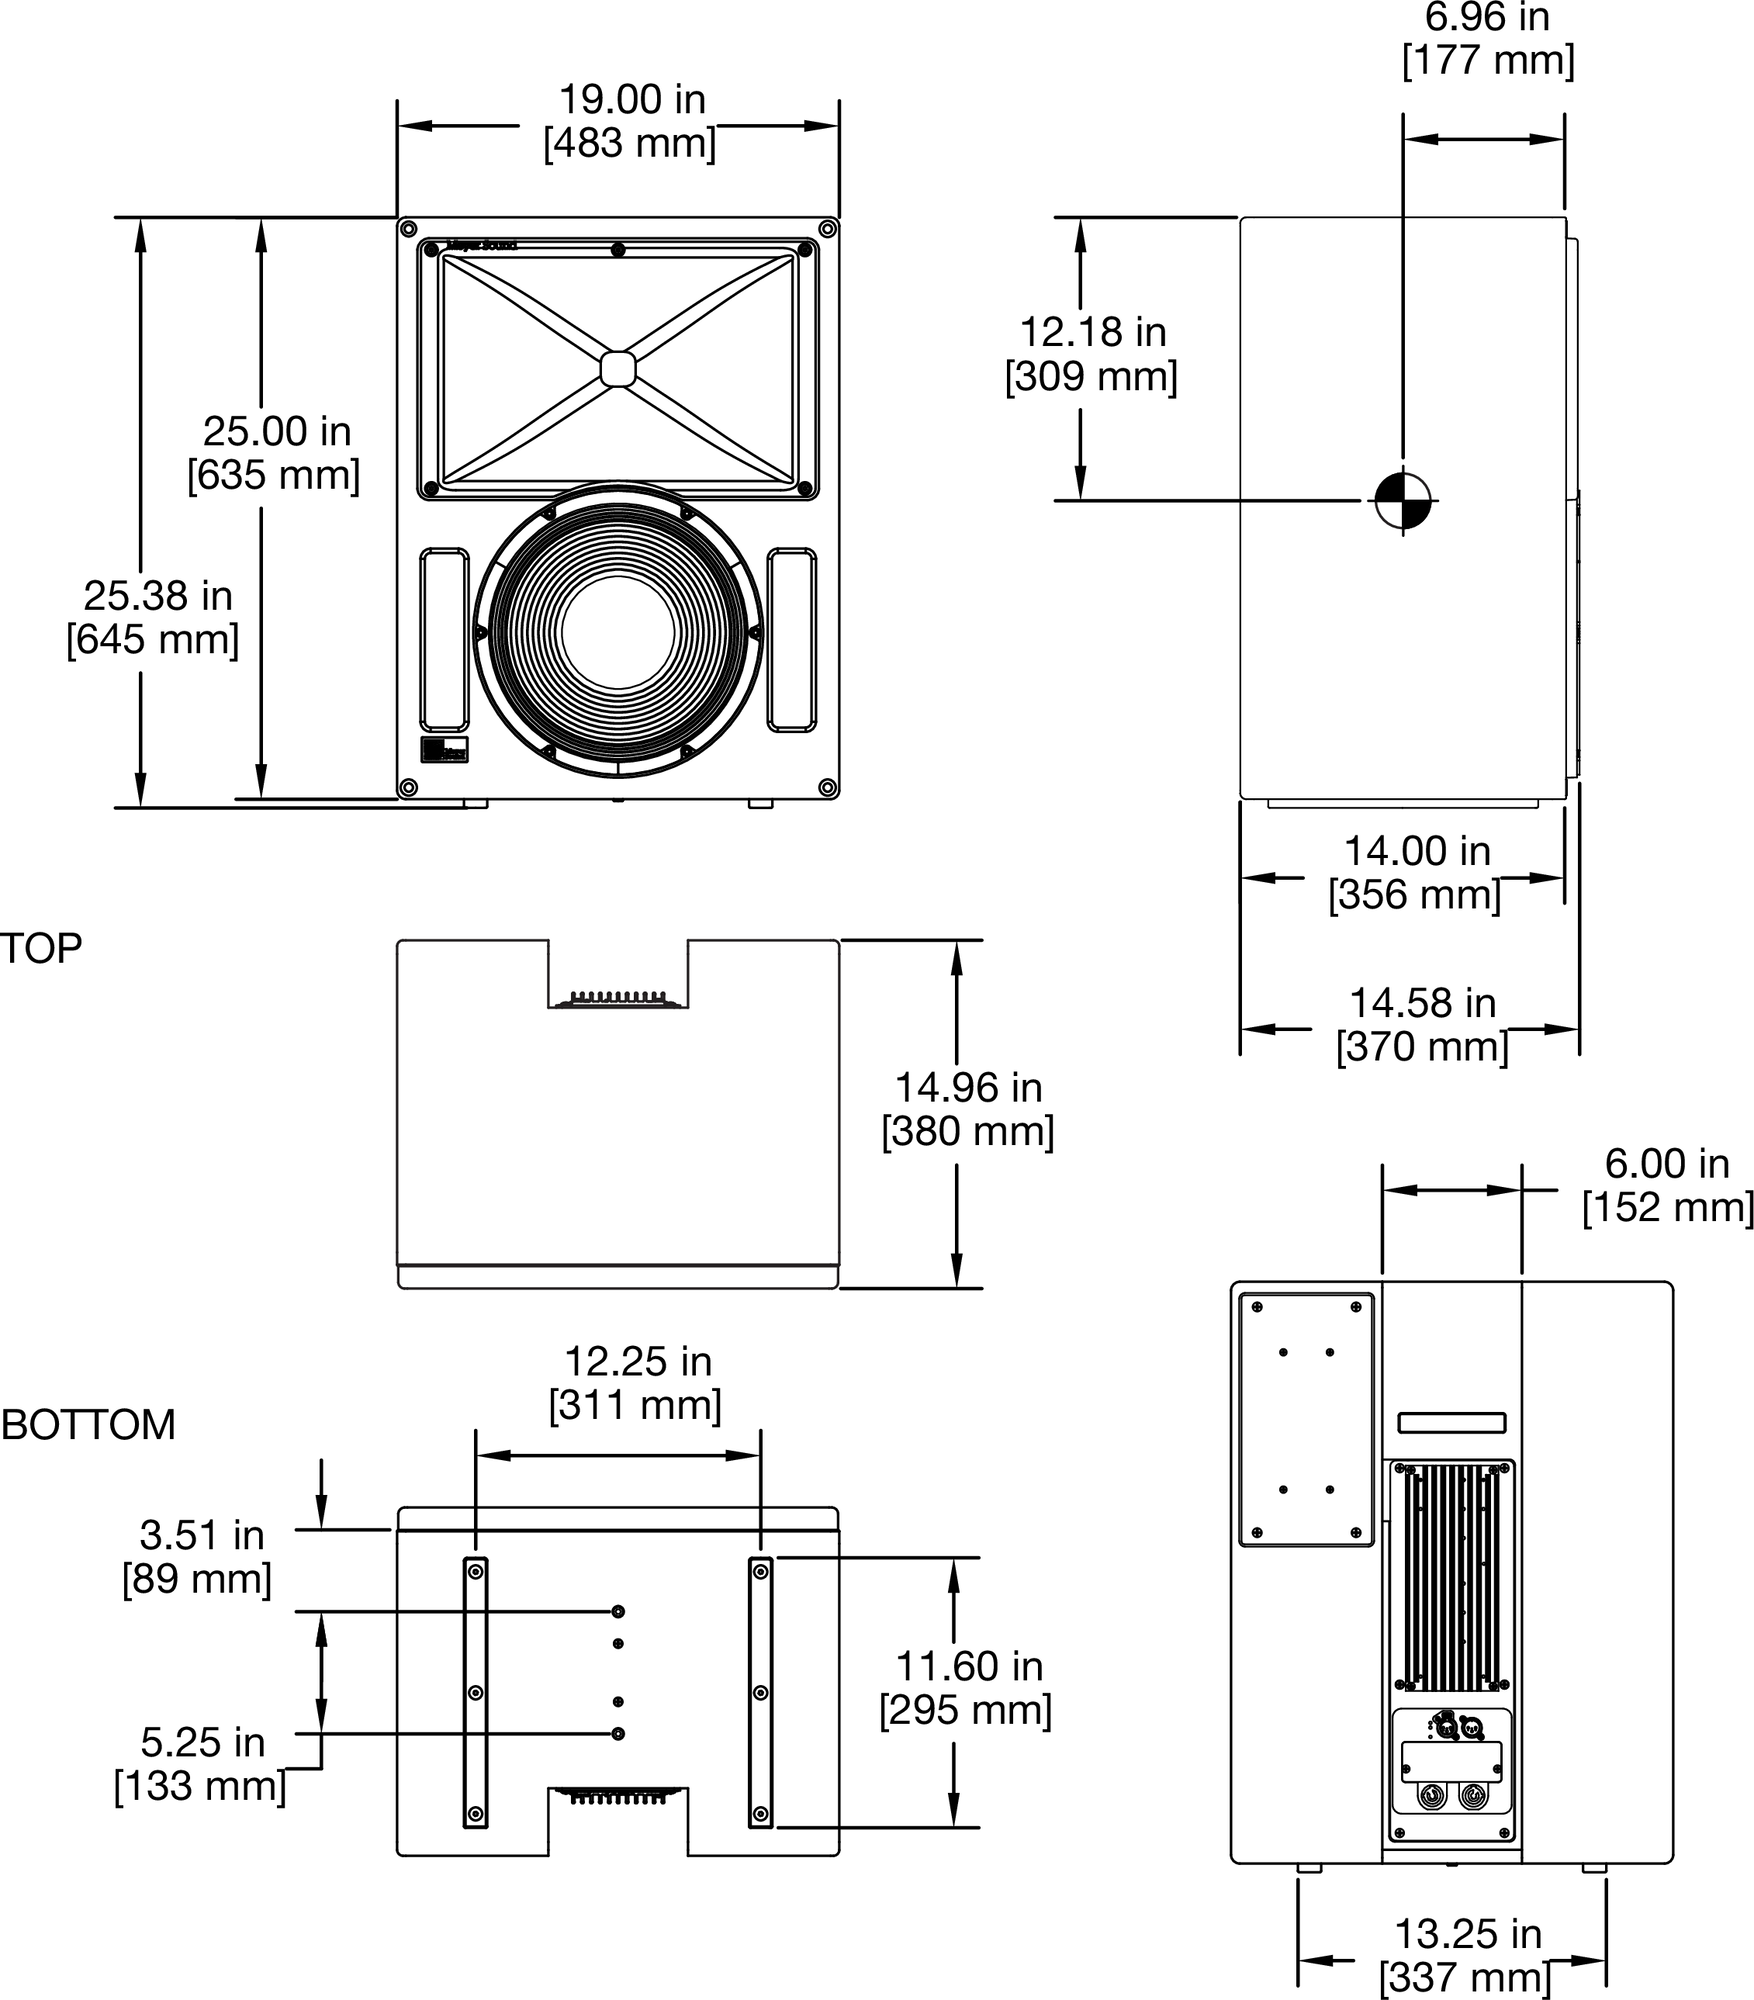
Acheron Designer Dimensions with MYA-Acheron Designer Cradle-style Yoke
Weight without MYA-Acheron Designer Yoke | 76.0lb (34.5kg) |
Weight with MYA-Acheron Designer Yoke | 104.5lb (47.4kg) |
MYA-Acheron Designer Self Weight | 28.5 lb (12.9 kg) |
MYA-Acheron Designer Yoke Load Rating | 7:1, 90 lb [40.8 kg] (1 Acheron Designer) |
