Operating Instructions — Ashby
Ceiling Loudspeakers with IntelligentDC
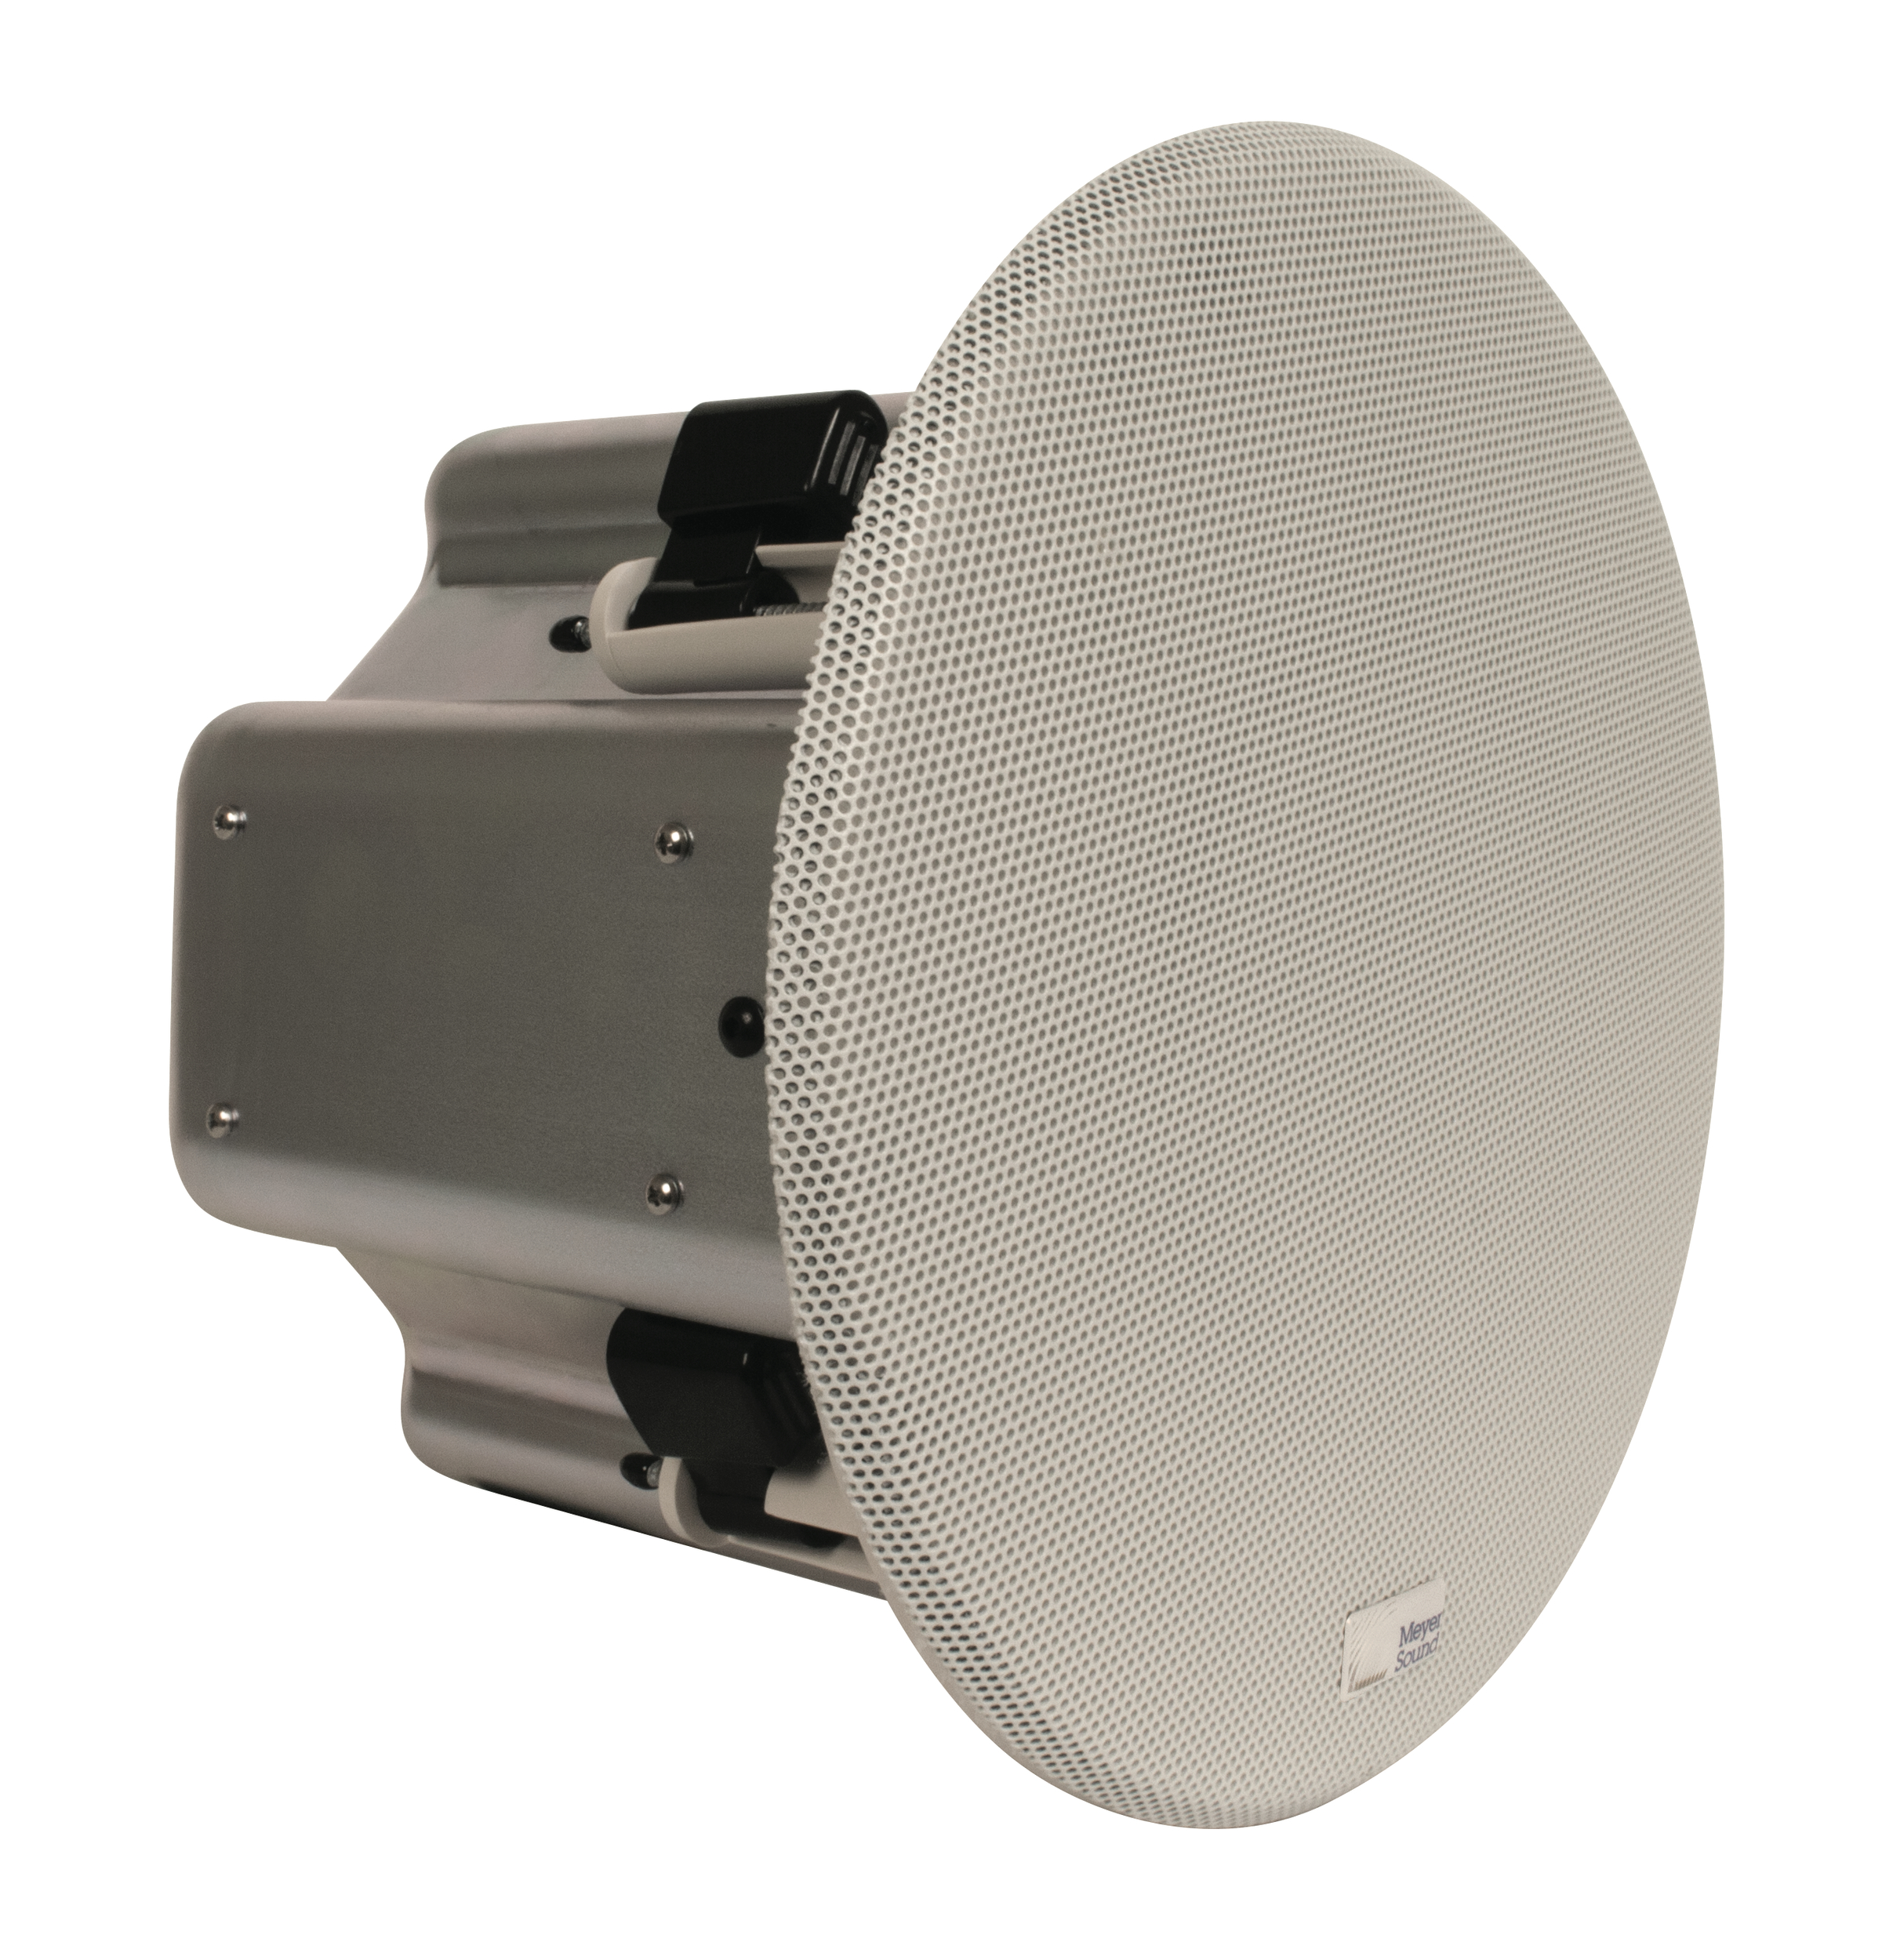
The Ashby self-powered, ceiling-mount, installation loudspeakers provide wide coverage and low distortion, even at high sound levels, for applications that require accurate music reproduction and intelligible voice. The Ashby loudspeakers offer sonic performance beyond other in-ceiling loudspeakers of comparable size.
The Ashby-5C and Ashby-8C loudspeakers are engineered to the same award-winning standards as all of Meyer Sound's IntelligentDC loudspeakers. With their onboard amplification and sophisticated signal processing, they exhibit the flat frequency and phase responses for which Meyer Sound loudspeakers are known.
The Ashby loudspeakers receive DC power and balanced audio from a single Phoenix™ 5-pin male connector. Using IntelligentDC to power the units from an external source has several advantages:
Eliminates the need to use conduit (Class 2 wiring).
Allows longer, lighter-gauge cable runs.
Preserves the advantages of self-powered systems with even more flexible installation options.
Housed in integrated metal back-cans to meet commercial fire codes, the Ashby loudspeaker can be flush-mounted in the ceilings using a discrete low-profile grille that blends into any decor.
All Ashby drivers are designed and manufactured at Meyer Sound's factory in Berkeley, California. The Ashby 0.75-inch metal dome tweeter is concentrically mounted in an innovative configuration that maximizes the surface of the waveguides. Their incredibly smooth and consistent 100° coverage lets you use fewer loudspeakers to cover a larger area, which reduces system cost while maintaining the highest sound quality.
The Ashby-5C and Ashby-8C include 5-inch and 8-inch cone drivers, respectively. The Ashby-8C is ideally suited for applications that require a deeper low-end and higher SPL.
The Ashby loudspeakers require an external Meyer Sound MPS IntelligentDC Power Supply. These rack units distribute DC power and balanced audio to Ashby loudspeakers or other Meyer Sound IntelligentDC loudspeakers. Composite multi-conductor cables (e.g., Belden® 1502) can deliver both DC power and balanced audio. Some versions, such as the MPS-488HP, can also connect to Meyer Sound’s RMS remote monitoring system.
Ashby loudspeakers can be installed in a variety of ceiling environments using Meyer Sound accessories:
C-Ring with Bridge Kit: Used for suspended ceilings, the C-ring better distributes the clamping force of the loudspeaker's four mounting clamps while the bridges help support the weight of the loudspeaker and provide additional safety in case the tile breaks. In addition, the C-ring can be used independently on brittle ceiling surfaces.
New Construction Bracket: This bracket can be fastened to the ceiling and acts as a template for ceiling cutout, ensuring a neat installation.
Ashby Pendant: Allows Ashby loudspeakers to hang from ceilings where a flush mount is not practical. These elegant pendant enclosures utilize a minimalistic design typically used in pendant lighting to blend discreetly into the environment.
The equipment was also evaluated to the requirements of UL 2043 and is suitable for use in air handling spaces.
Ashby Power and Input Channel
The Ashby-5C and Ashby-8C loudspeakers require a Meyer Sound MPS IntelligentDC Power Supply to function properly. The MPS-488HP, for example, can power up to 24 Ashby-5C (3 per channel) or 16 Ashby-8C (2 per channel).
Ashby loudspeakers receive DC power (-, +) and balanced audio (+, -, shield) from a Phoenix 5-pin male input connector. The pins are clearly labeled on the Ashby Power and Input panel shown below.
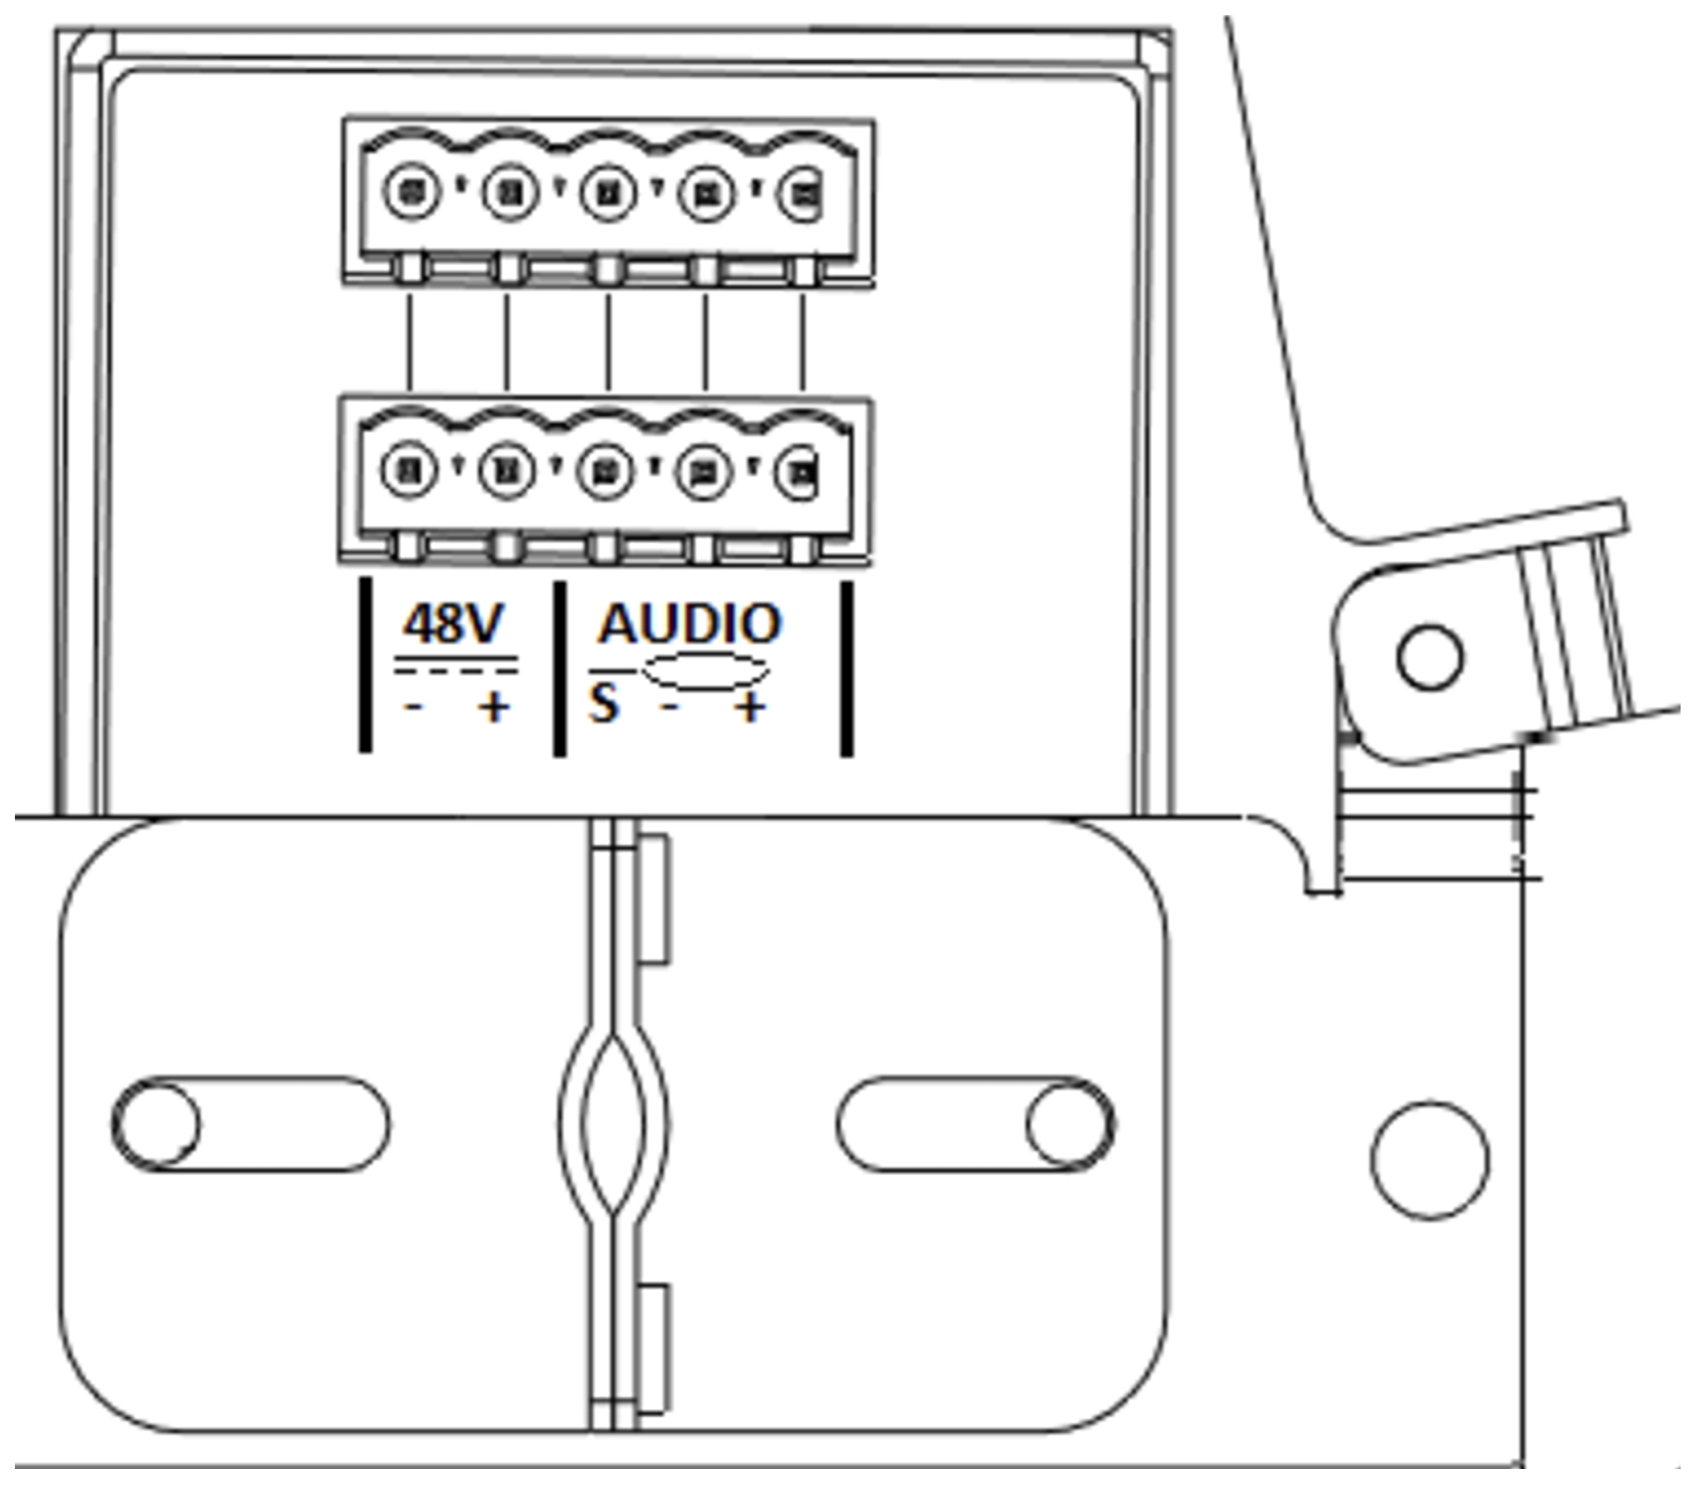
Ashby Power and Input panel
Looping
Ashby loudspeakers can be looped using the connectors on the Ashby Power and Input panel. The table below shows the maximum number of loudspeakers that can be looped from one channel of an MPS Power Supply to function properly and meet compliance requirements.
Model | Maximum Number |
|---|---|
Ashby-5C | 3 (2 looped) |
Ashby-8C | 2 (1 looped) |
Mixed | 1 Ashby 8C 1 Ashby 5C |
Loudspeaker Attenuator Knob
All Ashby loudspeakers powered by a single channel of an MPS Power Supply receive the same DC voltage and the same audio signal. To set loudspeakers to different levels, use the Loudspeaker Attenuation knob (on Ashby loudspeakers equipped with this feature).
The Loudspeaker Attenuator knob (shown below) is located on the front bezel. Possible values are: 1, 2, 3, 6, 10, and 20 dB.
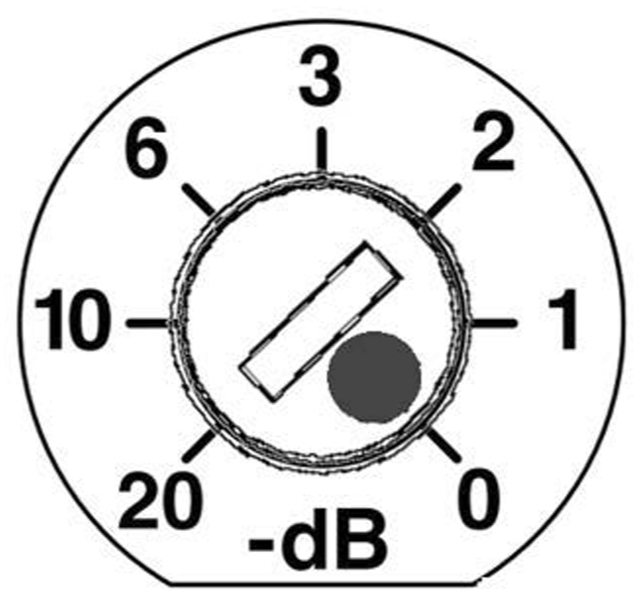
Ashby Power and Input panel
Cable Specification
Each loudspeaker ships with two Phoenix 5-pin, male cable-mount connectors for loudspeaker cable assembly (see Assembling Phoenix-to-Phoenix Loudspeaker Cables).
A single composite cable (e.g., Belden 1502) can route DC power and balanced audio to the Ashby loudspeakers (see Belden 1502 Cable).
It is extremely important to connect each pin correctly. Maintain proper polarity (- to -, + to +) or system performance will degrade and possibly damage can occur to the loudspeaker (see Assembling Phoenix-to-Phoenix Loudspeaker Cables).
Caution
Connect the 48 VDC directly (and only) from the external power supply to the 48 VDC pins on the loudspeaker connector.
Current Draw
DC current draw for Ashby loudspeakers is dynamic and fluctuates with changing operating levels. As the cable length increases between an Ashby loudspeaker and its external power supply, so does the resistance, which can eventually cause a voltage drop at the loudspeaker. This can compromise amplifier performance, peak SPL, and frequency response. The next section shows how to select the right cable gauge for each loudspeaker.
Cable Length and Gauge
The maximum cable length depends on the type and number of loudspeakers looped and the gauge of the cable. Table 1 shows the maximum cable length for Ashby loudspeakers using 18 AWG cable with only 1 dB of peak SPL loss.
Caution
The minimum cable gauge and type of wire must conform with national and regional electrical and building codes where loudspeakers are installed. The maximum number of loudspeakers, shown in the first table below, results in a maximum 3-second average power within Class 2 wiring limits in most countries.
Using 18 AWG wire, a single Ashby-5C loudspeaker can use up to 450 ft of cable (300 ft for Ashby-8C) from the MPS Power Supply and lose no more than 1 dB of peak SPL. Unlike 70 V line-distributed loudspeakers, Ashby loudspeakers do not suffer gain loss with the long 18 AWG cables.
Model | Number of loudspeakers | Maximum Cable Length (ft) |
|---|---|---|
Ashby-5C | 1 | 450 |
2 | 225 | |
3 | 150 | |
Ashby-8C | 1 | 300 |
2 | 150 |
The table below shows the maximum cable runs for a single channel of an MPS Power Supply powering up to 3 Ashby-5C or two Ashby-8C with different wire gauges. The last table below shows the same information for European cable gauges.
Maximum Cable Length (ft) | |||||
|---|---|---|---|---|---|
Model | Number of Loudspeakers | 12 AWG 0.0016 (Ω/ft) | 14 AWG 0.00253 (Ω/ft) | 16 AWG 0.00402 (Ω/ft) | 18AWG 0.00636 (Ω/ft) |
Ashby-5C | 1 | 1800 | 1125 | 700 | 450 |
2 | 900 | 550 | 350 | 225 | |
3 | 600 | 375 | 237 | 150 | |
Ashby-8C | 1 | 1200 | 750 | 475 | 300 |
2* | 600 | 375 | 237 | 150 | |
*Also applies to one Ashby-8C with one looped Ashby-5C
Note
Some high frequency loss can occur from long analog audio cables. For lengths greater than 500 ft (indicated by the gray background in the maximum cable length tables), Meyer Sound recommends using low capacitance shielded audio cable or AES Digital audio cable. Discuss expected high frequency loss with the cable manufacturer to determine acceptability.
Maximum Cable Length (m) | |||||
|---|---|---|---|---|---|
Model | Number of Loudspeakers | 2.5 mm2 0.0052 (Ω/m) | 1.5 mm2 0.01076 (Ω/m) | 1.0 mm2 0.02087 (Ω/m) | 0.75 mm2 0.03307 (Ω/m) |
Ashby-5C | 1 | 480 | 260 | 135 | 80 |
2 | 240 | 130 | 70 | 40 | |
3 | 160 | 87 | 45 | 27 | |
Ashby-8C | 1 | 320 | 175 | 90 | 55 |
2* | 160 | 87 | 45 | 27 | |
*Also applies to one Ashby-8C with one looped Ashby-5C
Note
Some high frequency loss can occur from long analog audio cables. For lengths greater than 150 m (indicated by the gray background in the maximum cable length tables), Meyer Sound recommends using low capacitance shielded audio cable or AES Digital audio cable. Discuss expected high frequency loss with the cable manufacturer to determine acceptability.
The maximum total cable resistance between one Ashby-5C loudspeaker and its external power supply is 6 Ω, and 4 Ω for one Ashby-8C.
When using the maximum number of loudspeakers per channel (3 Ashby-5C or 2 Ashby-8C), it should not exceed 2 Ω.
Calculating the Maximum Cable Length
The maximum cable length for an Ashby loudspeaker can be calculated using the formulas shown below. The Wire Resistance Per Foot (WRPF) is the resistance (in Ω) for one foot of individual wire of the chosen gauge. Enter the WRPF in the equations below to determine maximum cable length. The equations compensate for round trip length.
For 18 AWG, WRPF = 0.006385 Ω/ft
Ashby-5C: Maximum length (ft) = 3 Ω/ (WRPF x # of Ashby-5C)
Ashby-8C: Maximum length (ft) = 2 Ω/ (WRPF x # of Ashby-8C)
To calculate the maximum length in meters, substitute the
Wire Resistance per Meter for the selected wire gauge.
Belden 1502 Cable
The Belden 1502 multiconductor cable is an effective, convenient way to connect an Ashby loudspeaker system. DC power and balanced audio use dedicated conductors in a single cable jacket. Table 4 shows the wiring conventions.
The thicker red and black wires (18 AWG) are for DC power.
The blue, white, and shield drain wires for audio.

Belden 1502 multiconductor cable
Wire | Signal | Gauge (AWG) |
|---|---|---|
Black | DC power (–) | 18 |
Red | DC power (+) | 18 |
Shield drain | Audio shield | 24 |
Blue | Audio signal (–) | 22 |
White | Audio signal (+) | 22 |
Using Separate Cables for DC Power and Audio
If your installation does not allow using Belden 1502 multiconductor cable, or requires cable runs longer than 150 ft, use separate cables for DC power and balanced audio (see Cable Length and Gauge). Use a high-quality, balanced cable for audio. Attach the separate cables to the Phoenix connector as shown in the figure below.
Note the orientation of the connector while assembling the cable. This view shows the screws facing you.
Caution
It is very important to verify and measure the cabling before applying power.

Separate Cables for DC Power and Balanced Audio
On/Status LED
The LED on the Ashby connector panel is primarily intended for use at the factory and before installation, because it cannot be seen when a loudspeaker is installed.
Caution
Avoid “hot plugging” by inserting the Phoenix connector into the Ashby loudspeaker with live 48 V present (MPS Power Supply powered ON).
The MPS Power Supply can supply basic information about Voltage and Load Current on its front panel LEDs. The Voltage and Load Current LEDs verify whether each channel output has voltage and whether the connected loudspeakers are receiving DC power and audio.
For more information, refer to the specific MPS Power Supply Operating Instructions for your power supply model.
If you require more information about the status of the loudspeakers connected to the MPS Power Supply, Meyer Sound recommends using RMS (Remote Monitoring System), available on some MPS Power Supply models.
The On/Status LED on the Ashby connector panel indicates the loudspeaker's operational status with three colors:
Normal: Green
Limiting: Yellow
Clipping: Red
Normal
When powering on the Ashby loudspeaker, the On/Status
LED indicates the following startup events:
Multiple colors flash during its power-on sequence.
When it turns solid green, the power-on sequence has completed and the loudspeaker is ready.
Limiting
The On/Status LED turns yellow to indicate limiting. When engaged, the limiter protects the loudspeaker's drivers and prevents signal peaks from causing excessive amplifier distortion, thereby preserving headroom and maintaining a smooth frequency response at high levels.
When source levels return to normal, below the limiter threshold, the LED turns green and limiting ceases.
The Ashby performs within its acoustical specifications when the LED is green, or when limiting is not continuous.
If limiting activity is continuous, the loudspeaker is near its operating limits where:
Increasing the input level has no effect.
Distortion increases due to clipping and nonlinear driver operation.
The drivers are subjected to excessive heat and excursion, which compromises their life span and may eventually damage them over time.
Caution
The On/Status LED turns yellow when the loudspeaker's signal rises about 2 dB above the limiting threshold, indicating that a safe, optimum level has been exceeded.
Clipping
The On/Status LED lights red when the loudspeaker's input stage clips, causing the amplifier to overload. Reduce the source level to avoid distortion and overloading the amplifier.
Operating Temperature and Amplifier Cooling
Ashby loudspeakers rely solely on natural convection to cool their enclosures. Efficient amplifier design keeps temperatures low even when operated in high ambient temperatures and driven continuously at high output levels.
Connecting and Powering Ashby Loudspeakers
Power off the MPS Power Supply.
Use balanced XLR cables to connect audio sources from a mixer or audio processor to the MPS channel inputs.
Use the MPS Link switches to route channel inputs to the desired channel outputs.
See the MPS Operating Instructions for your specific model for information about the MPS Link switches.
Connect Ashby loudspeakers to the MPS channel outputs.
Caution
Do not connect more than three Ashby-5C or two Ashby-8C on one channel of an MPS Power Supply.
Power on the MPS Power Supply and monitor the LEDs on the front panel to verify connections.
Enable output from the audio sources connected to the MPS Power Supply.
Tip
Enable output from the audio sources connected to the MPS Power Supply.
RMS Example: Configuring the MPS-488HP in the Control Software
Power on the MPS-488HP and RMServer(s).
Connect Compass and RMServer to the same local area network (LAN).
In Compass, click the RMServer > Inventory tab.
In the Device list, right-click the MPS-488HP powering the Ashby loudspeakers and choose Edit Loudspeaker Inventory.
In the Edit Loudspeaker Inventory dialog box, click in the Product column and select the Ashby loudspeaker model connected to each MPS-488HP channel output.
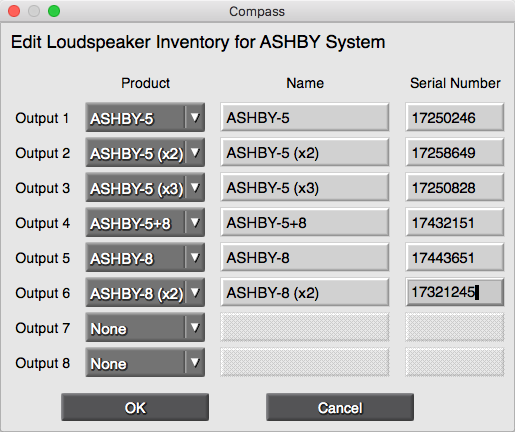
Edit Loudspeaker Inventory dialog in Compass
Enter a name and the number of loudspeakers looped on each channel.
Click OK to save and upload the MPS-488HP loud- speaker inventory.
Once the MPS-488HP is added to an RMS page, the device container can display channel labels with simple device status or a full meter bar display along with a detailed text view showing voltage and current draw for the connected Ashby loudspeakers.
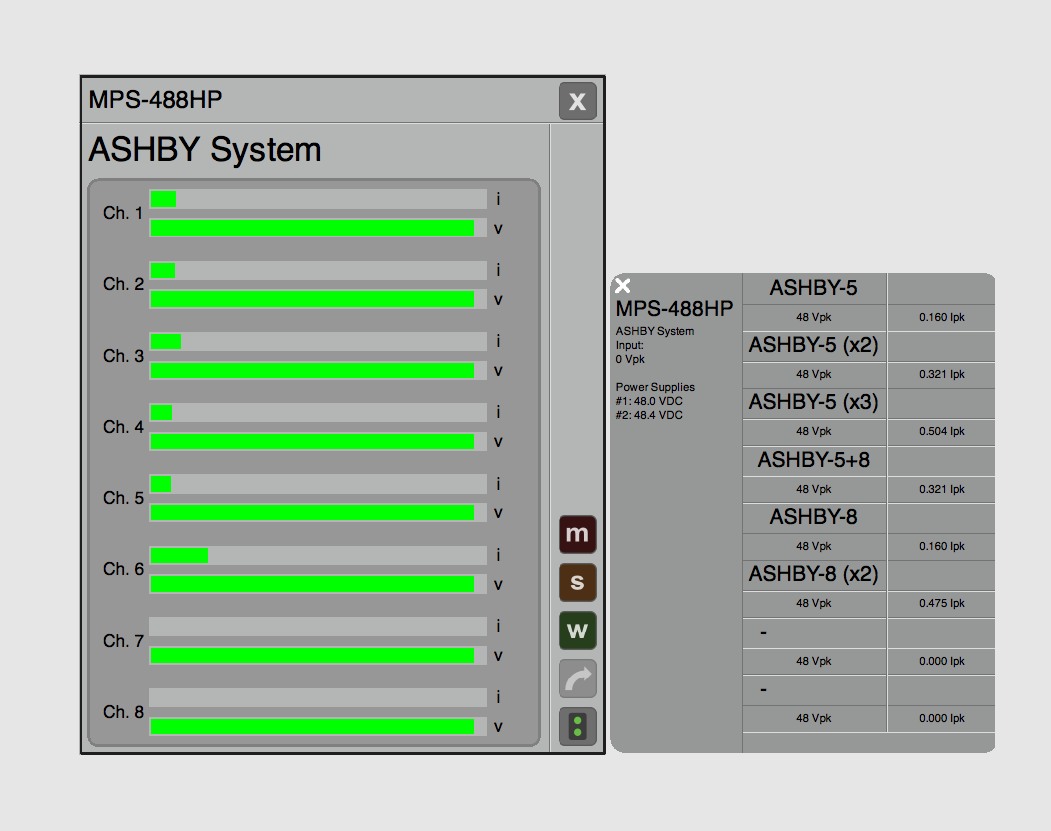
Voltage and current draw for connected loudspeakers in Compass
Caution
Disconnect the mains plug or power off the MPS-488HP before disconnecting its power cord.
Installing Ashby Loudspeakers
This section provides procedures to install Ashby loudspeakers into ceilings, pendants, and suspended ceilings.
Meyer Sound Accessories
Meyer Sound provides several accessories to install Ashby loudspeakers.
Tile C-Ring and Bridge Kit
The Tile C-Ring distributes the clamping force of the loudspeaker mounting clamps and is highly recommended on brittle ceiling surfaces. It can be used with or without the bridges (see below).
Use the following part numbers to order Tile C-Ring kits:
Ashby-8C Tile C-Ring: PN 40.260.130.01
Ashby-5C Tile C-Ring: PN 40.261.130.01
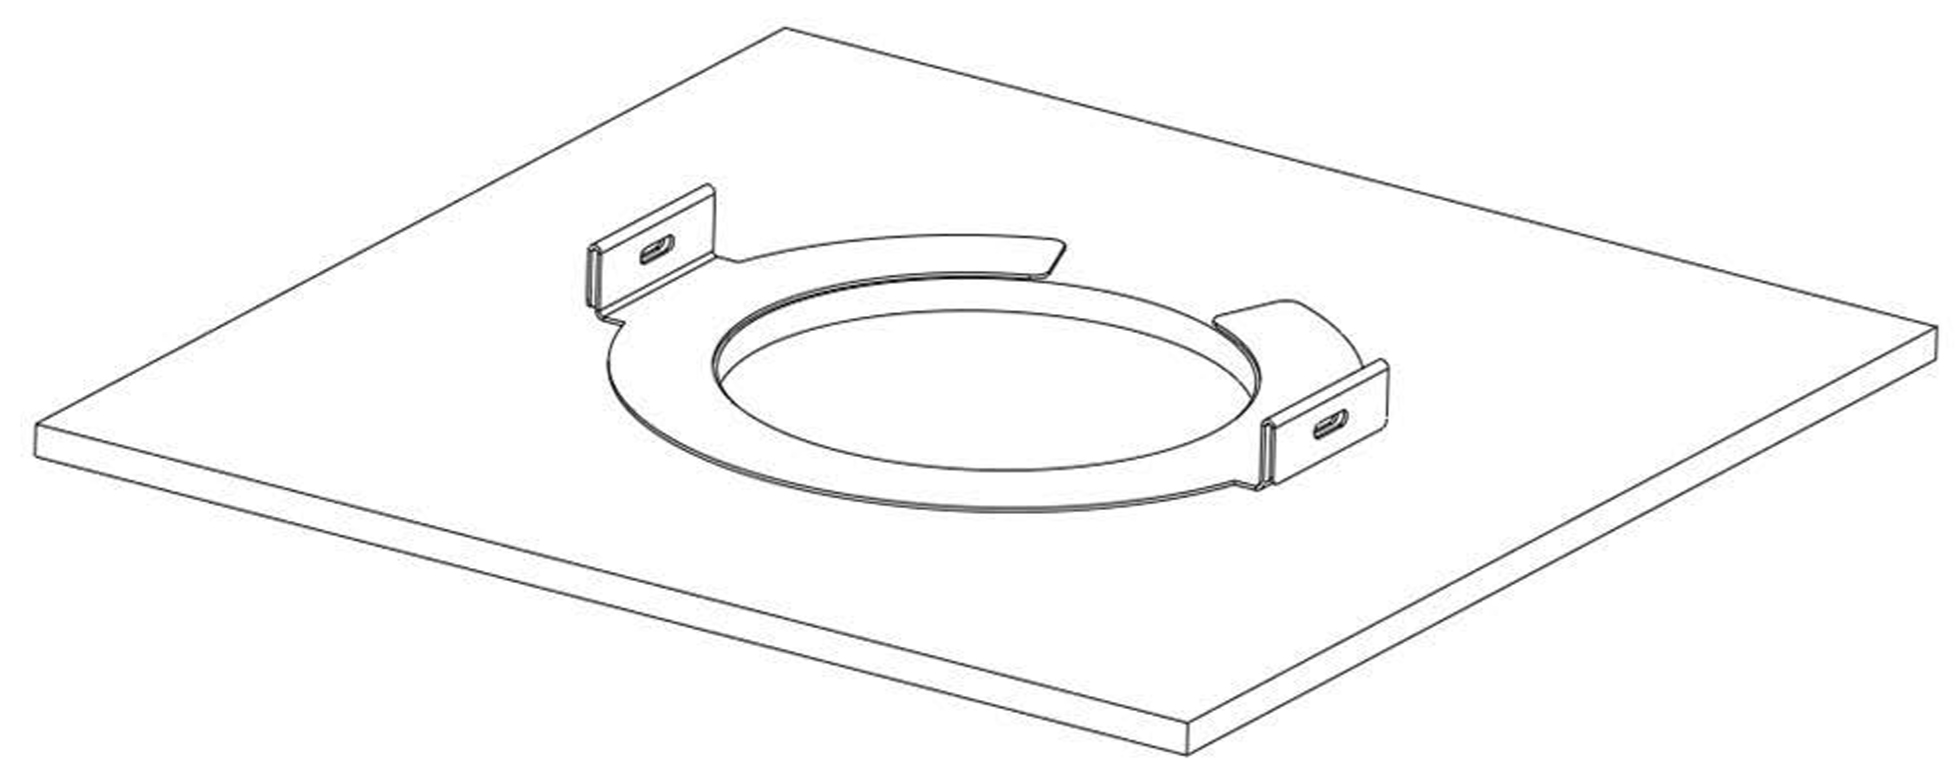
The C-Ring with Bridge Kit
The Tile C-Ring with Bridge Kit is used for suspended ceilings. The C-ring distributes the clamping force of the loudspeaker’s four mounting clamps and the bridges support and distribute the weight of the loudspeaker.
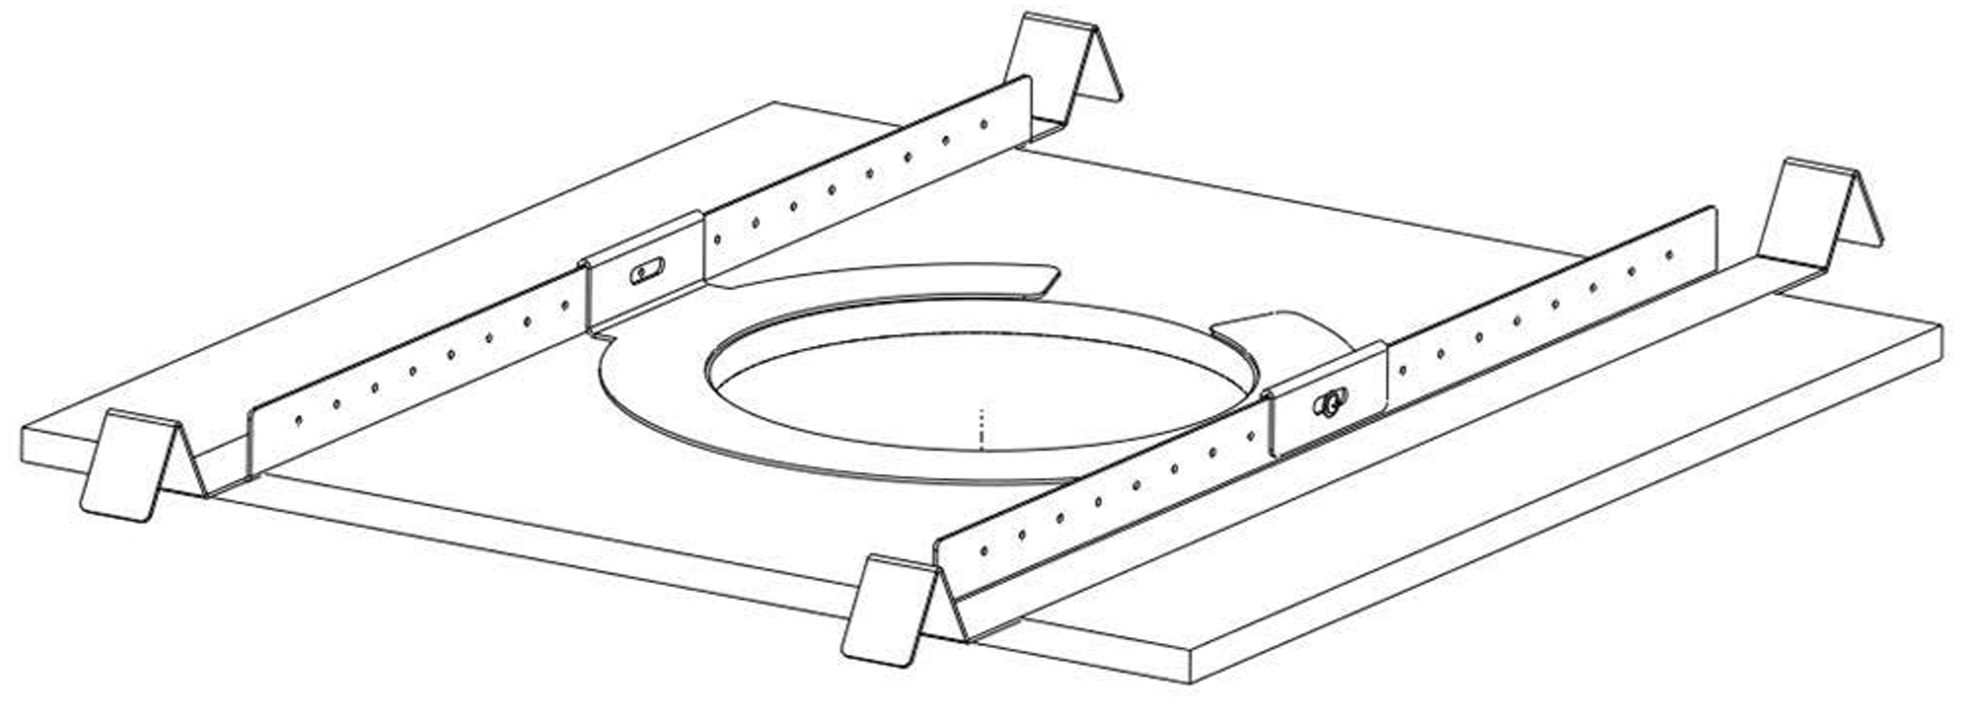
The C-Ring with Bridge Kit
Use the following part numbers to order C-Ring with Bridge Kits:
Ashby-8C Tile C-Ring with Bridge Kit: PN 40.260.131.01
Ashby-5C Tile C-Ring with Bridge Kit: PN 40.261.131.01
New Construction Bracket
This bracket can be fastened to the ceiling and acts as a template for ceiling cutout, ensuring a neat installation. The bracket fastens to the ceiling using #10 screws.
Use the following part numbers to order new construction bracket kits:
Ashby-8C New Construction Bracket: PN 40.260.140.01
Ashby-5C New Construction Bracket: PN 40.261.140.01
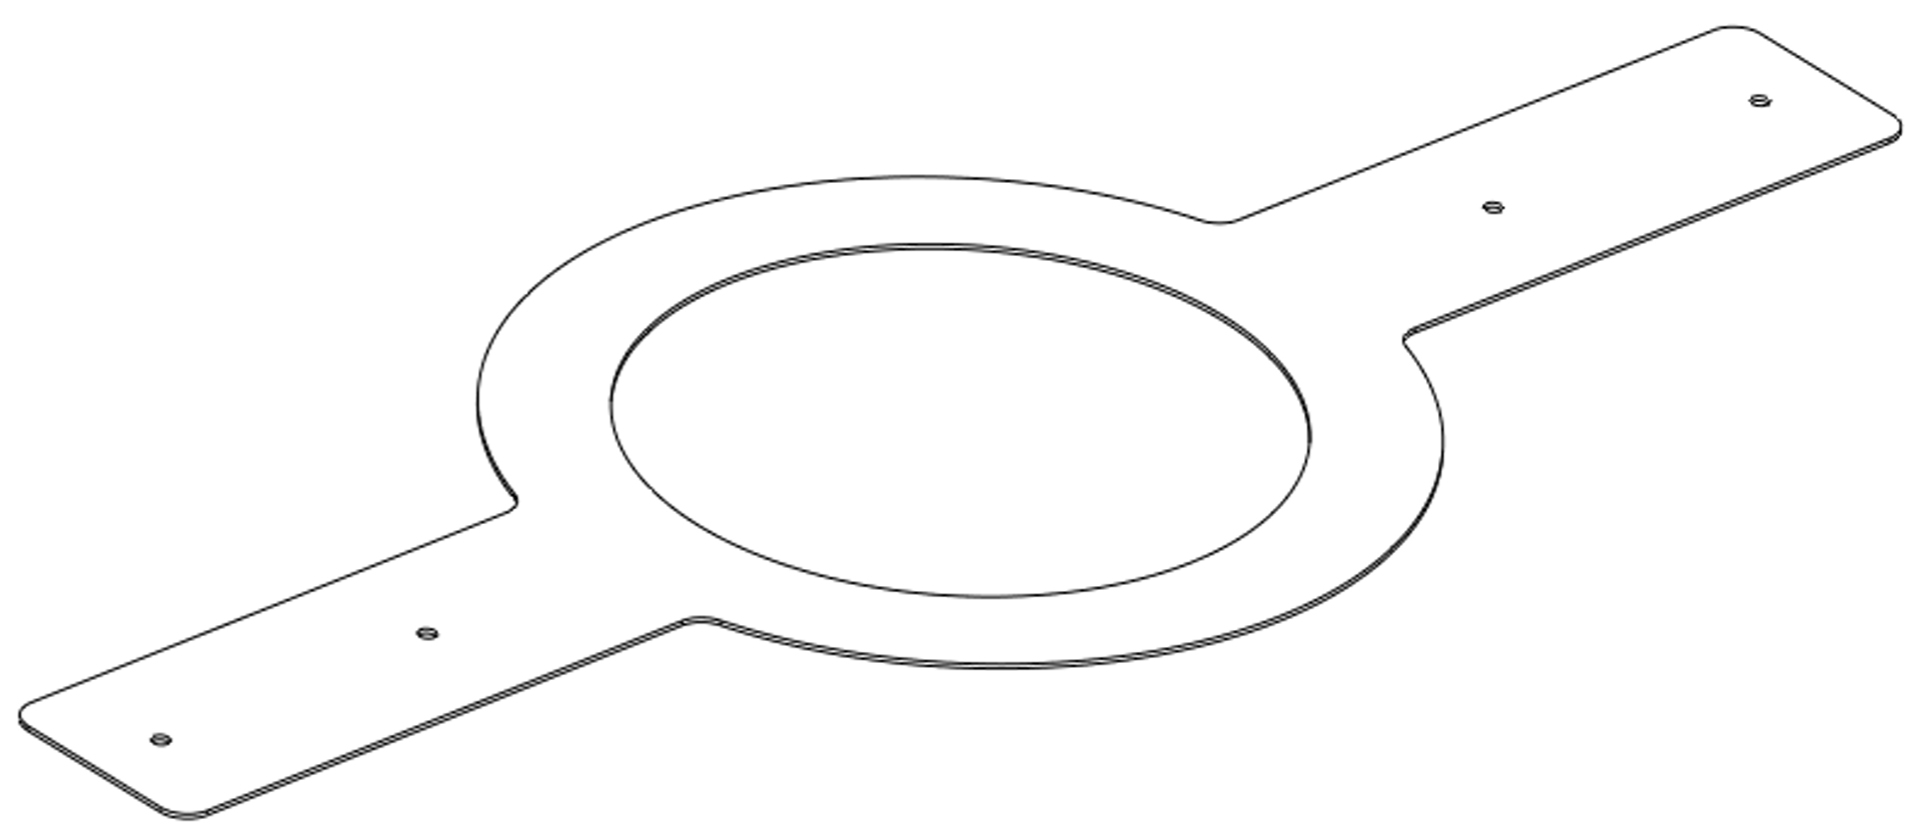
New construction bracket
Meyer Sound Pendant
The Meyer Sound pendant allows Ashby loudspeakers to hang from ceilings where a flush mount is not practical. These elegant pendant enclosures utilize a minimalistic design typically used in pendant lighting to blend discreetly into the environment.
The pendant holds an Ashby loudspeaker inside without requiring extra hardware using the same grille as a ceiling-mounted Ashby to maintain a consistent appearance.
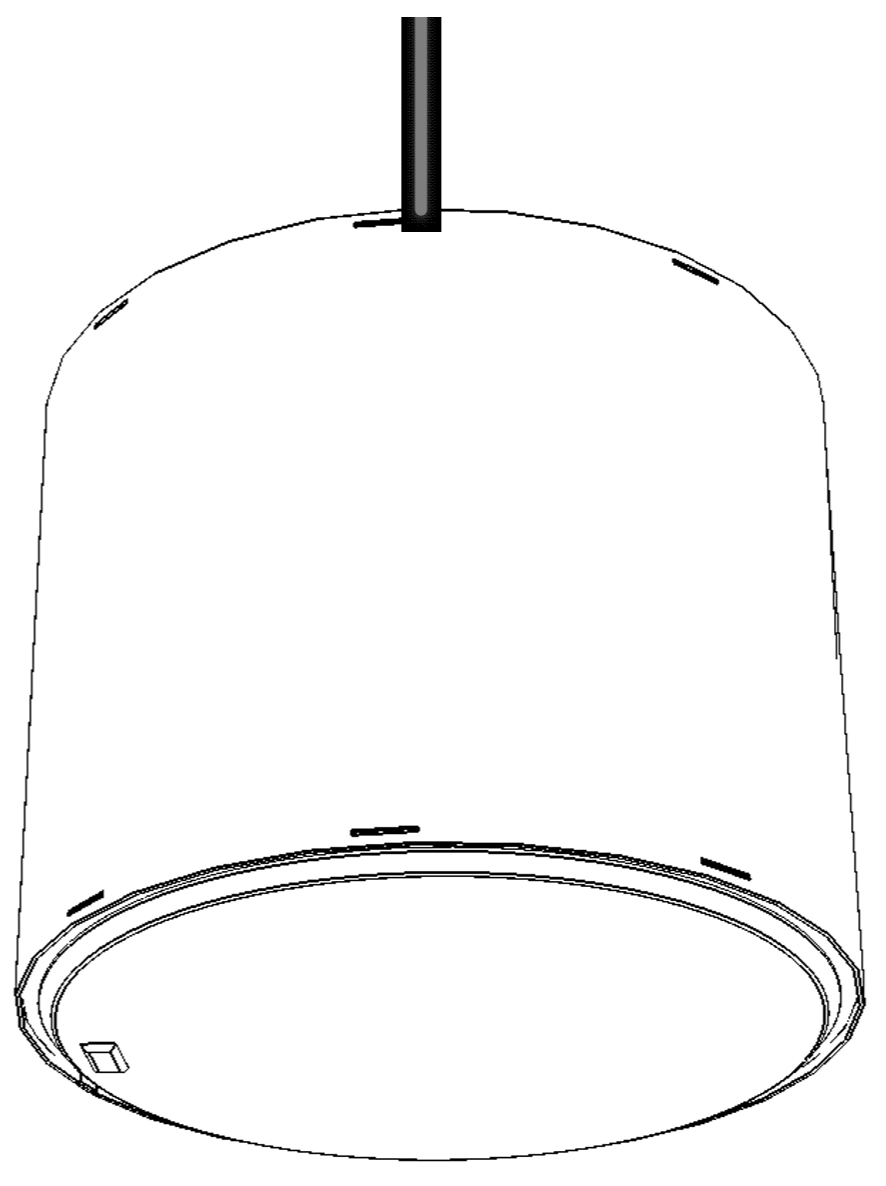
Ashby Pendant
The pendant includes a top cover to hide the back of the loudspeaker and wiring connectors making them perfect for installations where they may be viewed from above. The top cover includes:
Holes with protection grommets for cables;
A center hole for a threaded rod;
Three tabs for steel wires (not included) for a single hang point. The tabs must be bent up before use.
The Ashby-5C and Ashby-8C have separate pendant models.
Use the following part numbers to order Ashby pendant kits:
Ashby-8C Pendant: PN 40.260.030.01
Ashby-5C Pendant: PN 40.261.030.01
Ashby Wiring
The loudspeaker provides a strain relief fitting for bare wires, 1/2-in flexible metal conduit, or 1/2-in 14 NPSM threaded conduit adapters.
Prepare the wires.
For bare wires or conduit without a threaded conduit adapter, open the wiring cover, loosen the L-bracket screws, and remove the clamping screws.
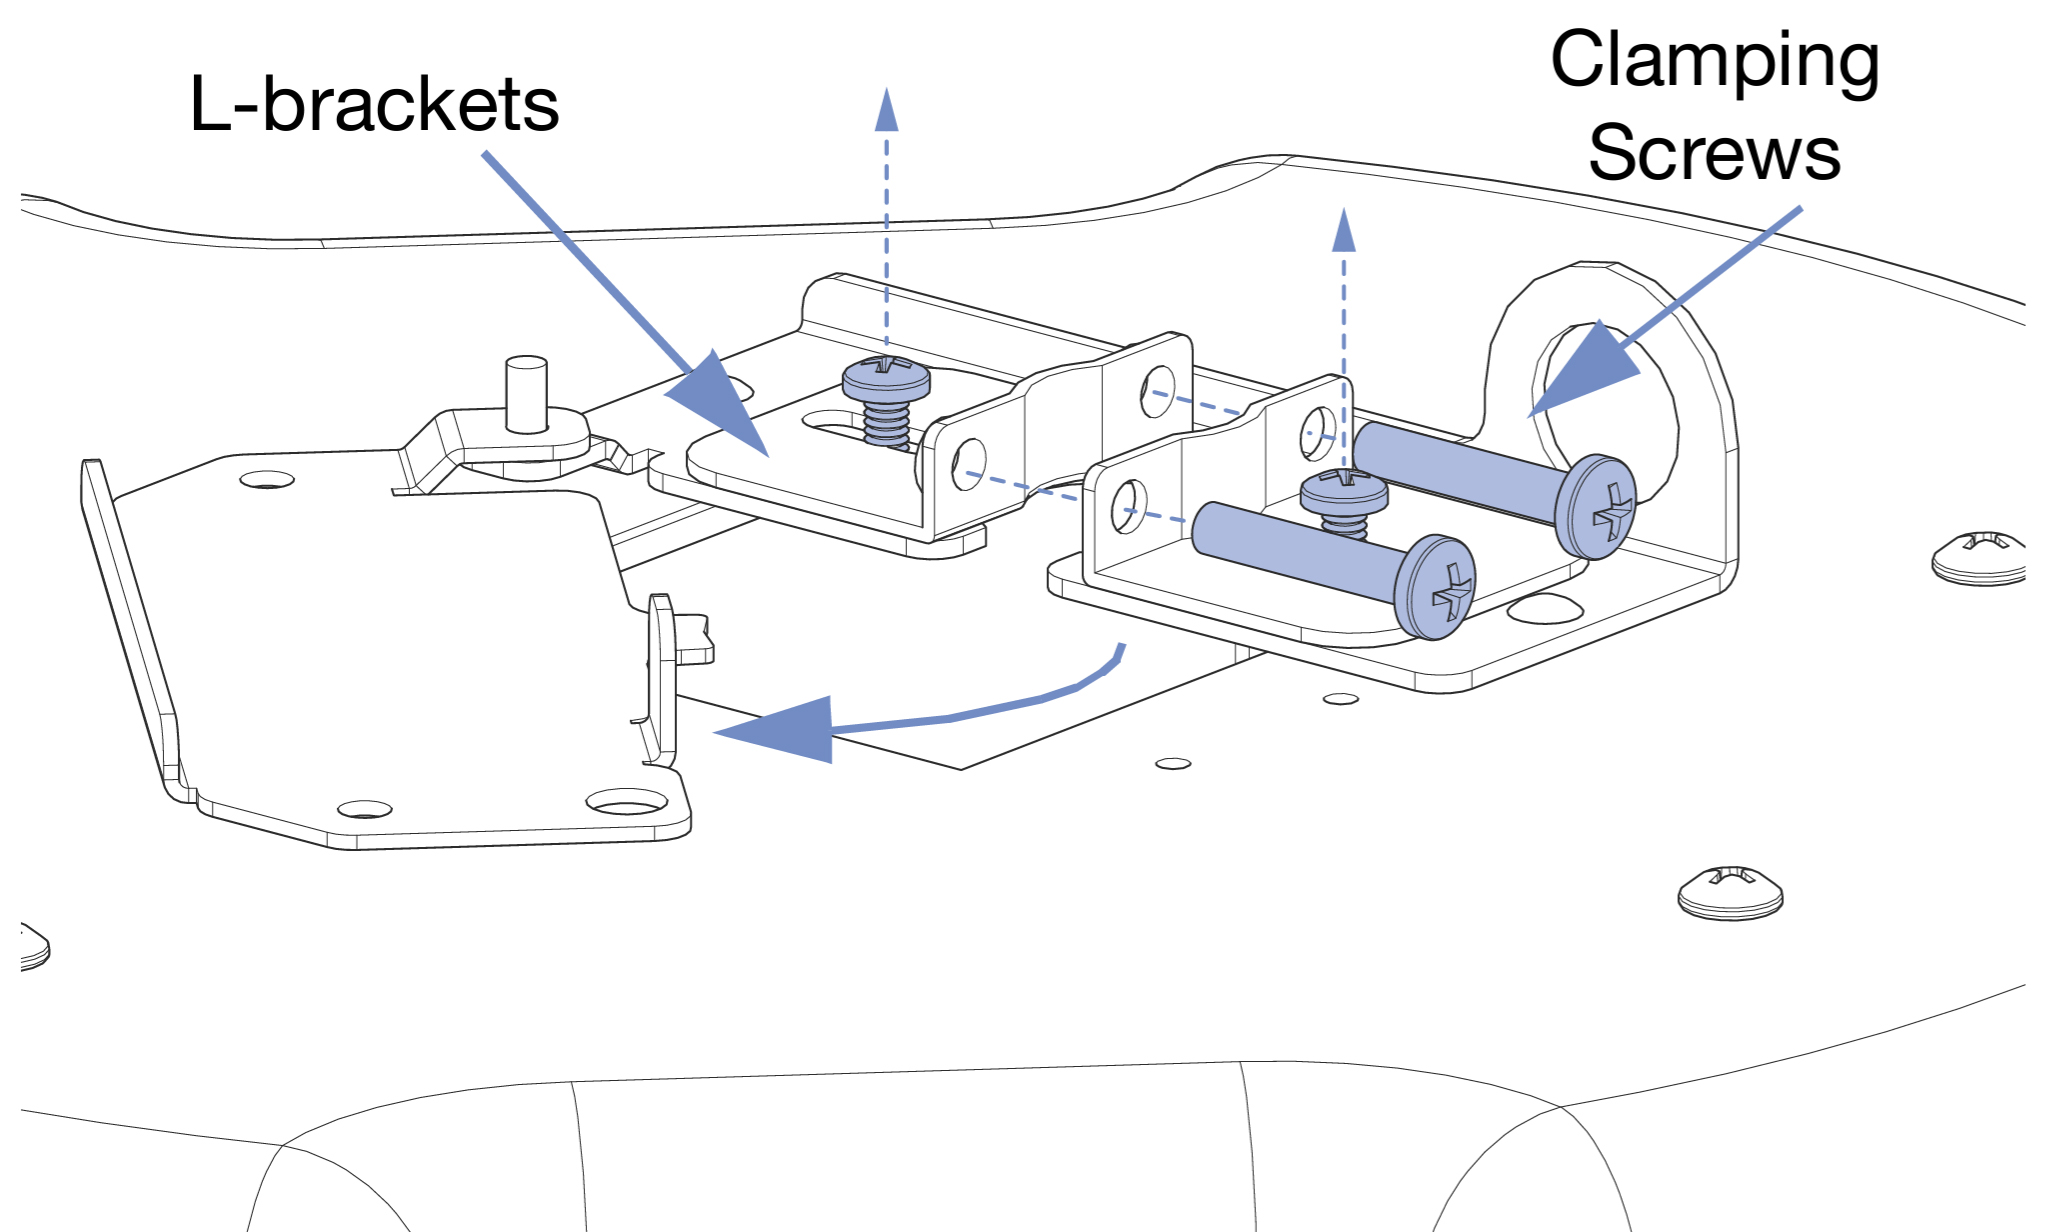
Close and latch the wiring cover, and clamp the wire or conduit with the L-brackets. Tighten the L-bracket and clamping screws.
Insert the cable or 1/2-in flexible metal conduit into the input or looping connector and feed the wires through the L-bracket opening.
Close and latch the wiring cover, and clamp the wire or conduit with the L-brackets. Tighten the L-bracket and clamping screws.
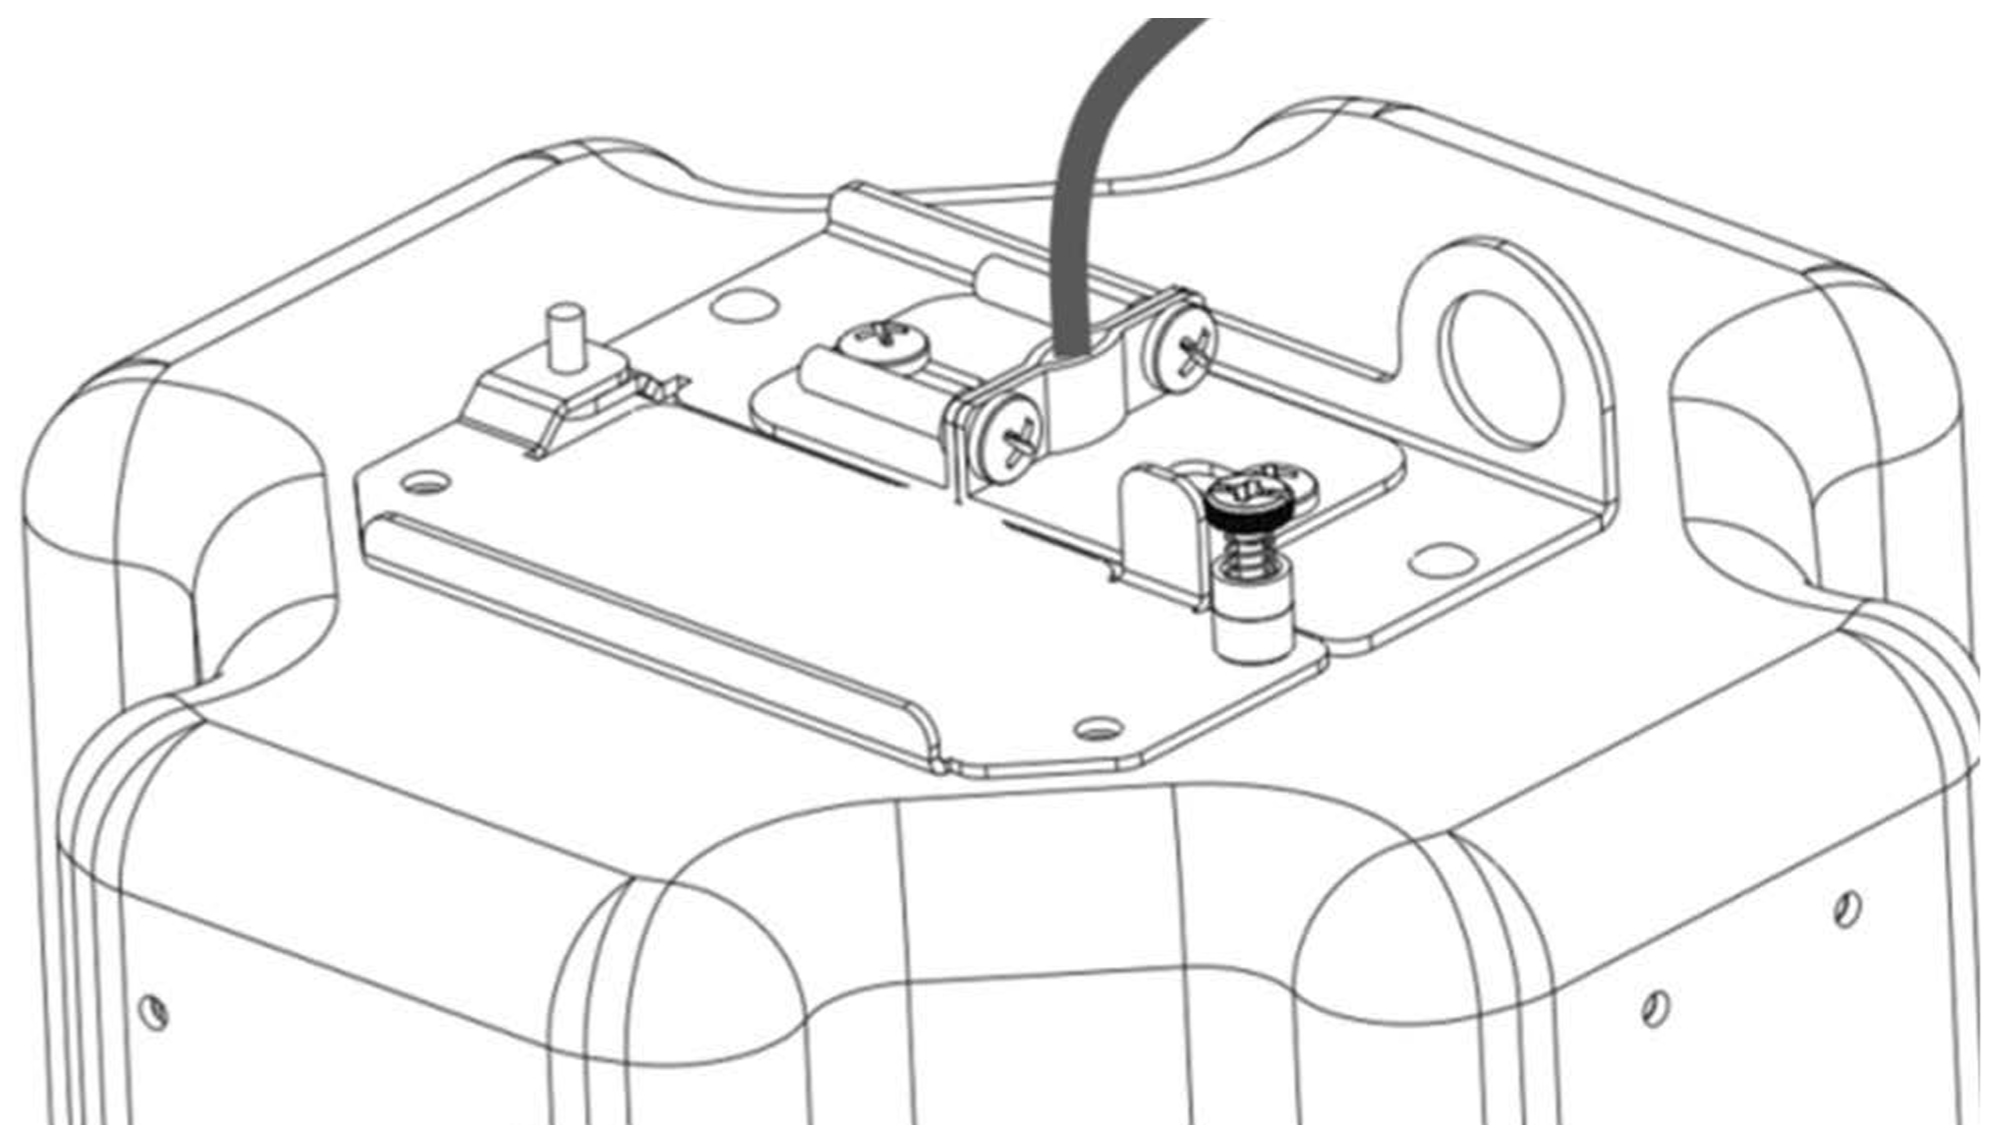
Clamping the wire
Open the wiring cover and completely remove the L bracket screws, L brackets, and clamping screws.
Install the threaded adapter, insert the conduit, and connect the wires.
Close and latch the wiring cover.
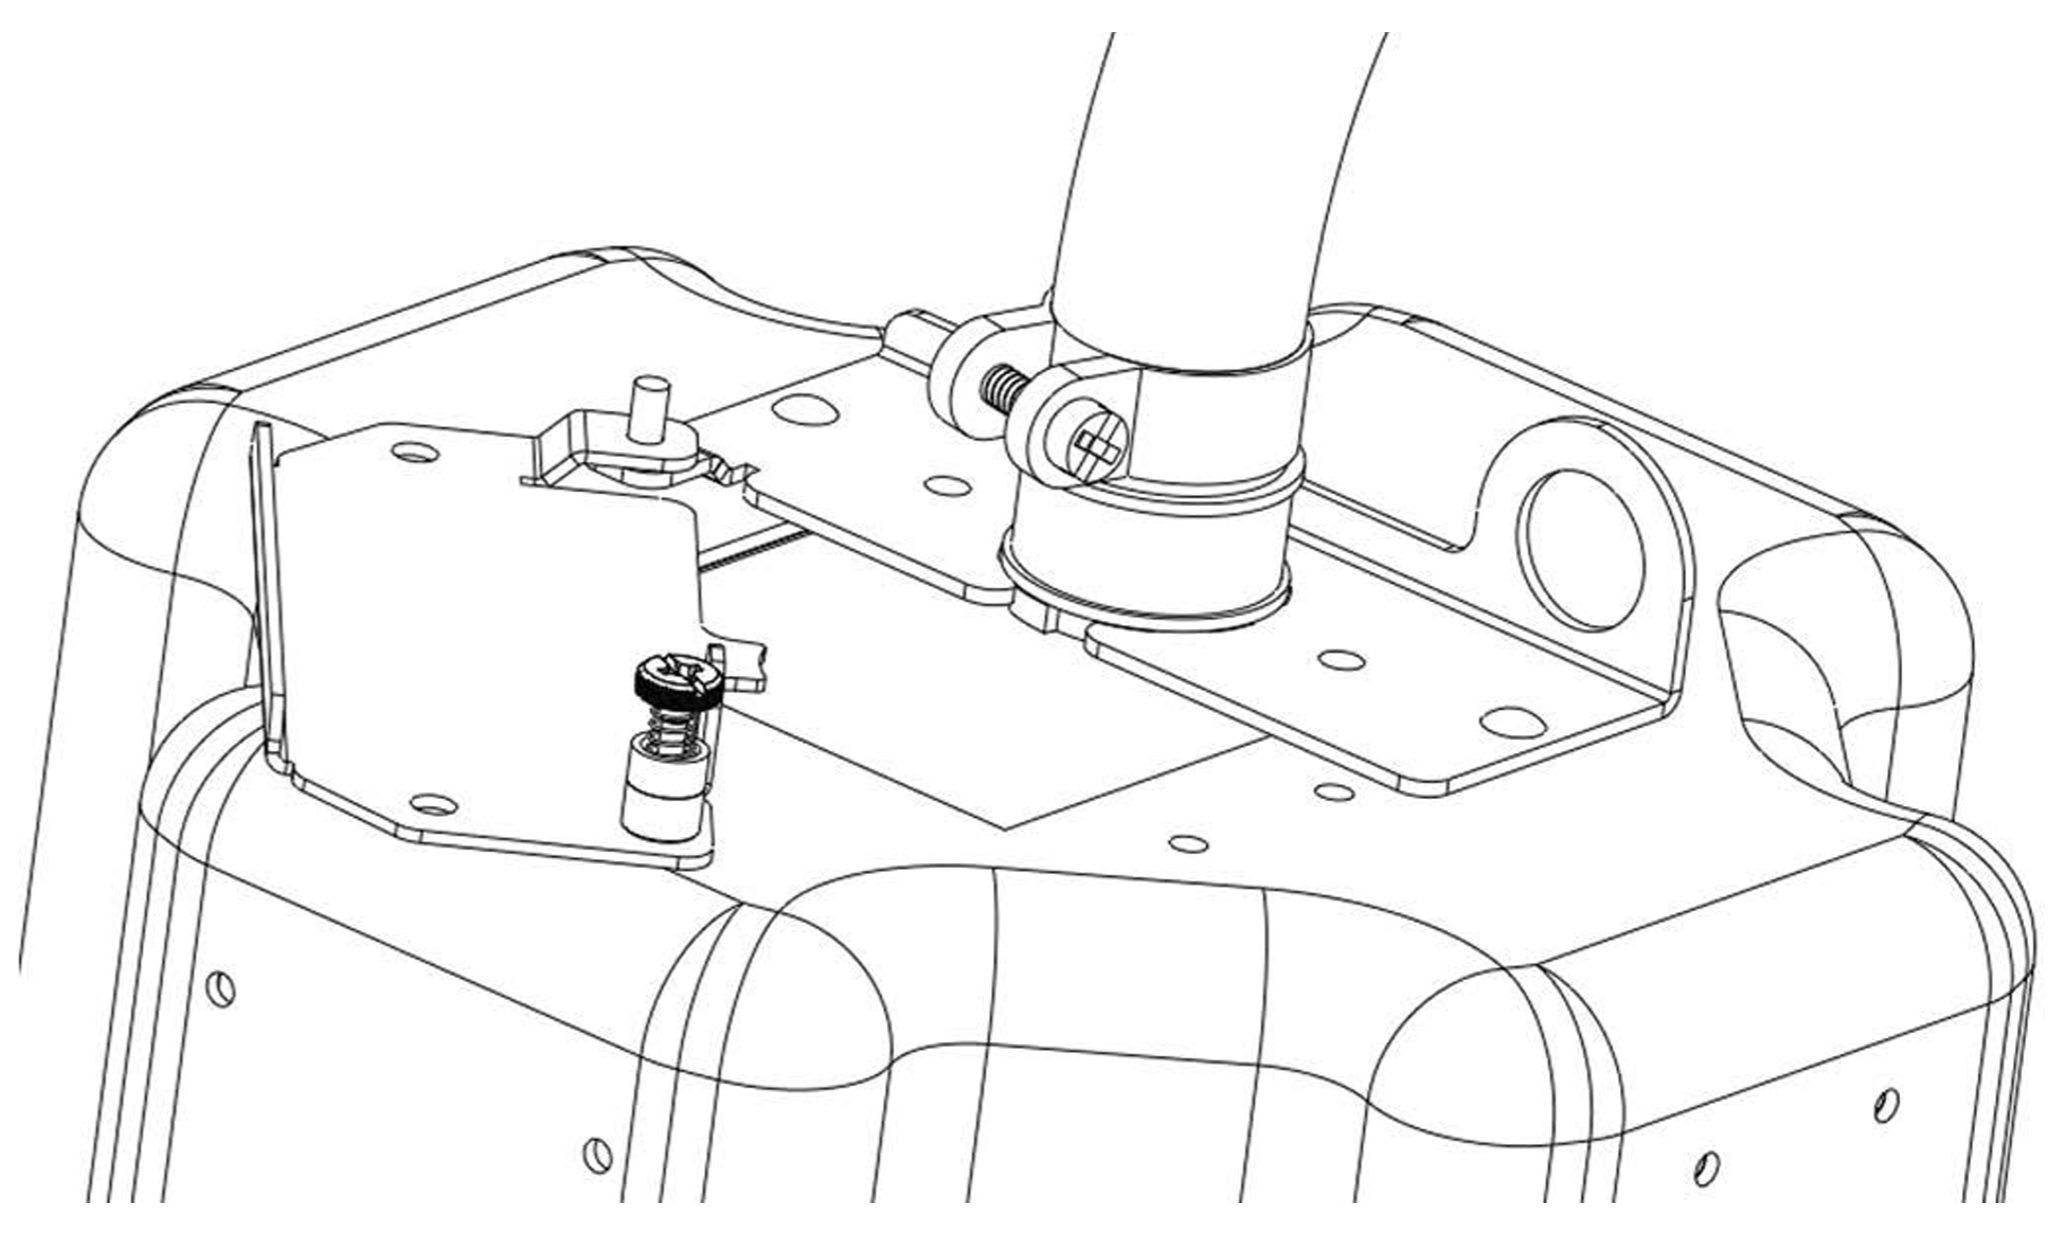
Clamping a conduit
Installing into a Standard Ceiling
Locate the desired position of the loudspeaker and mark its center on the ceiling.
Use the template provided with the loudspeaker to align the hole in the center of the template with the mark.
Trace the perimeter of the template with a pencil.
Cut along the traced circle on the ceiling and remove the cutout disc.
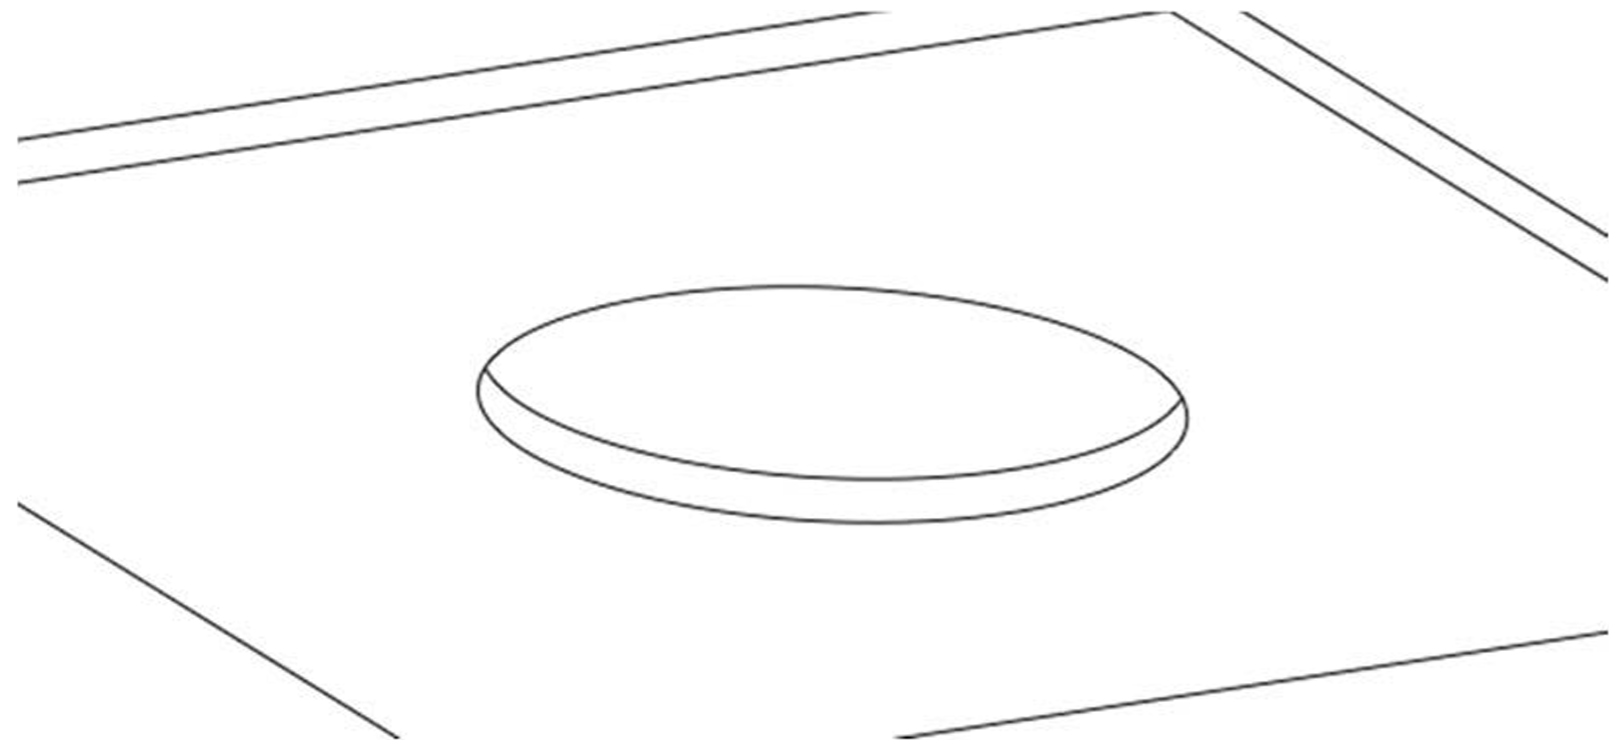
Cutting a hole in the ceiling with the template provided
Install the loudspeaker into the ceiling and hold flush to the ceiling.
Make sure the loudspeaker's clamps are flush with the loudspeaker to allow it to pass freely into the ceiling.
Note
if desired or required, a safety lanyard can be attached to the loudspeaker with a carabiner before inserting the loudspeaker into the ceiling (see below).
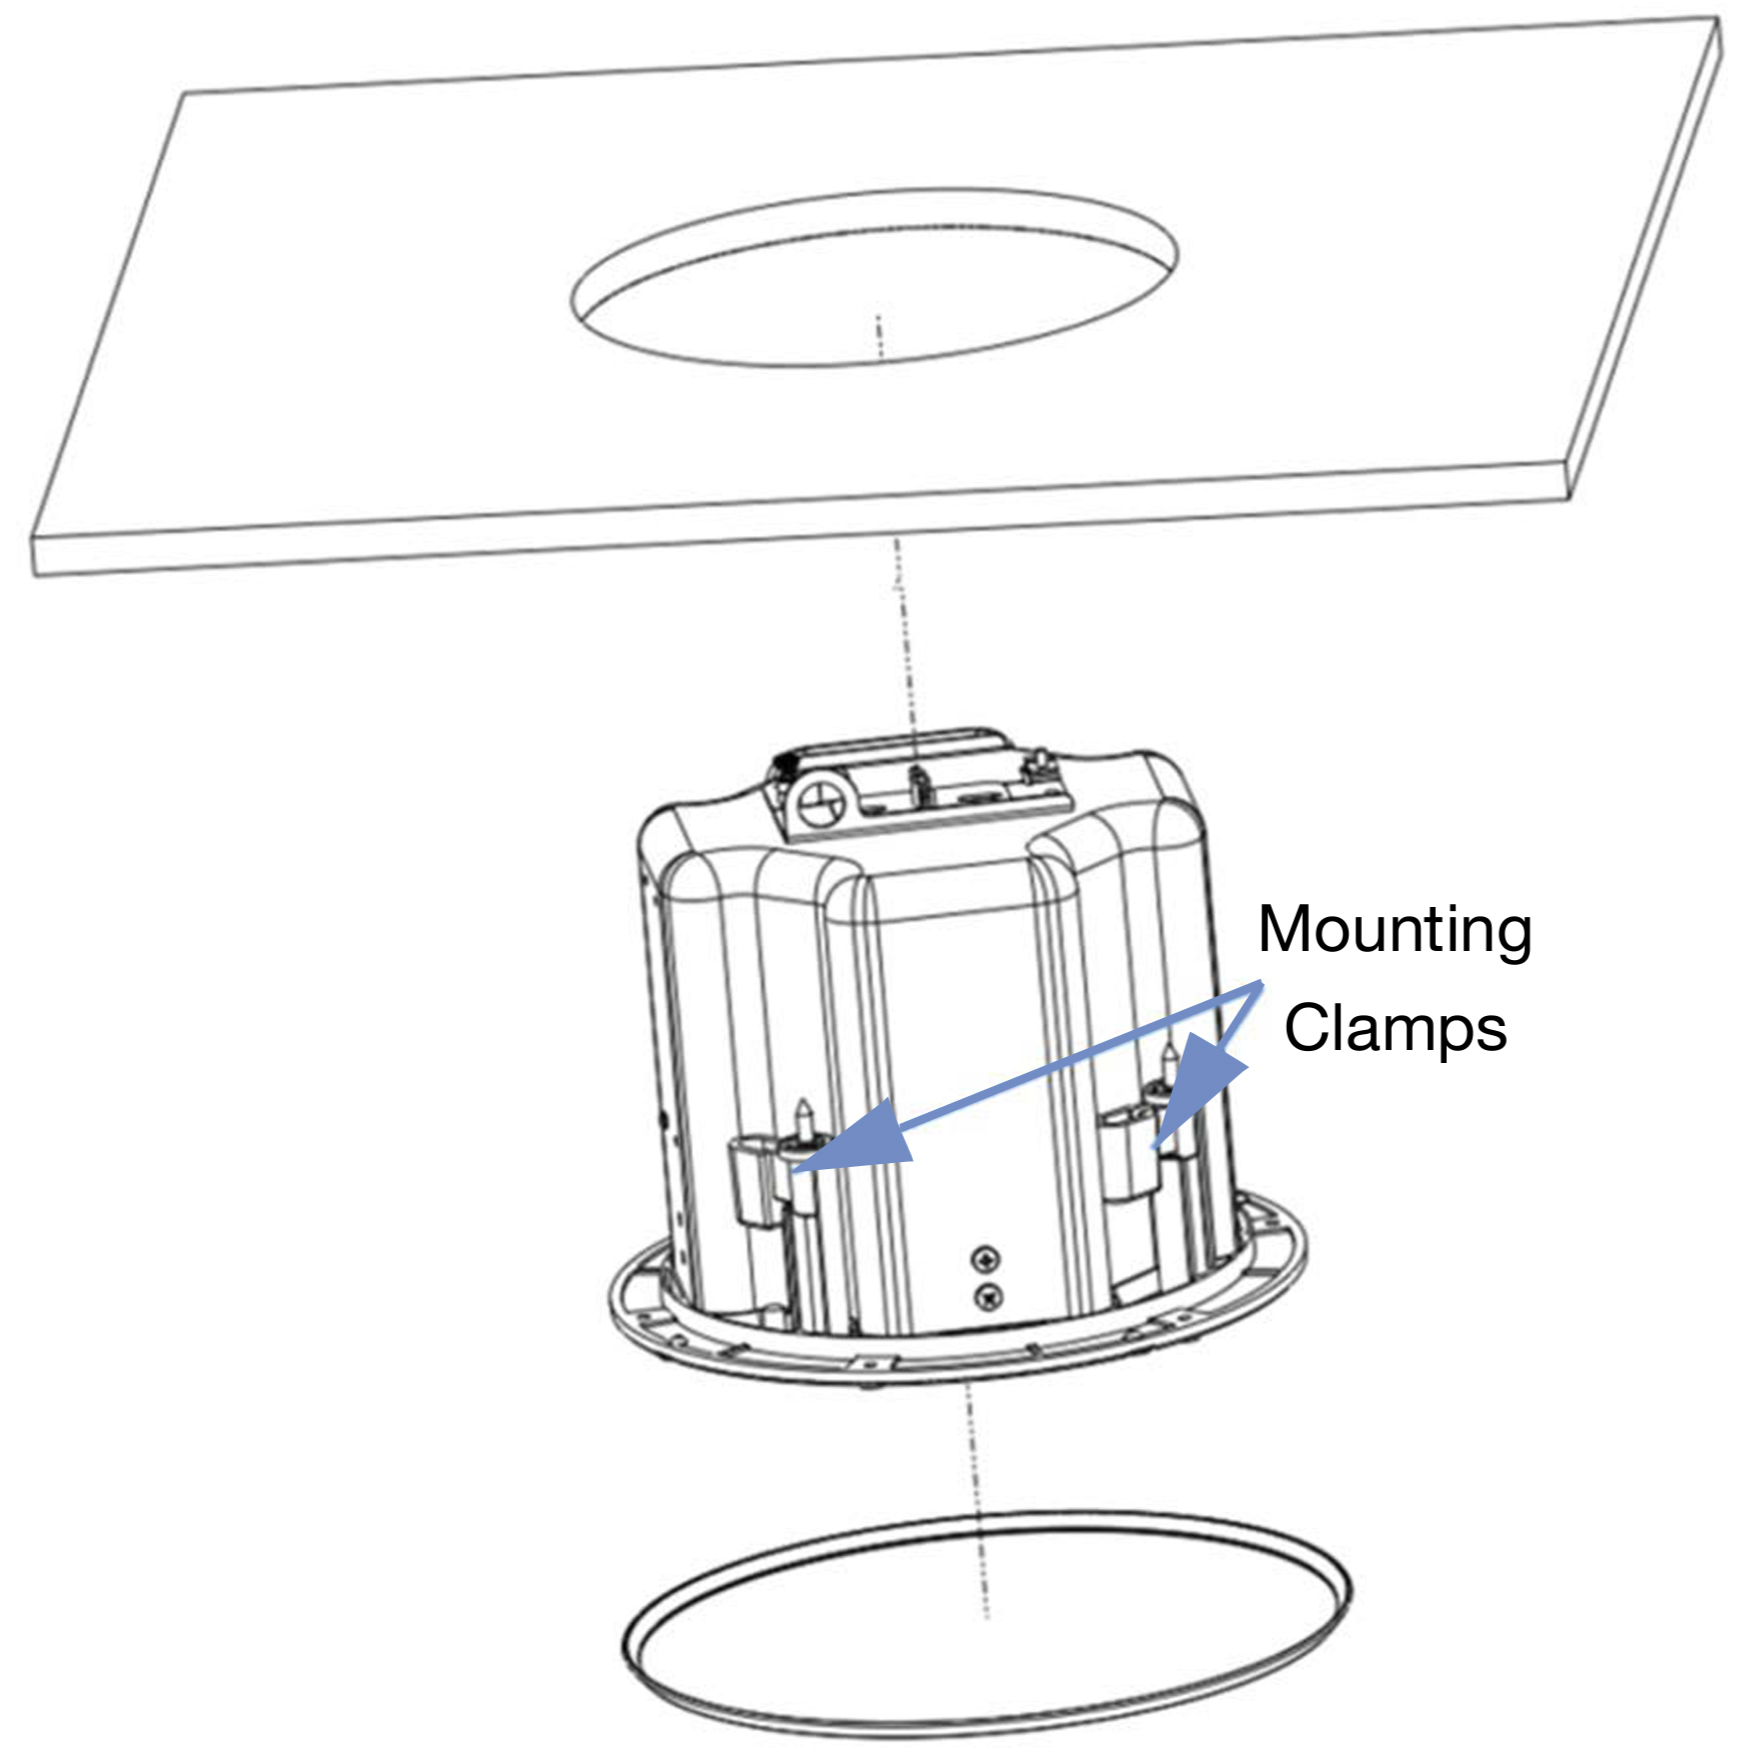
Inserting the loudspeaker into the ceiling
Use a #2 Phillips screwdriver to torque the four screws to hold the loudspeaker in place.
Caution
Do not over-tighten! If using a powered screwdriver, set the torque to 0.8 N-m (7 in-lbs). if the screwdriver torques out, slowly increment the torque setting until the mounting clamps begin to move.
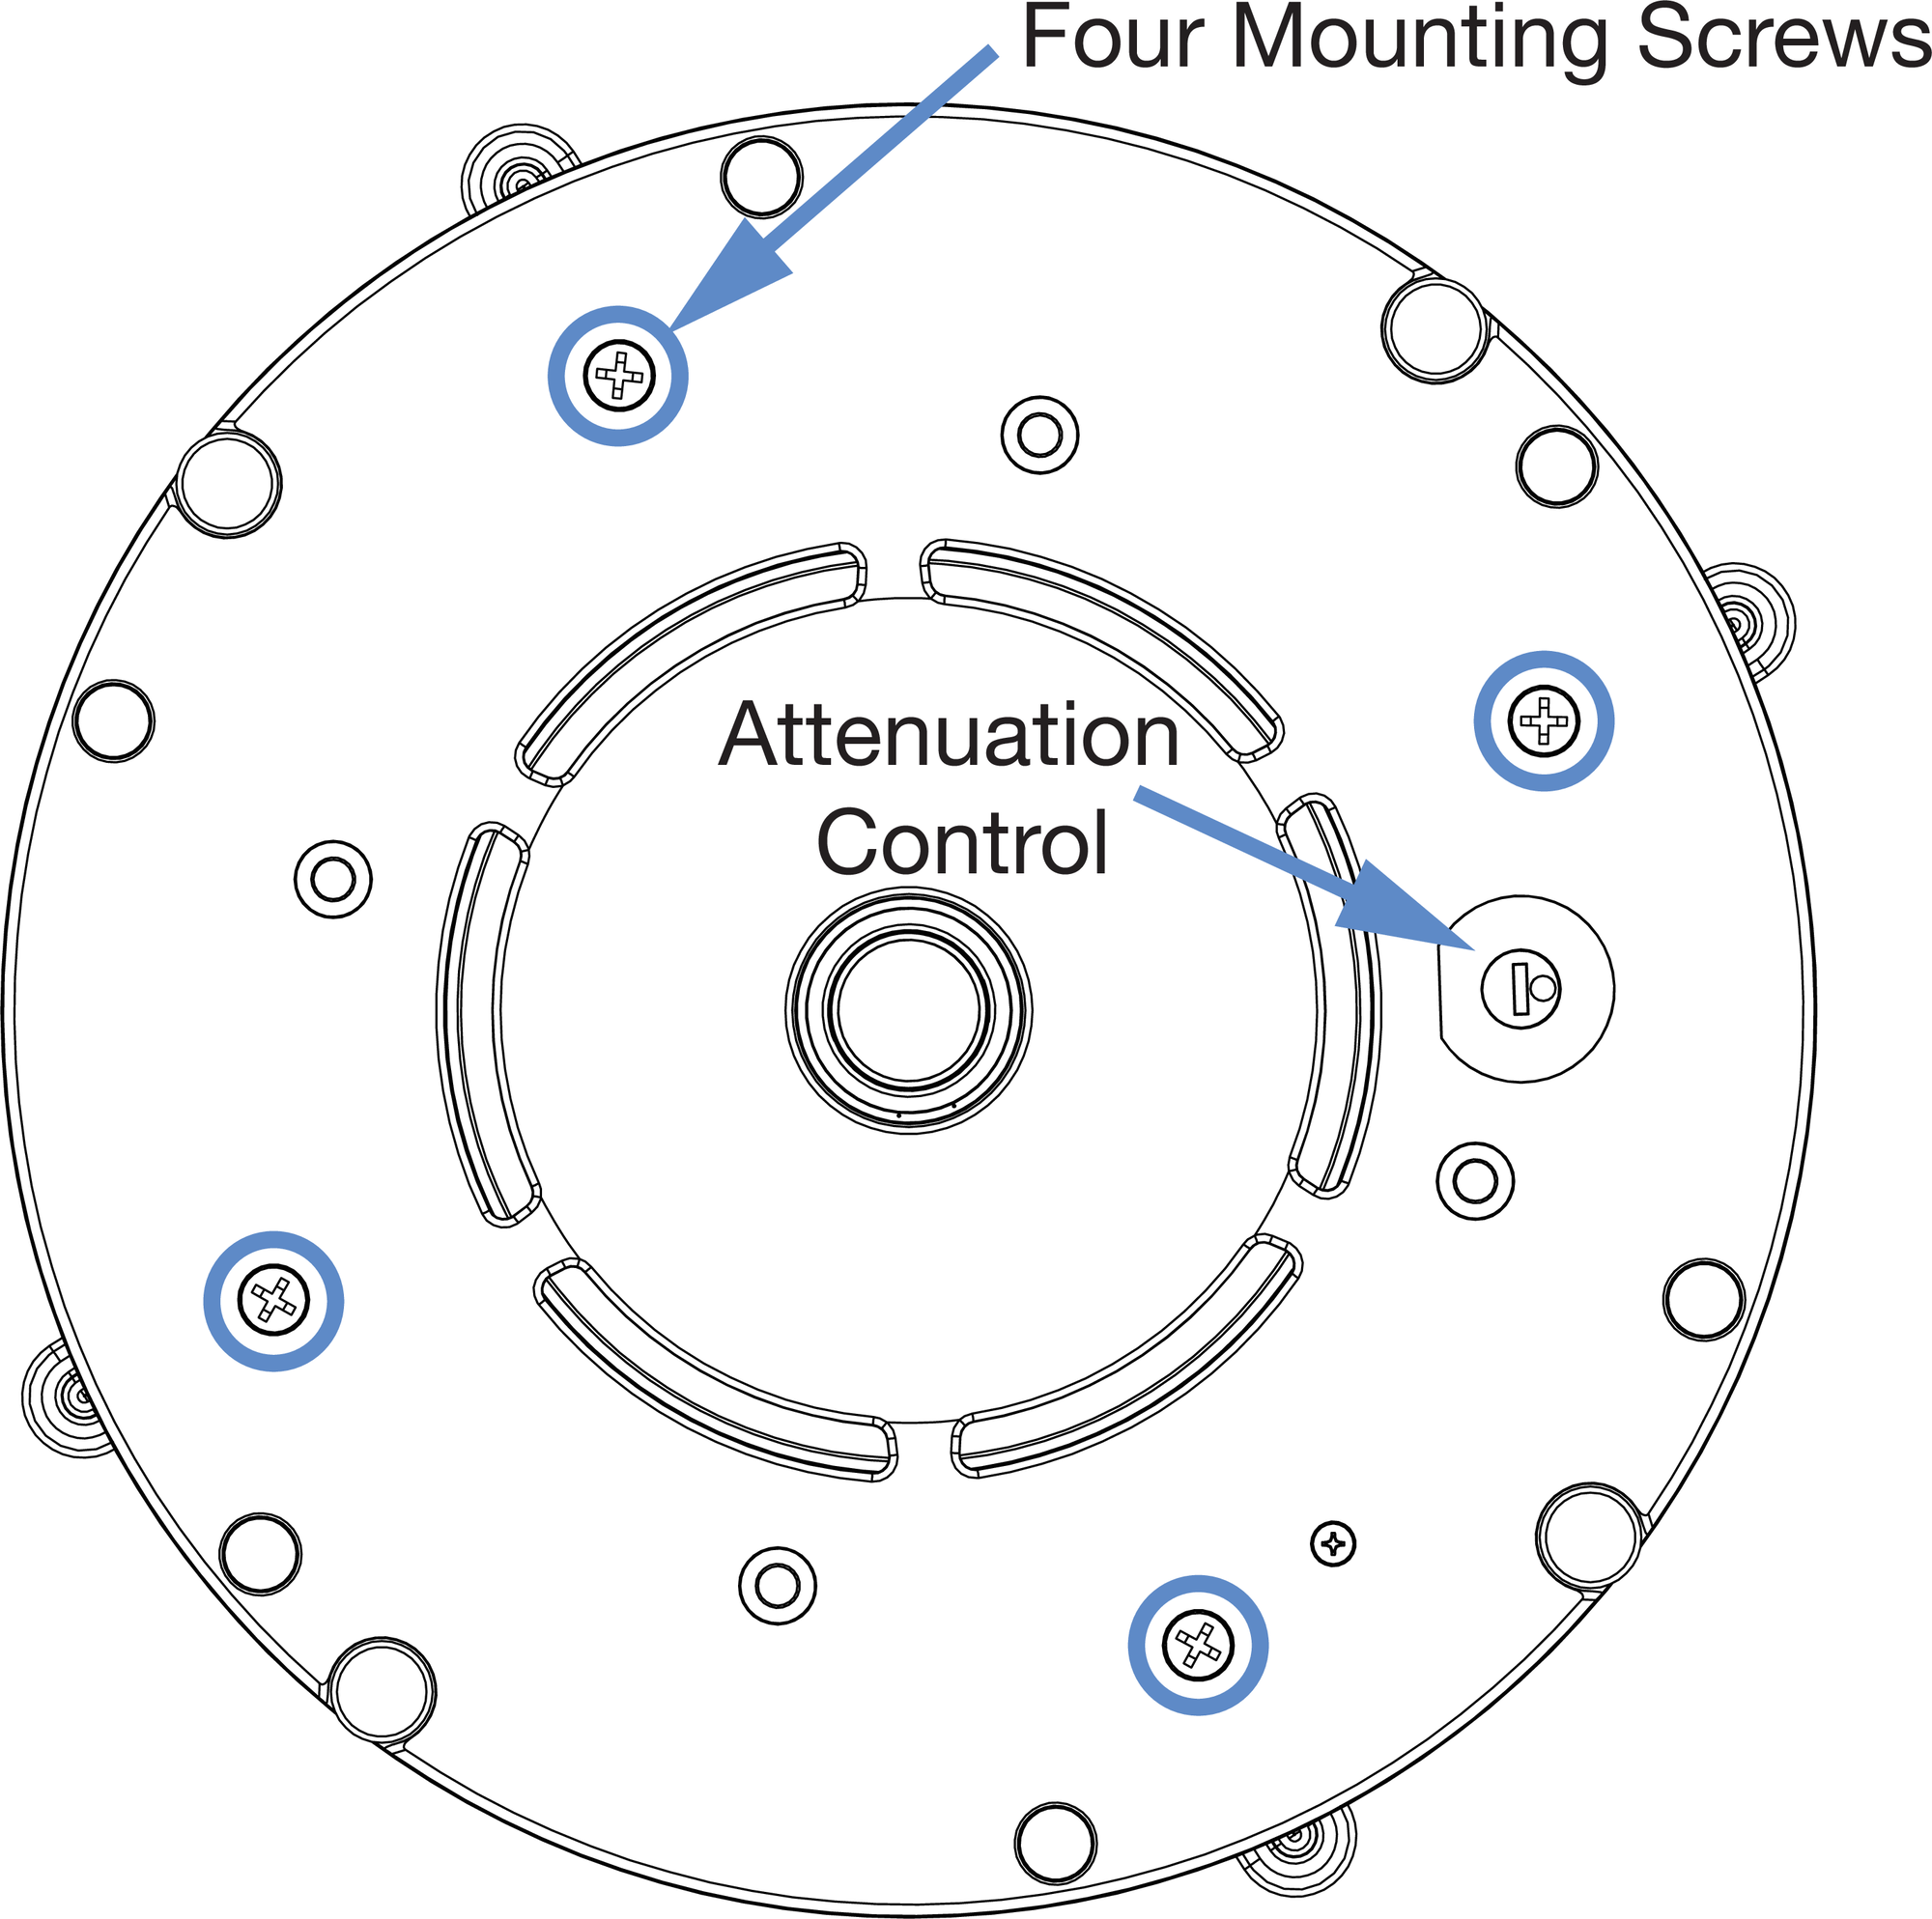
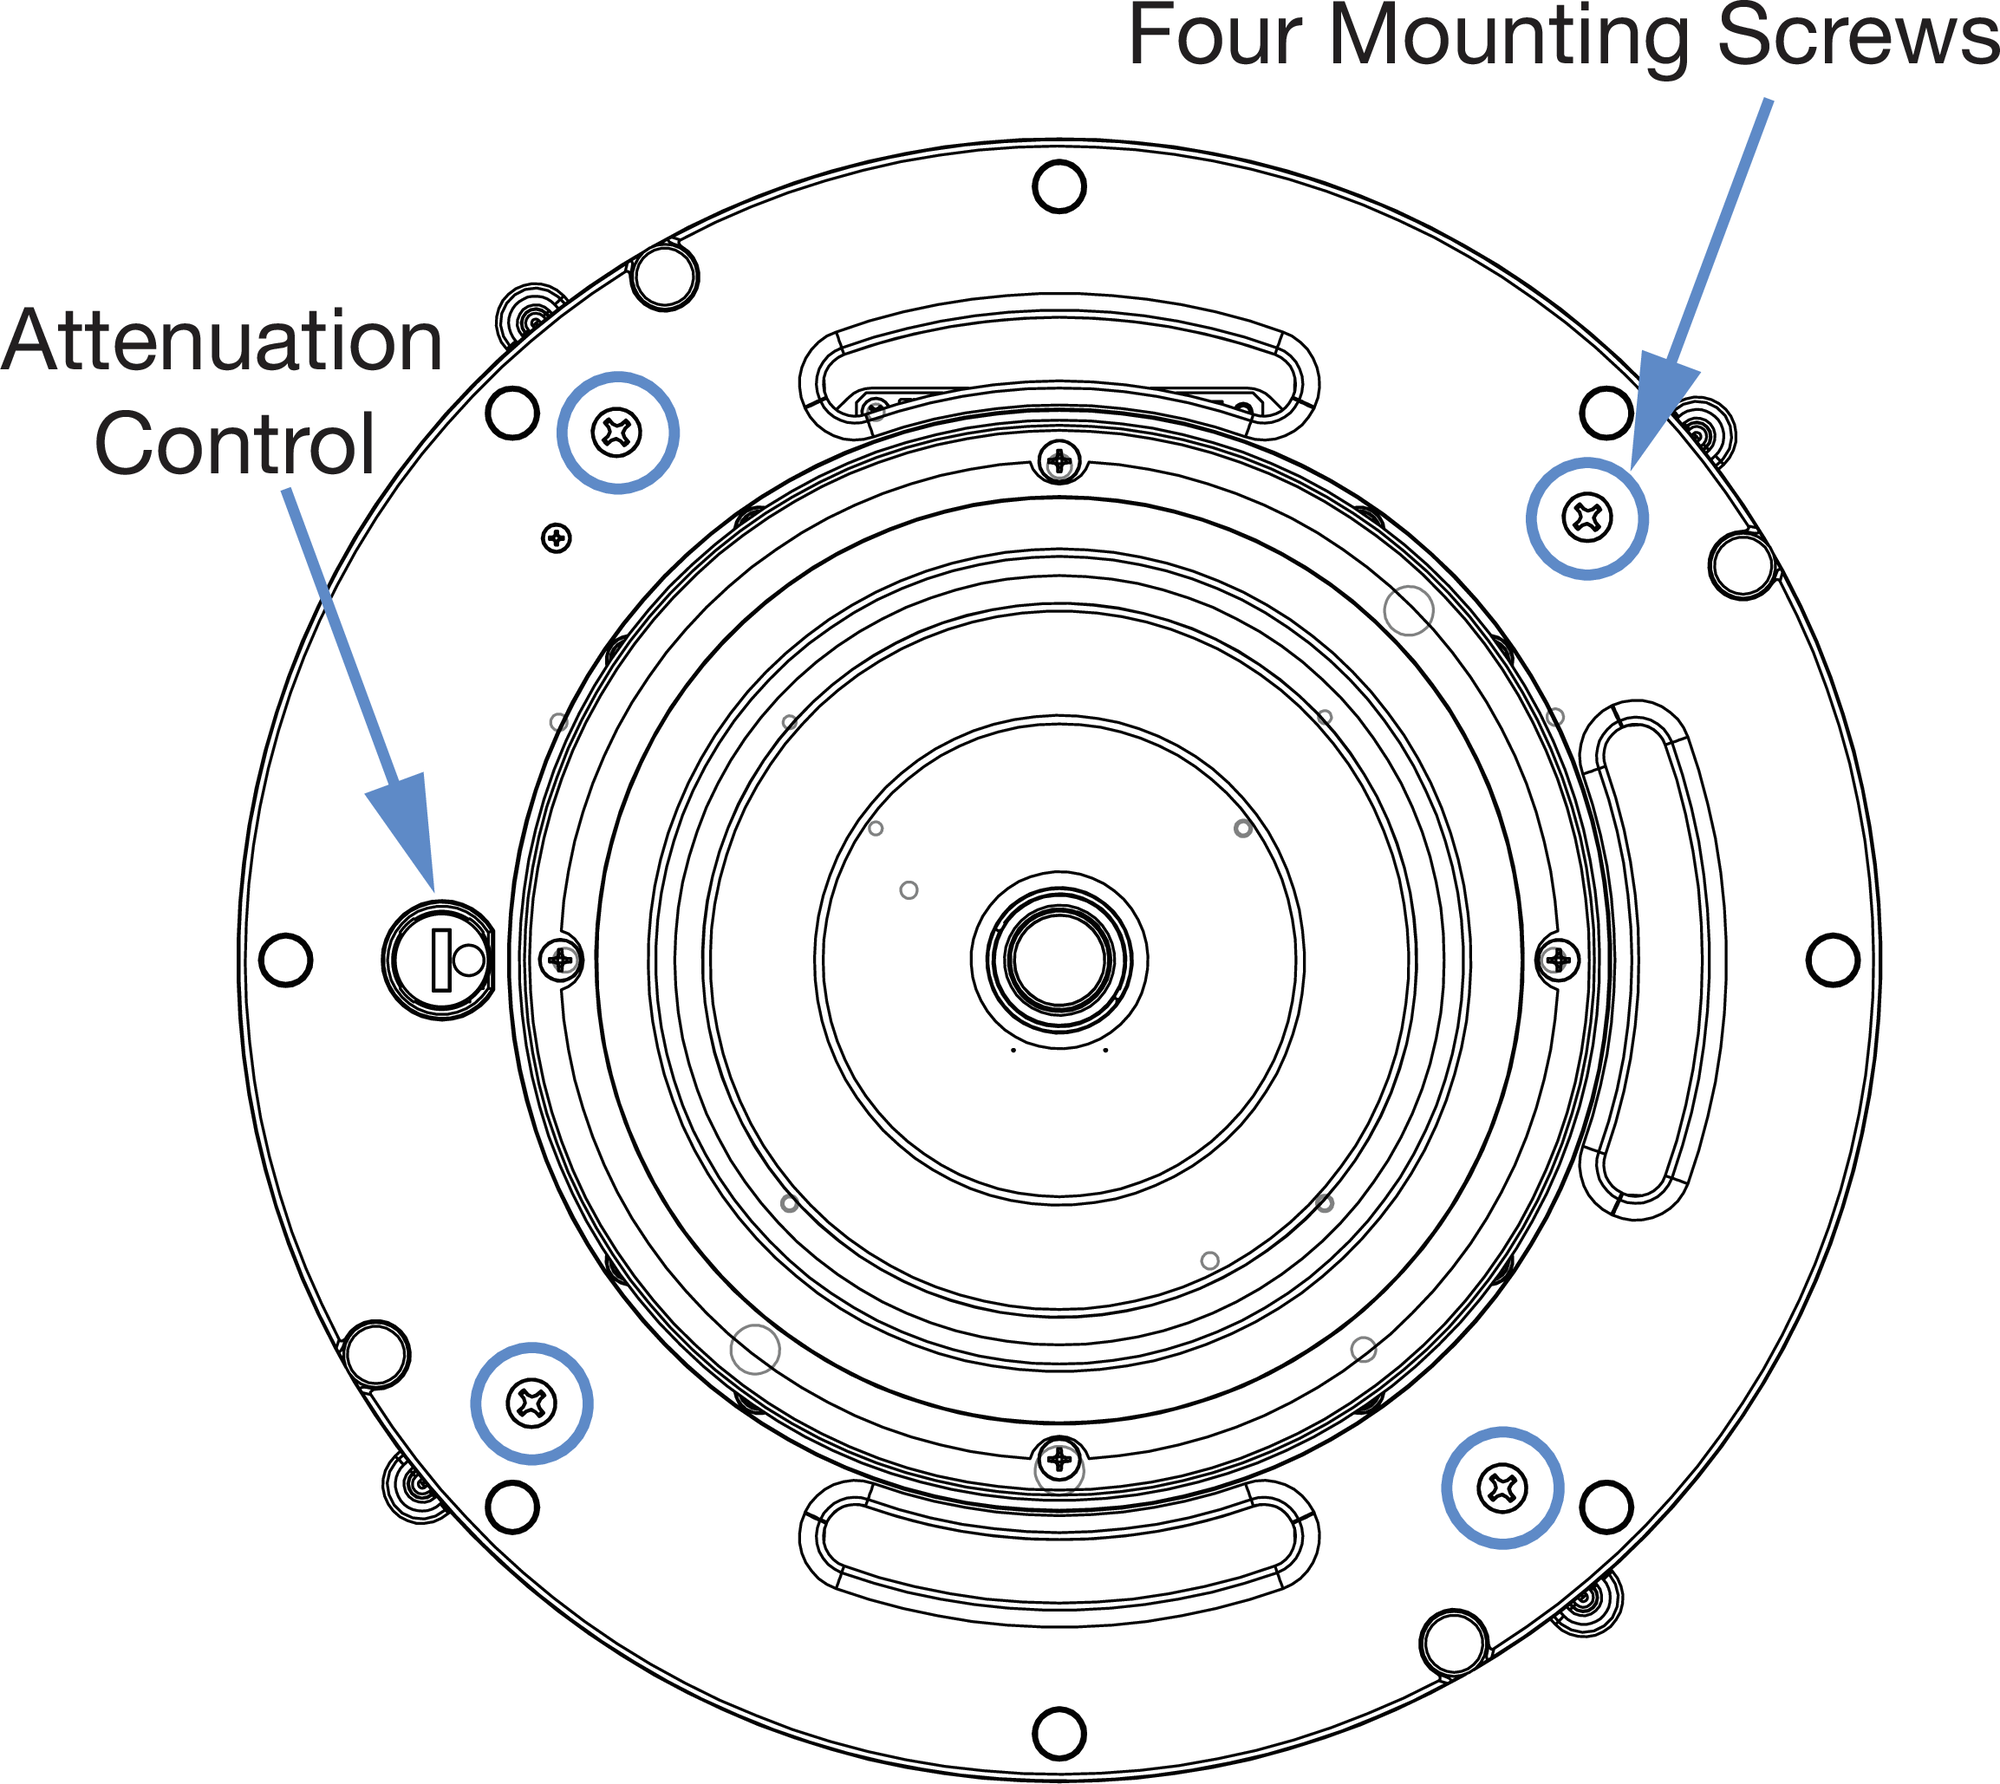
Ashby-5C (top) and Ashby-8C (bottom) loudspeaker mounting clamp screws and Attenuation Selector
Before placing the grille frame on the loudspeaker, choose an attenuation setting (if the loudspeaker has this feature).

Attenuation Selector
Place the loudspeaker grille on the installed loudspeaker.
Make sure to line up the grille with the magnets on the loudspeaker.
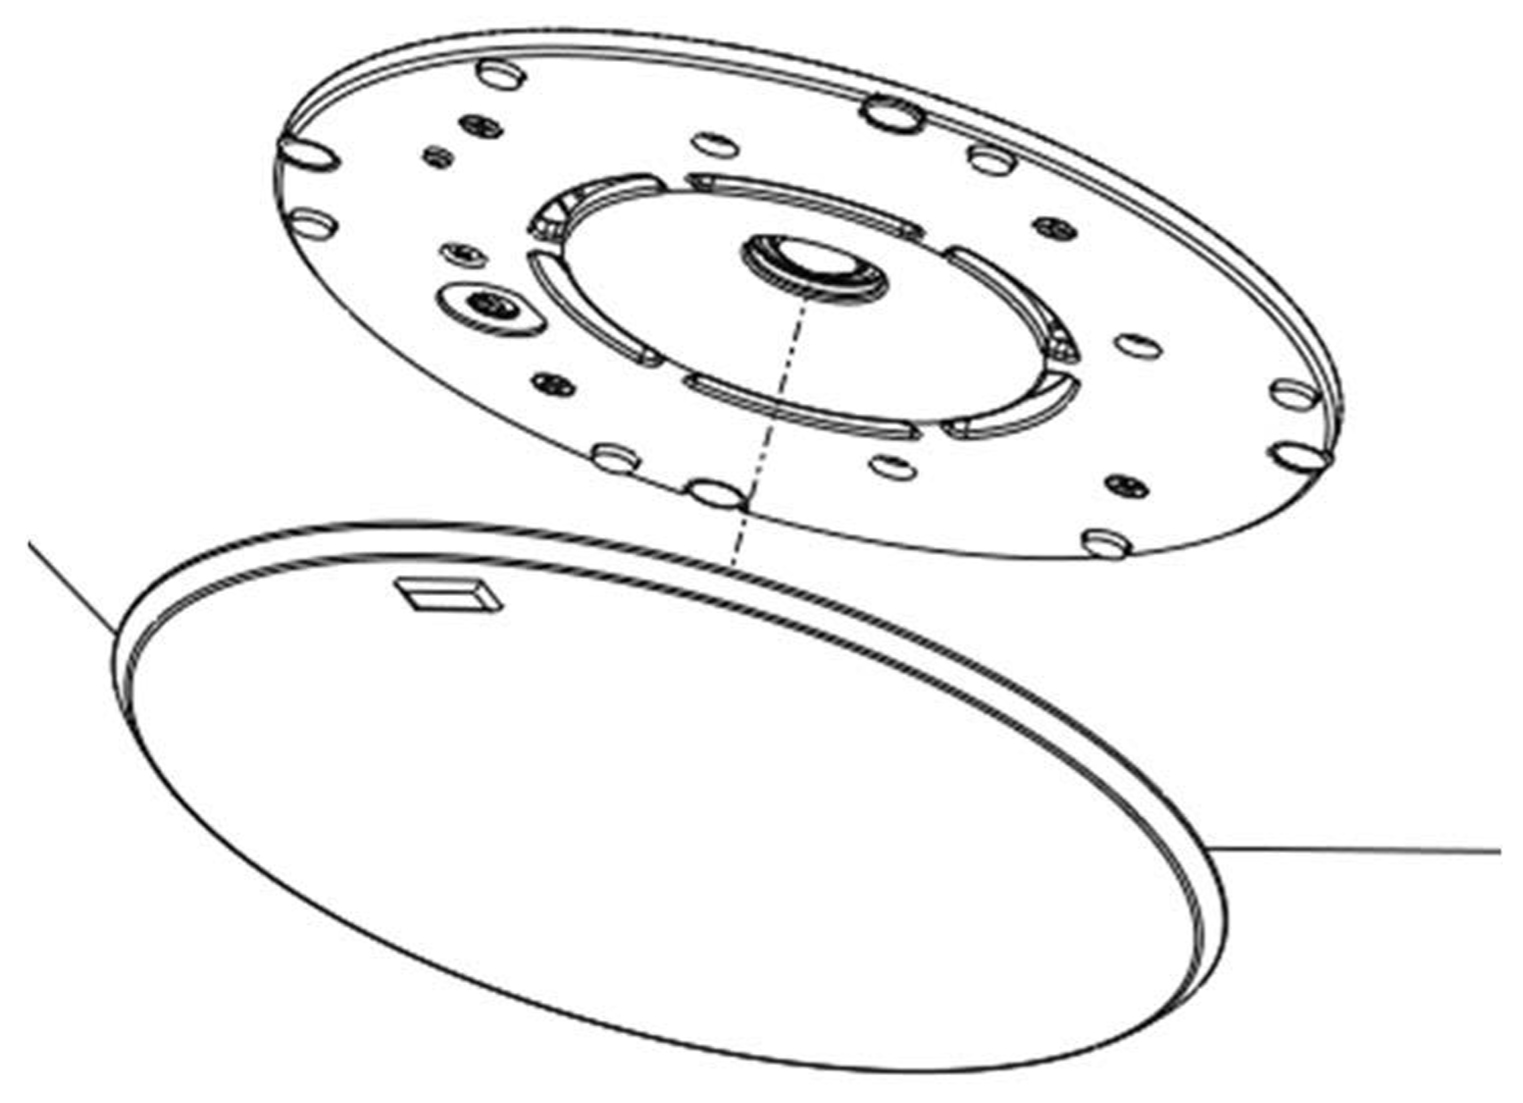
Placing the loudspeaker grille on the loudspeaker
Installing into a Suspended Ceiling
Assemble the C-ring with tile bridge in the ceiling.
Slide the C-ring on the tile bridge until it is centered with the hole.
Install washers and #6 sheet metal screws (included) into the C-ring and tighten into place.
Install the loudspeaker by tightening the four mounting screws on the bezel of the loudspeaker to clamp it to the C-ring.


Ashby-5C (top) and Ashby-8C (bottom) loudspeaker mounting clamp screws and Attenuation Selector
Note
The tile bridge acts as a fail-safe if the tile gets damaged, so it may not contact the railings.
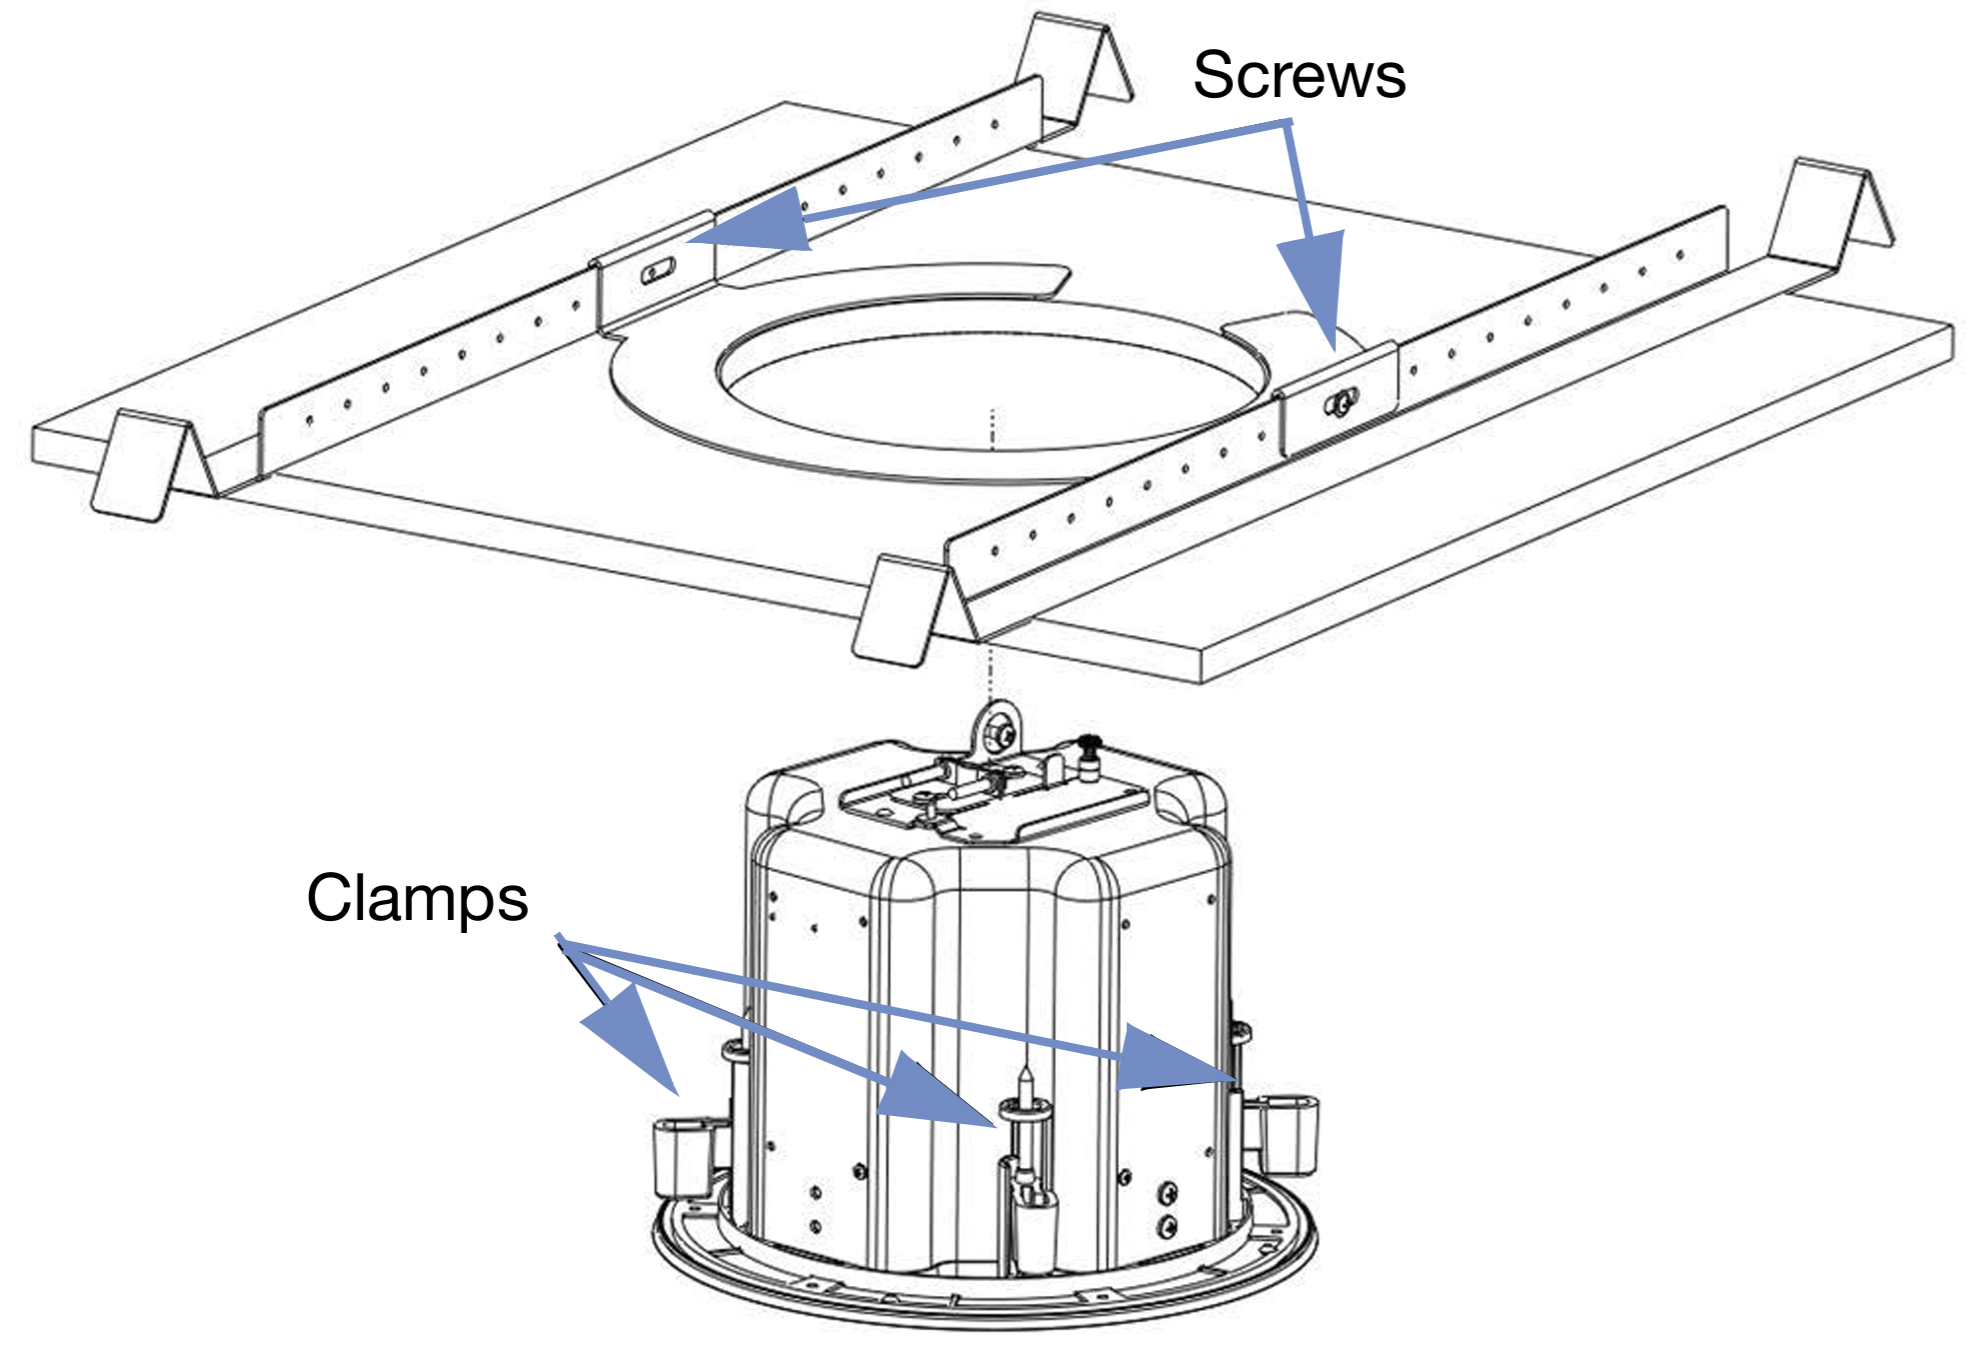 |
Installing the loudspeaker into a bridge in the ceiling
Safety Lanyard
Some construction codes require a secondary support system. Ashby loudspeakers have a built-in attachment point for a load-rated carabiner with lanyard (neither included) to safely support the weight of the loudspeaker.
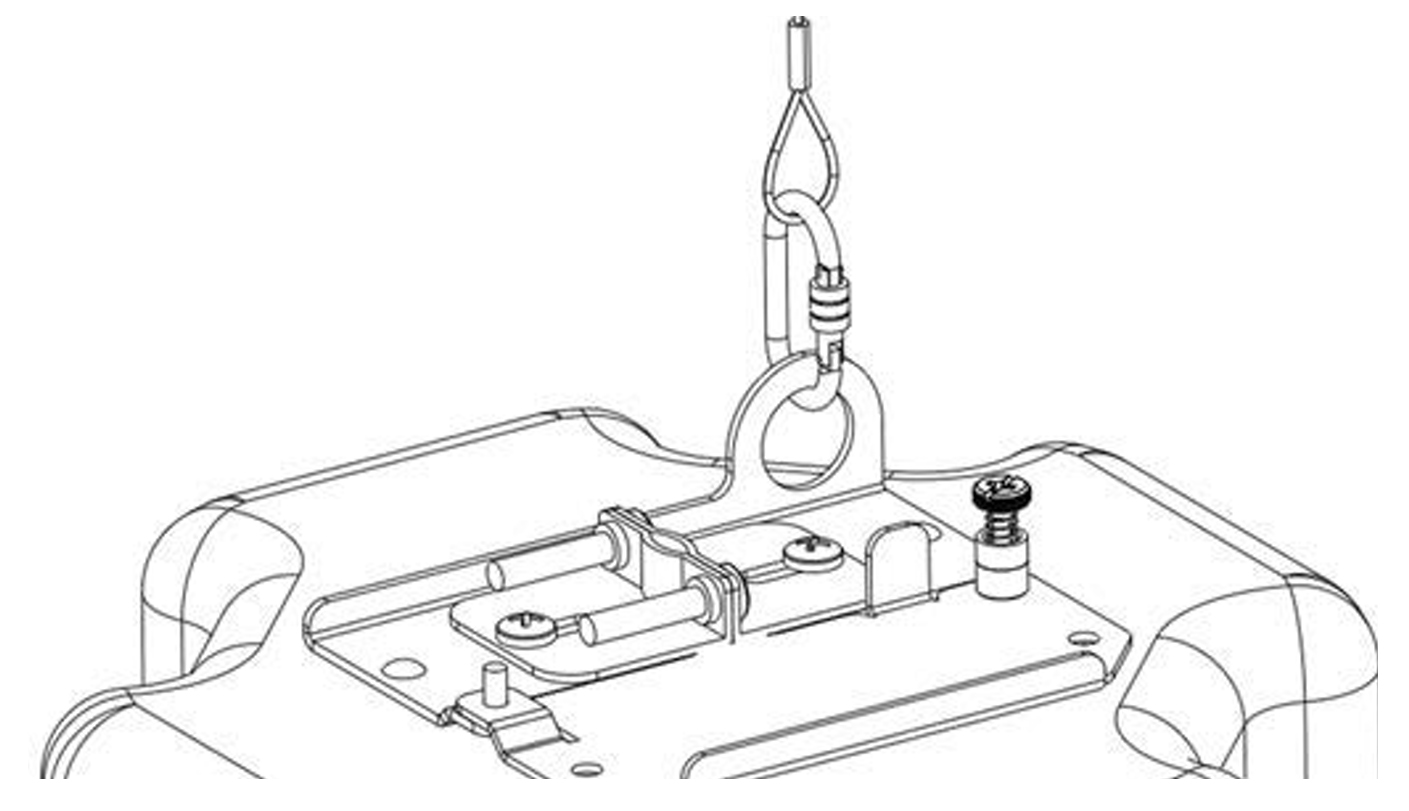
Attaching a safety lanyard for secondary support
Installing into a High Ceiling with the Pendant
The pendant is designed to replicate flush-mounted ceiling installations, utilizing the four integrated clamps, and thus do not require extra hardware.
Remove the loudspeaker grille and make sure that the clamps are away from the front of the bezel and locked in the open position.
Attach the supplied lanyard using the supplied hardware onto the loudspeaker to act as a secondary support.
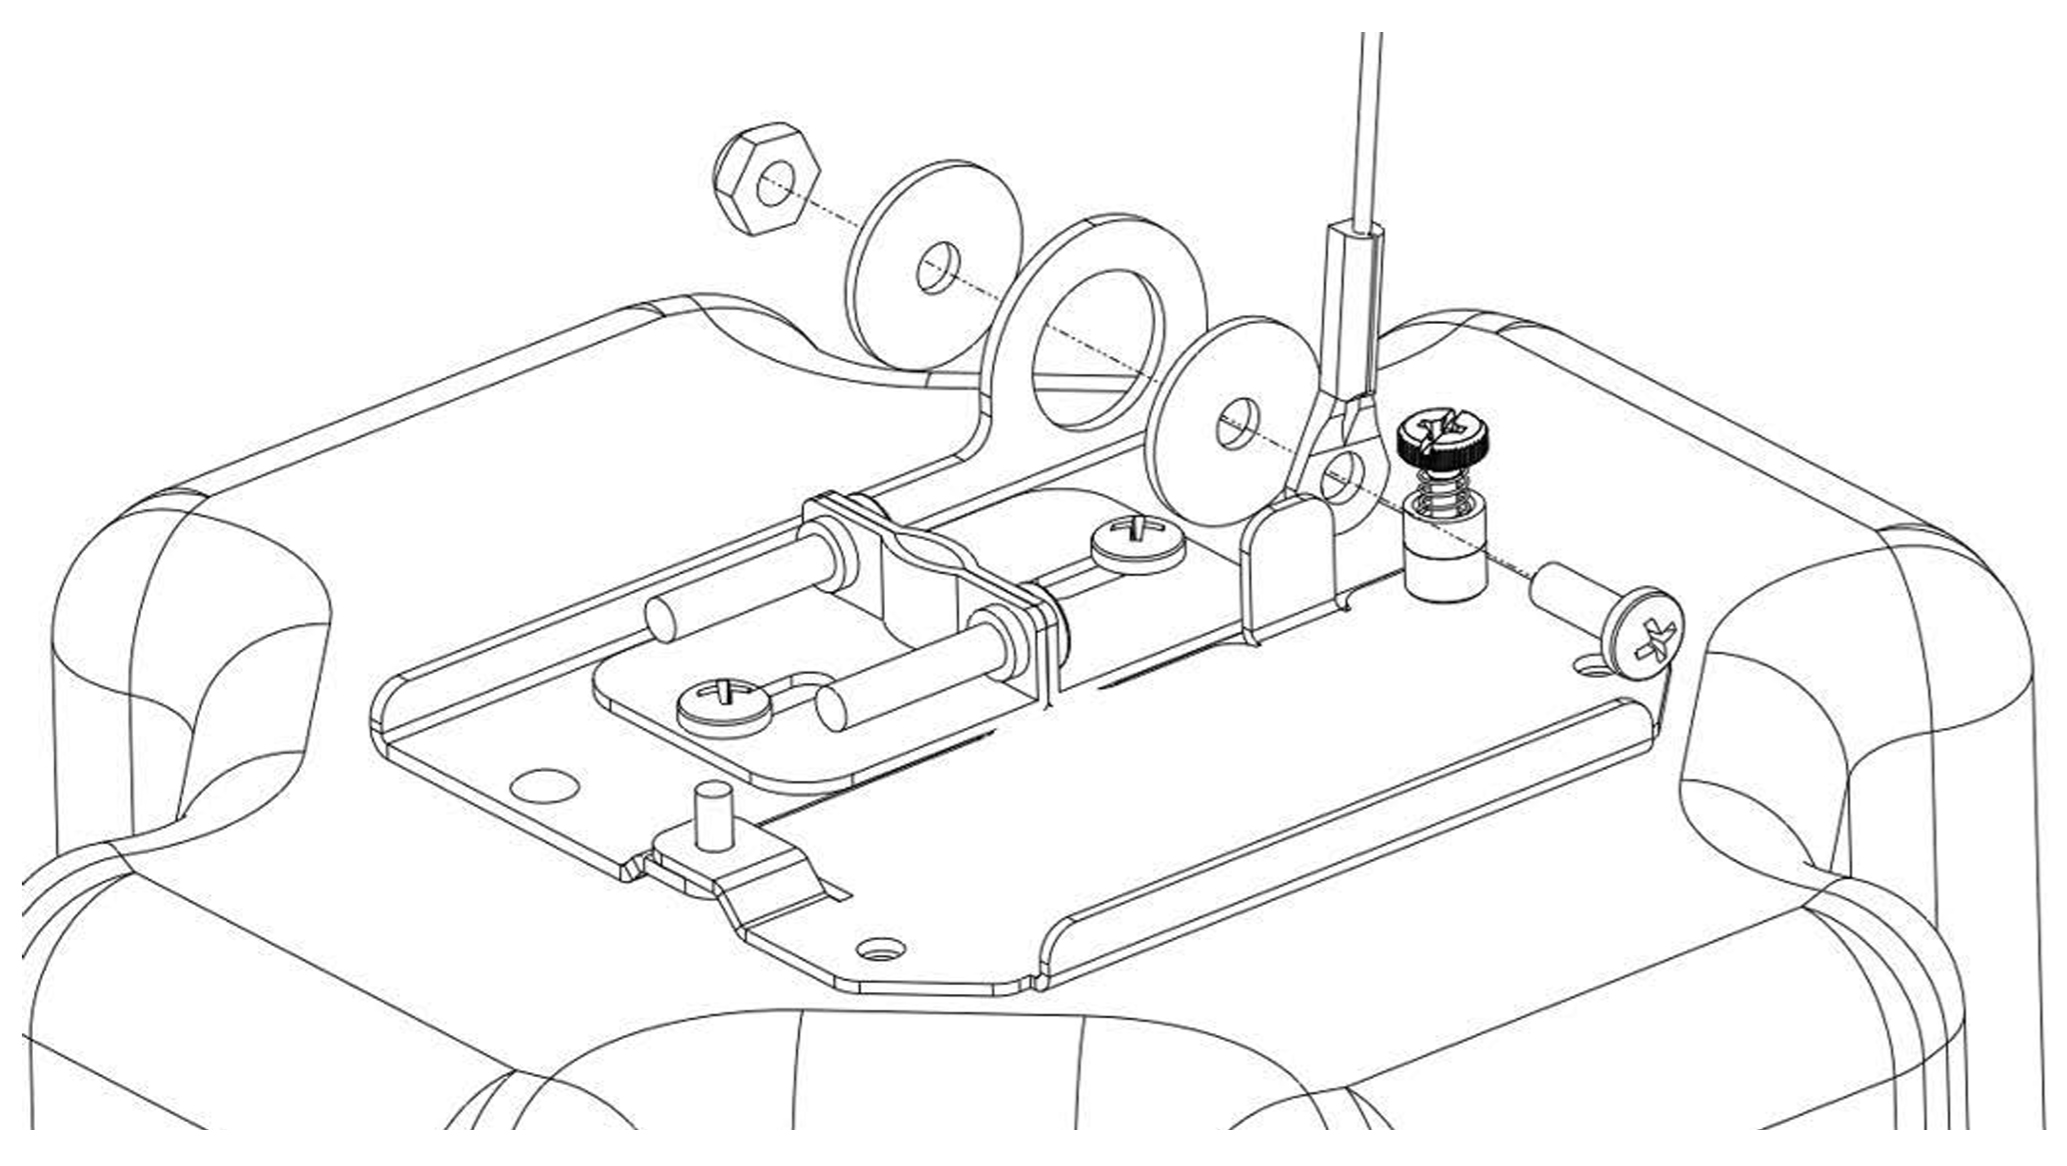
Attaching a safety lanyard
Insert wires through the grommets and attach them to the Ashby connector panel.
Slide the lanyard through one of the holes.
Insert the Ashby loudspeaker inside the pendant and rotate the four Phillips head screws clockwise to engage the loudspeaker clamps to the pendant.
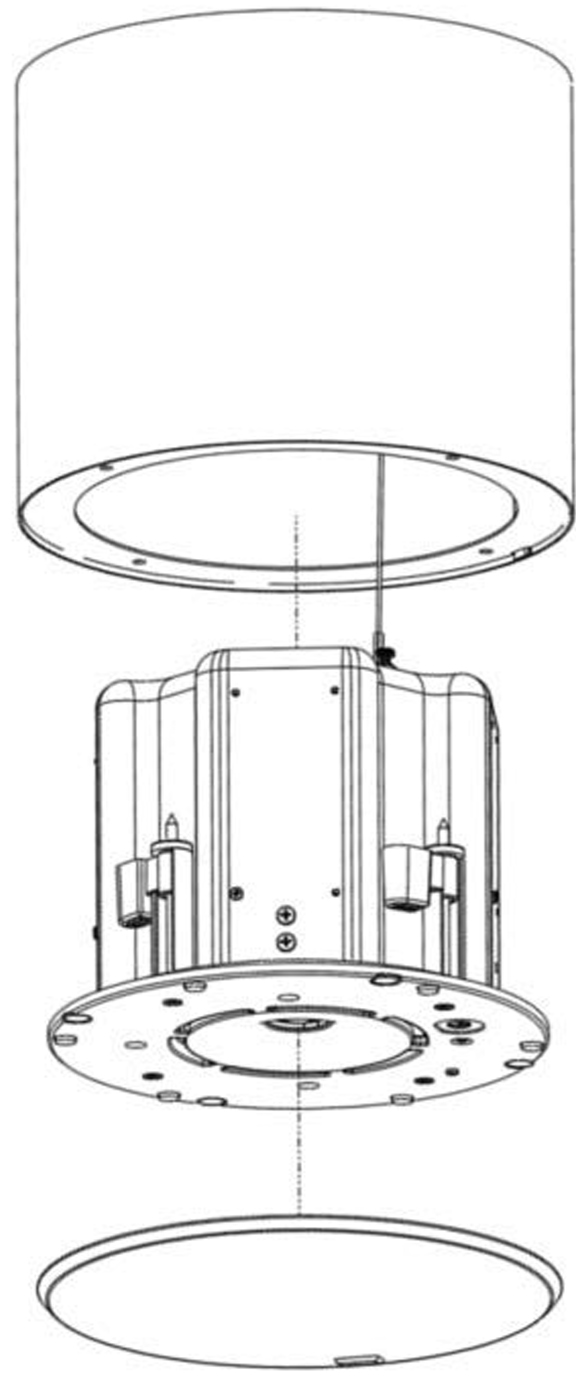
Installing an Ashby loudspeaker into a Meyer Sound pendant
Lock the loudspeaker securely into place by tightening the mounts until the loudspeaker is flat against the pendant.
Caution
Do not over tighten! If using a powered screwdriver, set the torque to 0.8 N-m (7 in-lbs). if the screwdriver torques out, slowly increment the torque setting until the mounting clamps begin to move.
Attach the lanyard to a secondary support point
Before placing the grille frame, adjust the attenuation control to choose an attenuation setting, if the loudspeaker has this feature.


Ashby-5C (top) and Ashby-8C (bottom) loudspeaker mounting clamp screws and Attenuation Selector
Place the loudspeaker grille on the installed loudspeaker.
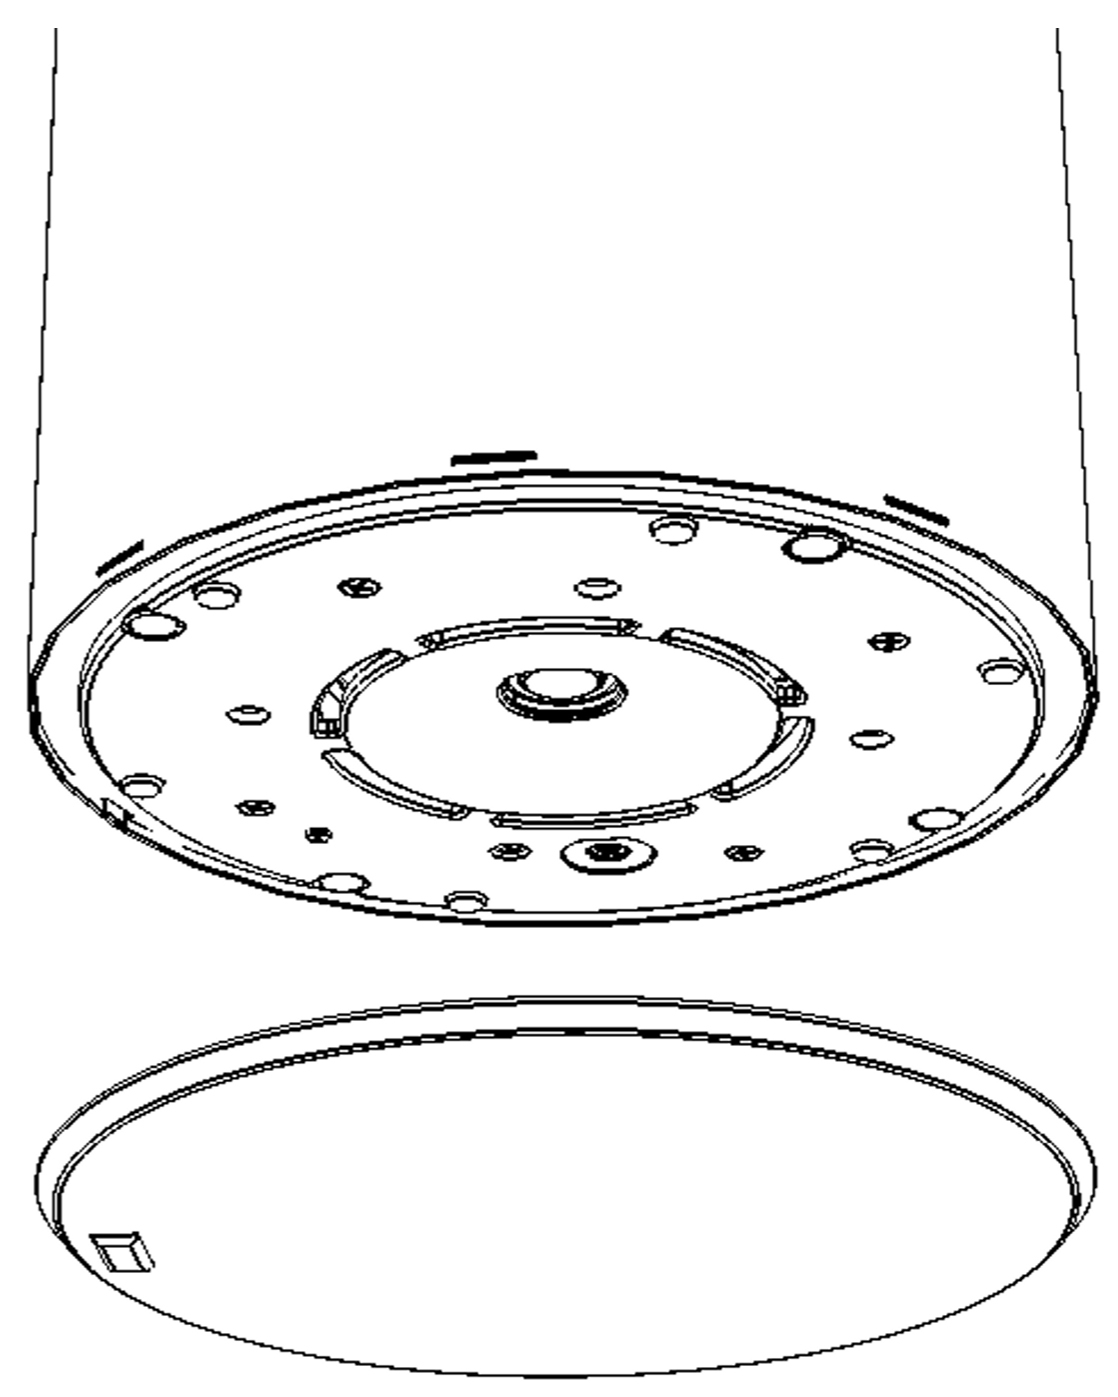
Fitting the grille frame onto an Ashby loudspeaker in a pendant
Equalization for Pendant Installation
Ashby-8C and Ashby-5C are optimized for ceiling mounting (infinite baffle) and require some filters to achieve flat response when mounted in a pendant or free-air. These filters simulate the infinite baffle effect of the ceiling.
The simplest solution is to use a minimum-phase U-Shaping filter found in GALAXY processors.The filter is a low frequency shelf with a 580 Hz breakpoint and 6 dB/octave slope. The gain is +6 dB for the Ashby-8C and +8 dB for the Ashby-5C.
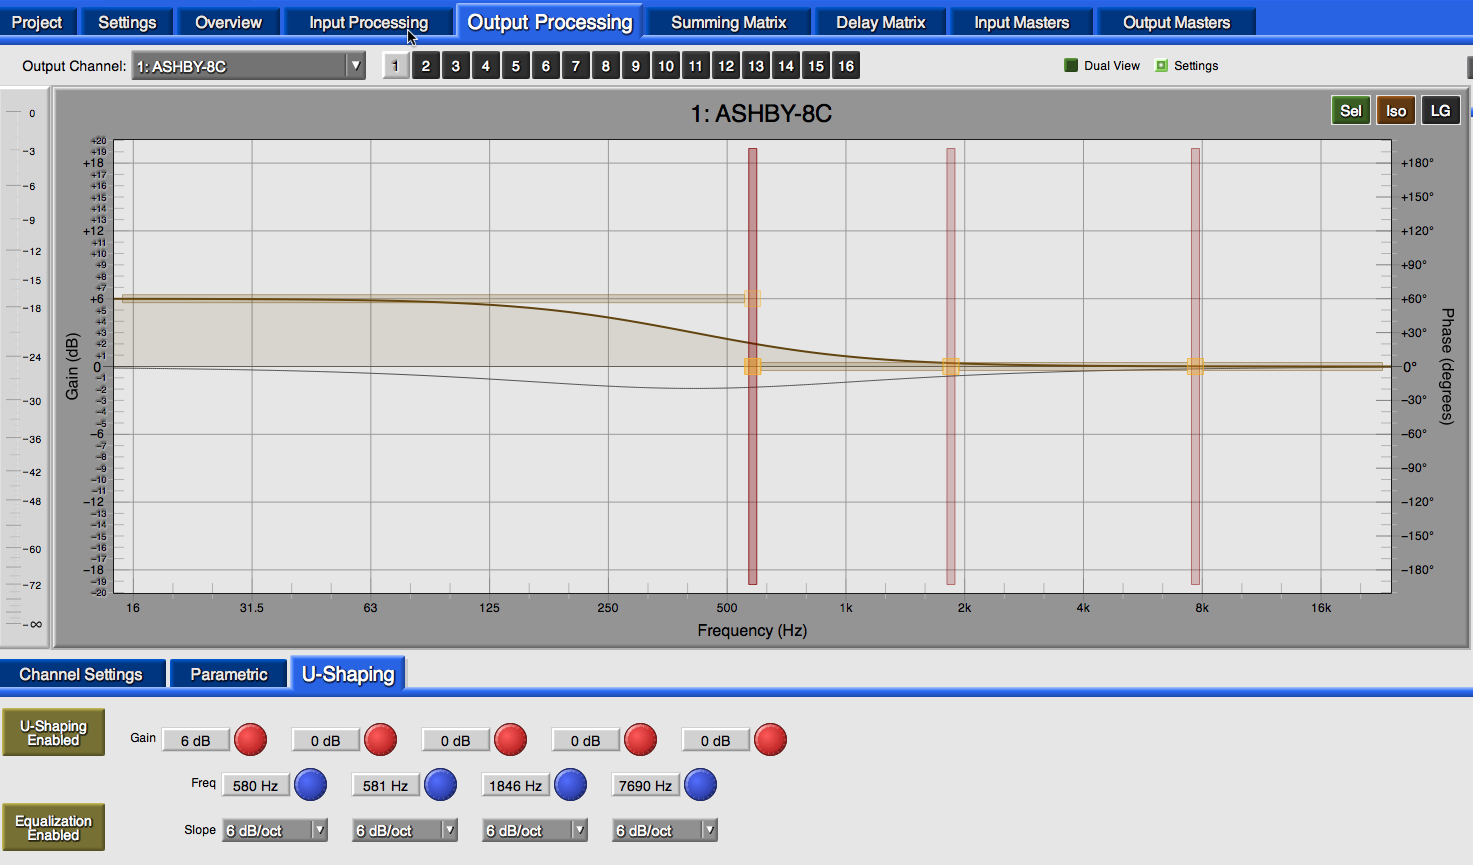
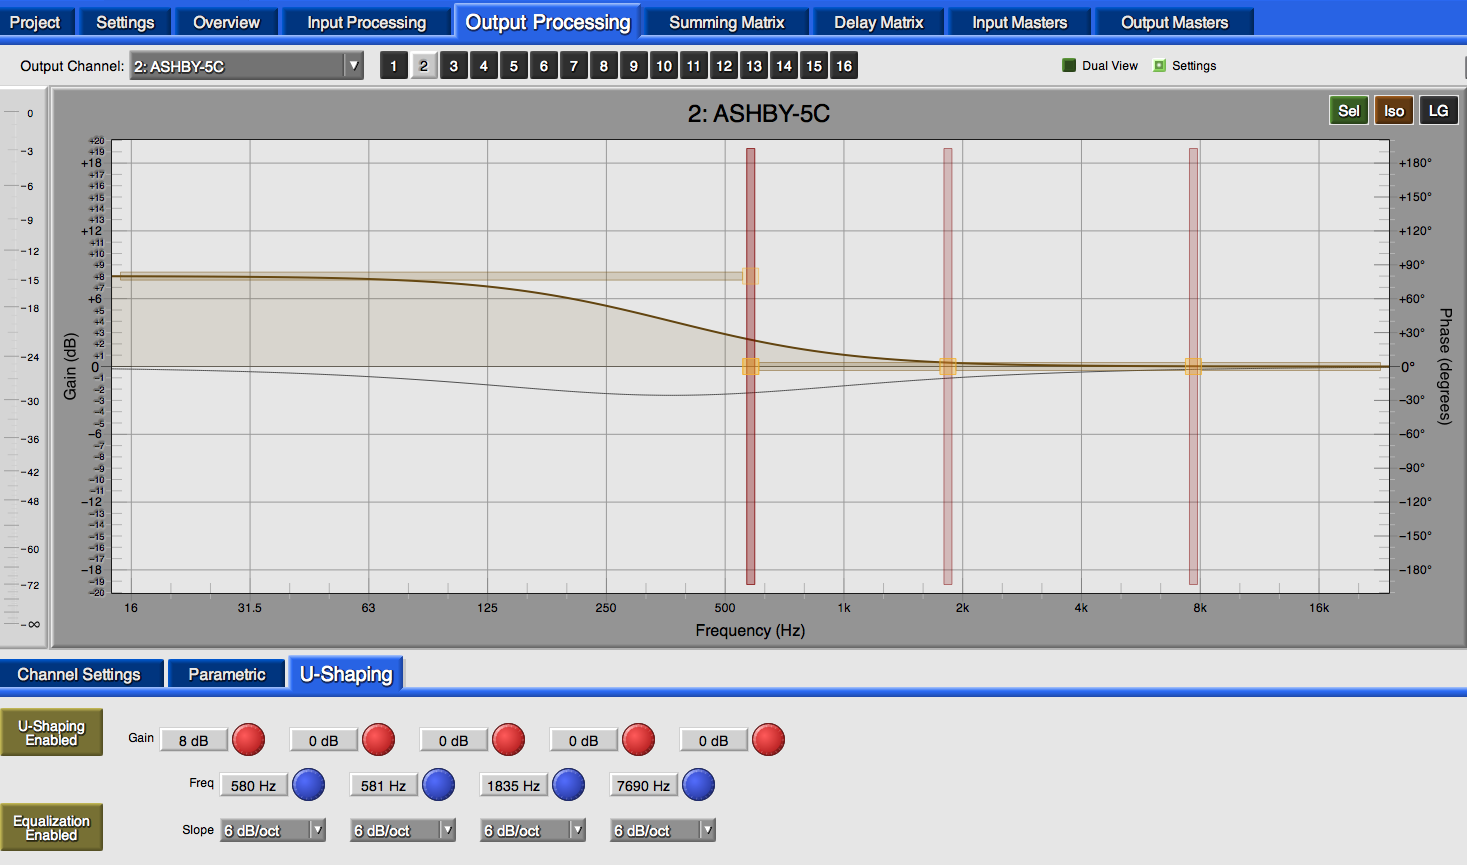
Filter settings Ashby-8C (top) and Ashby-5C (bottom)
Ashby Accessories
The following Ashby accessories are available from Meyer Sound.
Part Number | Accessory | Notes |
|---|---|---|
40.260.030.01 | Ashby-8C Pendant | |
40.260.061.01 | Ashby-8C Grille Frame Replacement (White) | |
40.260.061.02 | Ashby-8C Grille Frame Replacement (Black) | |
40.260.130.01 | Ashby-8C Tile C-Ring | |
40.260.131.01 | Ashby-8C Tile C-Ring with Bridge kit | |
40.260.140.01 | Ashby-8C New construction bracket | |
40.261.030.01 | Ashby-5C Pendant | |
40.261.060.01 | Ashby-5C Grille Frame Replacement (White) | |
40.261.060.02 | Ashby-5C Grille Frame Replacement (Black) | |
40.261.130.01 | Ashby-5C Tile C-Ring | |
40.261.131.01 | Ashby-5C Tile C-Ring with Bridge kit | |
40.261.140.01 | Ashby-5C New construction bracket | |
484.065 | Phoenix 5-pin female cable mount connector | Connects to MPS-488HPp channel output connectors and Ashby Input connectors |
524.014 | Bulk cable, no connectors (regular) | 500-ft spool, black |
524.015 | Bulk cable, no connectors (plenum) | 500-ft spool, white |
Note
Bulk cables use Belden 1502R (regular) or Belden 1502P (plenum) cable. Belden 1502 is a composite cable comprised of two 18 AWG wires for DC power, two 22 AWG wires for balanced audio, and one 24 AWG wire for audio shield. This single cable delivers DC power and balanced audio to loudspeakers at cable runs of up to 150 feet with only 1 dB of loss in peak SPL. Longer cable runs are possible using heavier gauges for DC power and separate cables for balanced audio. For more information, see Using Separate Cables for DC Power and Audio.
Assembling Phoenix-to-Phoenix Loudspeaker Cables
When connecting loudspeakers equipped with Phoenix connectors to the MPS-488HPp power supply, you need a Phoenix 5-pin female to Phoenix 5-pin female cable. The following procedure documents how to assemble this cable.
 |
Assembled Phoenix-to-Phoenix Cable
If the cable has not yet been stripped, strip one end of the cable. Strip the outer shielding by 1 inch and then strip the black, red, blue, and white wires by 0.275 inch.

Insert the five exposed conductors into the five cable holes in a Phoenix 5-pin female cable mount connector. Use the following wiring scheme.

Pin Destinations for Phoenix 5-Pin Female Cable Mount Connector
Secure the conductors by tightening the five screws in the Phoenix cable mount connector. Screws should be torqued to 5–6 Nm(4.4–5.3 In-Lbs).

Caution
Screws should not be inserted into the Phoenix connector while the connector rests in a mating plug. Doing so will damage the contacts. During assembly, the Phoenix connector should only be held in place externally.
Repeat the previous steps and attach the other end of the cable to another Phoenix 5-pin female cable mount connector.
Verify the wiring polarity is correct for both cable ends
Ashby-5C Dimensions
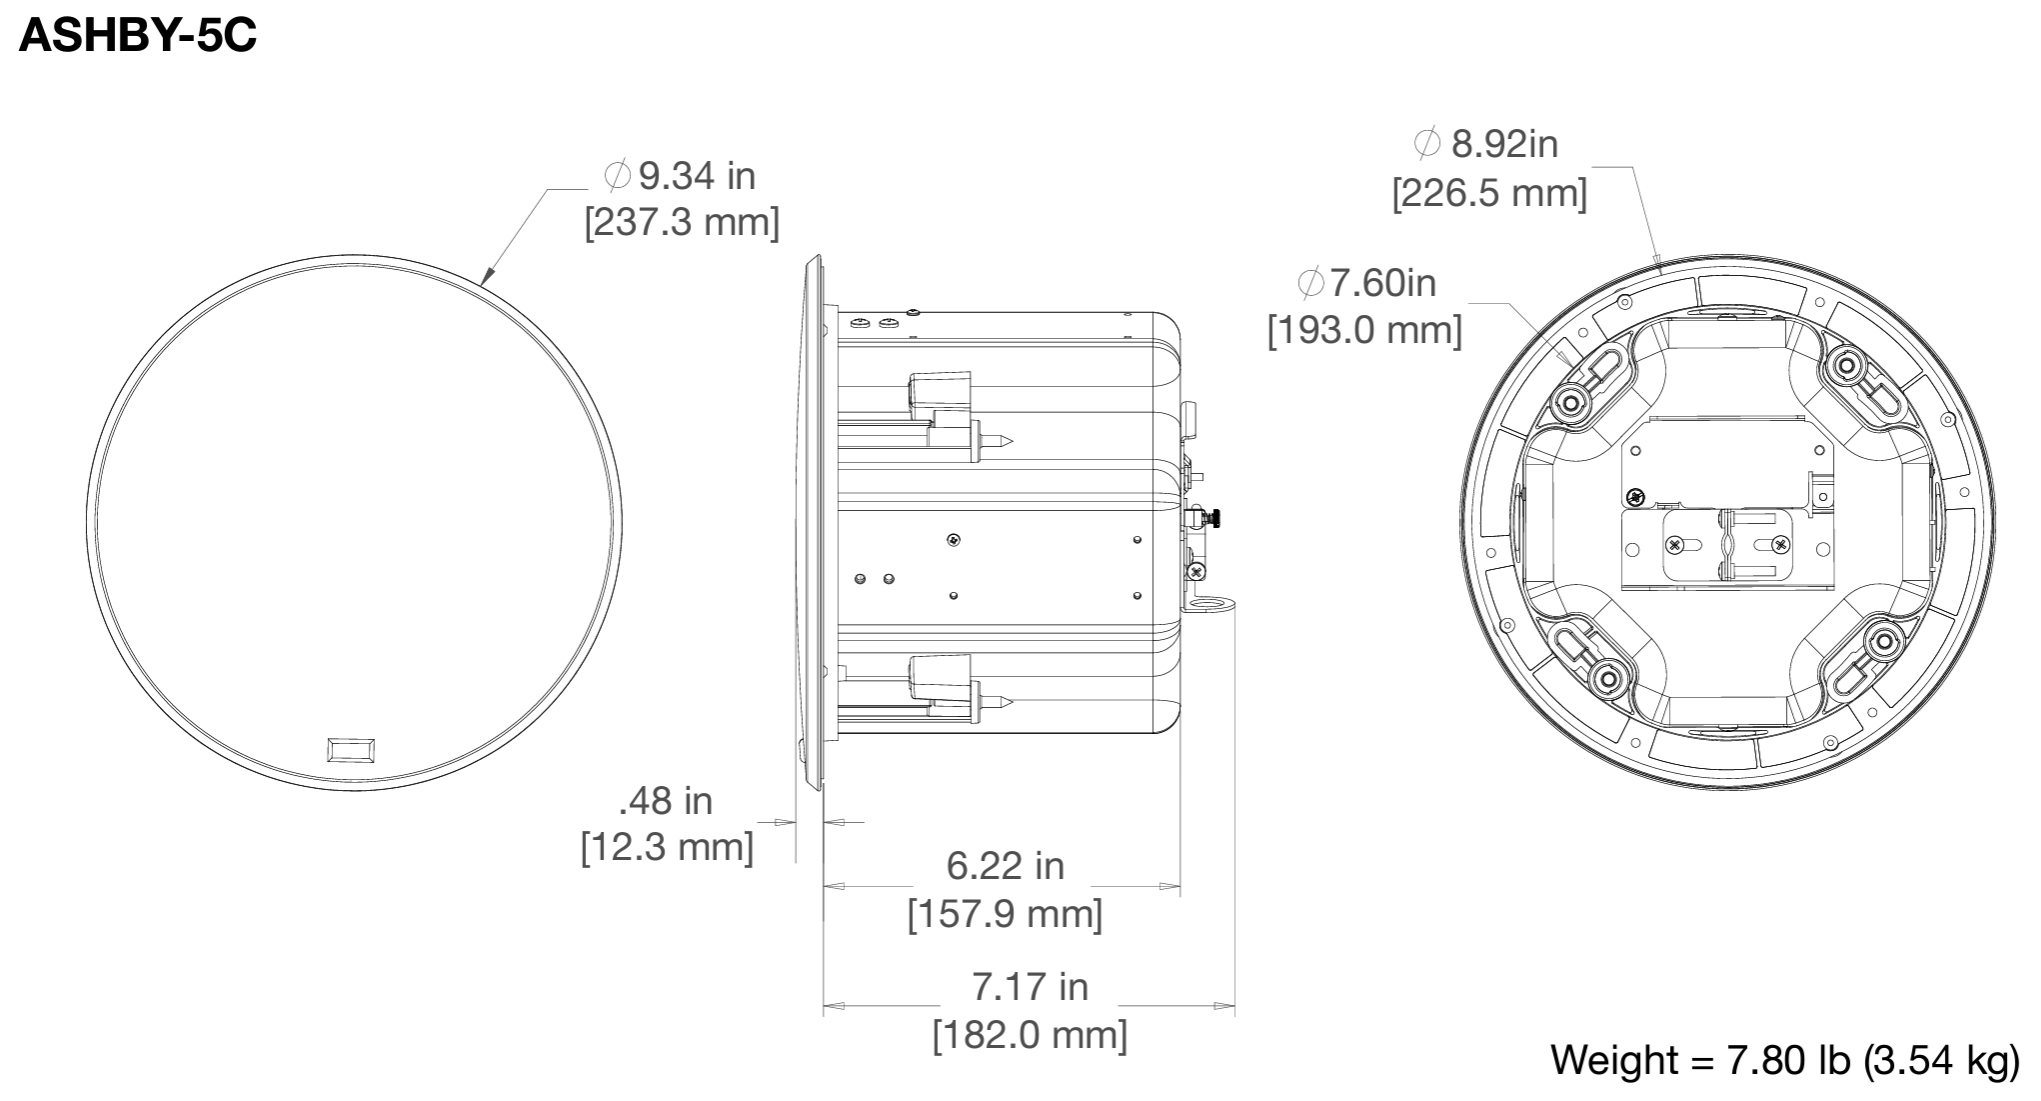
Ashby-8C Dimensions
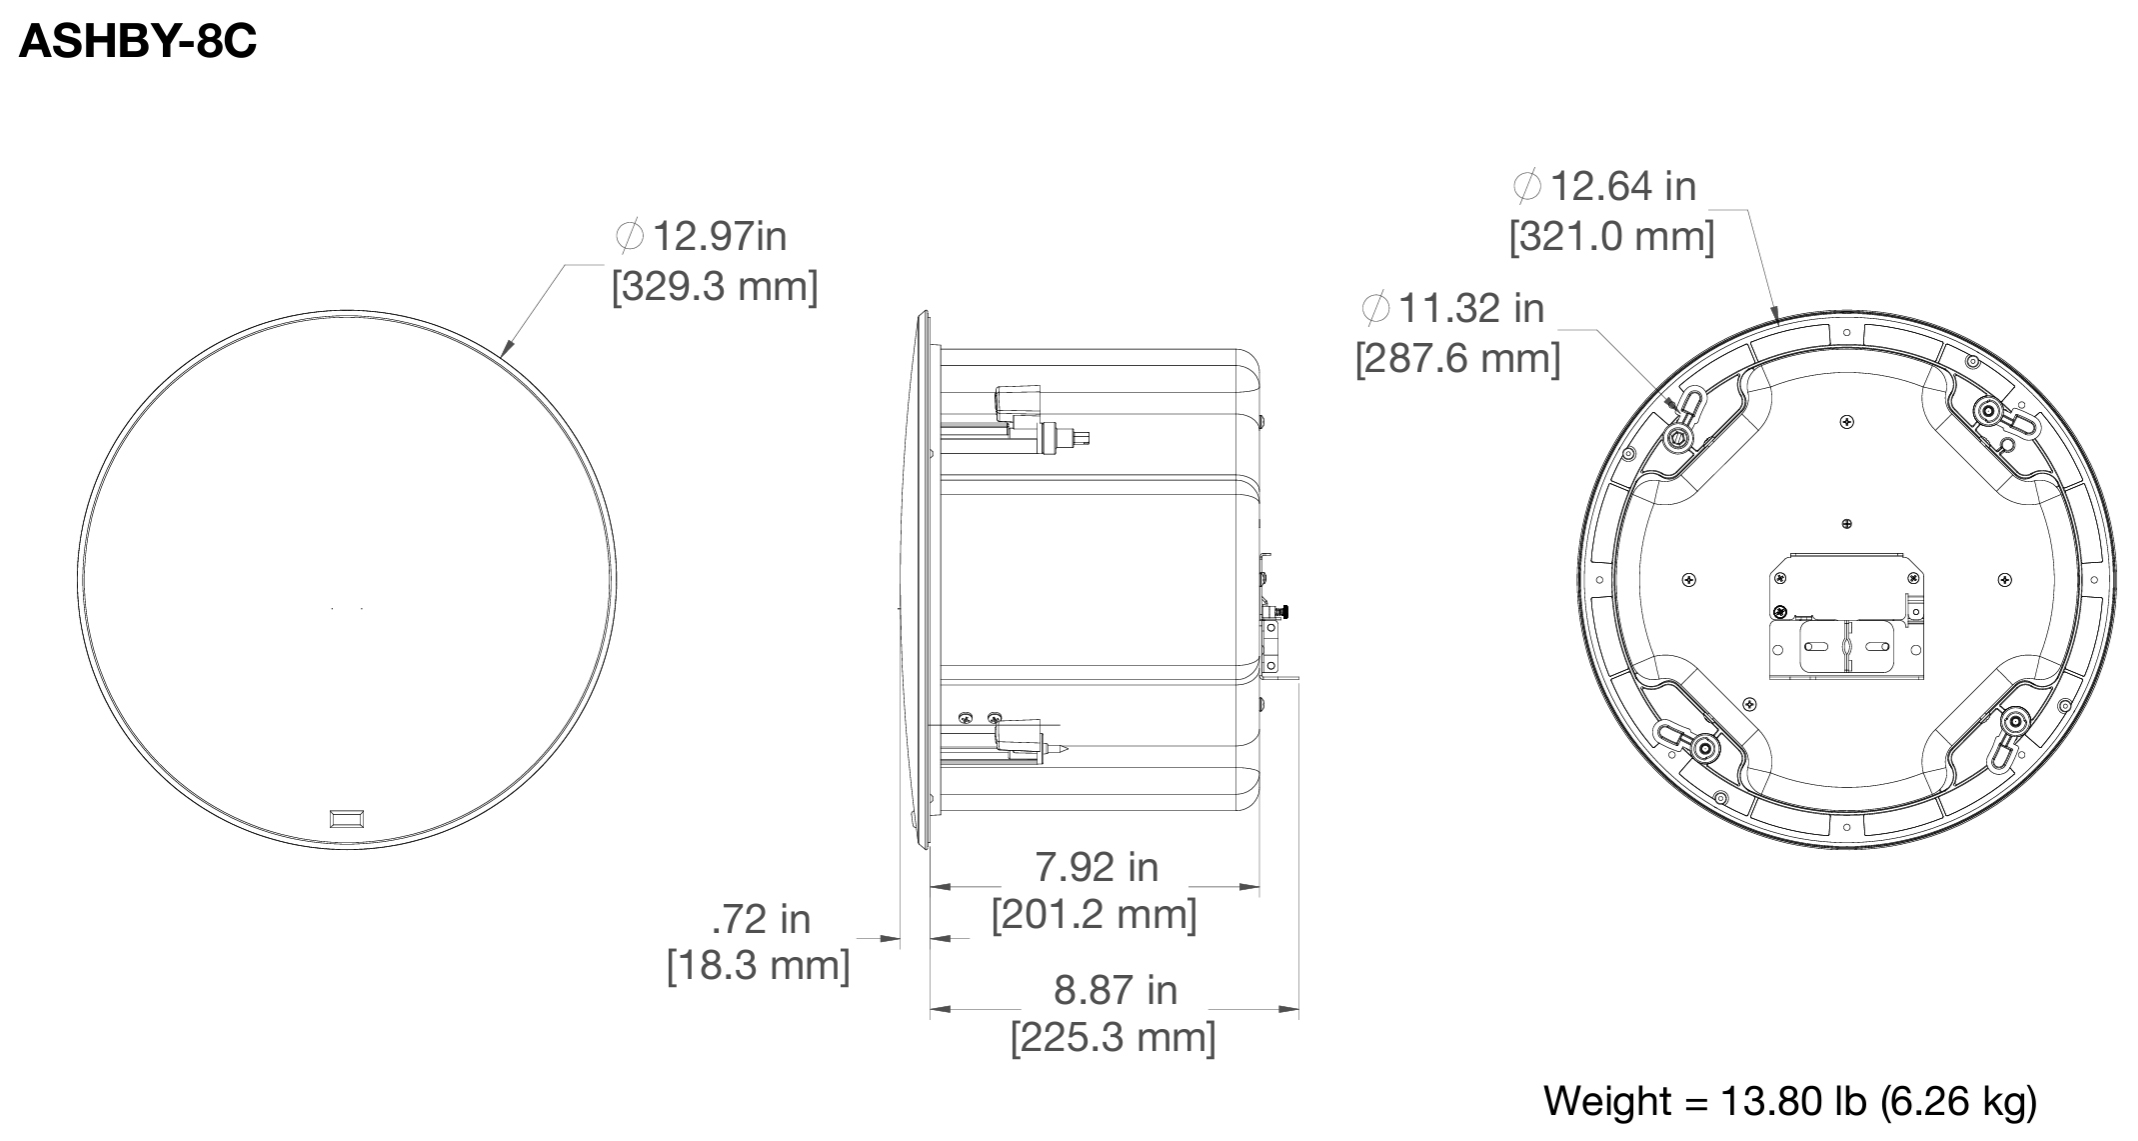
Ashby-5C Pendant Dimensions
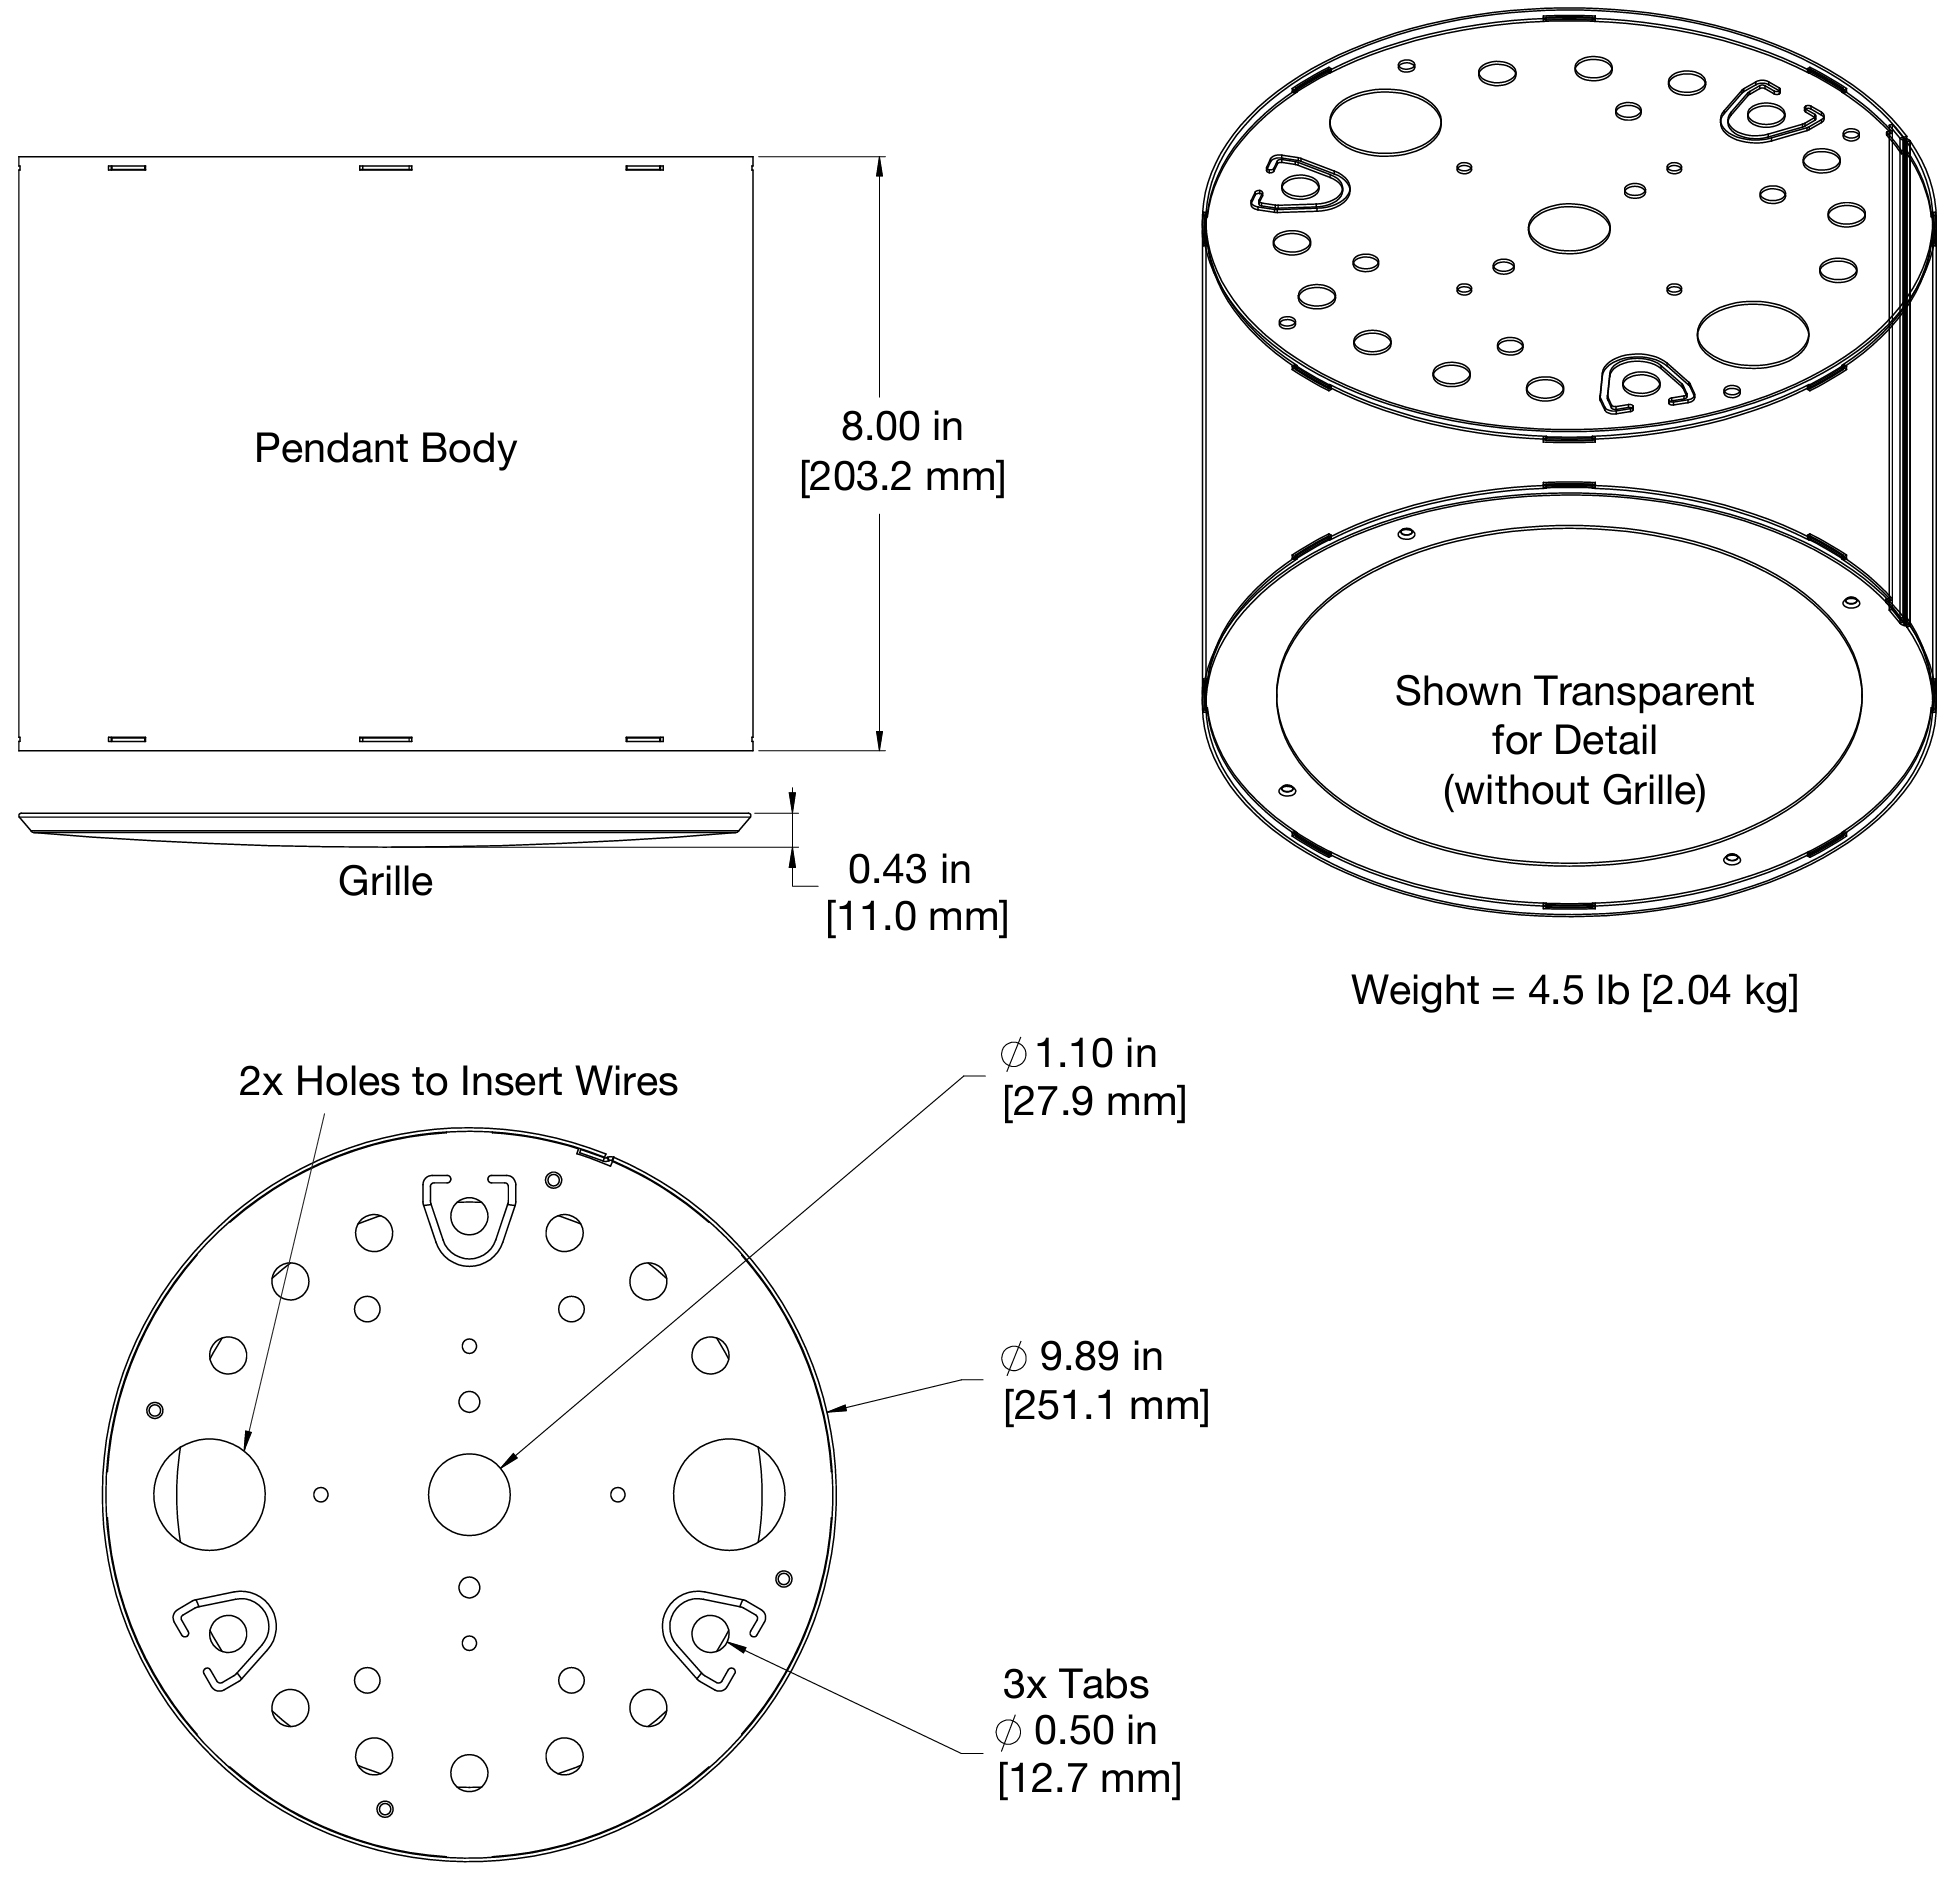
Ashby-8C Pendant Dimensions
