Customizing CueStation
CueStation can be customized to improve workflow by using saved layouts, keyboard short- cuts, project notes and reports, and communication between clients.
Page Group Controls
CueStation windows with the Display > Show Page Group Controls option can be grouped so that the displayed pages synchronize.
The following table describes the behavior of Page Group Controls.
Component | Function | |
|---|---|---|
Page Group Status | Disabled | Window does not affect any other members of the Page Group. Win- dow does not follow any other members of the Page Group. |
Mirror | Window display affects all Group Mirrors and Group Slaves in the Page Group. Window display follows Group Masters and all other Group Mirrors in the Page Group. | |
Slave | Window display follows Group Masters and all other Group Mirrors in the Page Group. | |
Master | Window display affects all Group Mirrors and Group Slaves in the Page Group. | |
Page Group ID | Changes which Page Group the current window is assigned. Ranges from 1–128. | |
has offsets | Offsets the display relative to other members of the Page Group. The first field is horizontal offset, the second is vertical. Offsets can be positive (right/down) or neg- ative (left/up). |
 NOTE: Each Page Group can have multiple Group Masters. Each Group Master will affect all Group Slaves, but other Group Masters will remain unaffected.
Layouts
Custom layouts are stored arrangements of windows on the screen. Saving several layouts with different purposes offers the convenience of switching between layouts quickly. For example, a custom layout can be saved for a performance-specific workflow that displays the Transport, Log, System Status, and Meter windows. A second layout can be saved that gives the user quick access to the Cue List, Cue Library, and Subcue Library windows. A custom hotkey or utility button can be set up to quickly switch between these two layouts.
CueStation layouts are saved as dmitriLayout files. You can also save a layout as a default, which can be opened automatically whenever CueStation is launched.
In addition to window selection and placement, a layout file also includes client connection information. For example, if the client is connected to a specific server when you save a layout as default, then whenever you launch CueStation, it will automatically try to connect to that server.
To save a custom layout:
Arrange the CueStation windows into the desired positions.
Choose Layout > Save Layout As.
Type a name for the layout, and save it to the client computer’s hard drive. To save a default layout:
Choose Layout > Save Layout As Default.
Enable the Layout > Use Default Layout on Launch option to have CueStation restore the default layout automatically upon launch.
Mapping Layouts to Hotkeys
The Open Layout subcue makes it possible to open a layout using a custom key mapping (see “Key Mappings Window” on page 204).
To assign a saved layout to a hotkey combination:
Choose Windows > Support Files window.
Drag a dmitriLayout file into the window to add it to the list of support files. The layout file must be included in the support files in order for it to be accessed by CueStation.
Choose Windows > Subcue Library window and create a new Commands subcue, with a Type of CueStation Control and a Command of Open Layout. Take note of the Subcue ID.
Type the name of the layout file in the Layout File Name field. If you would like to simulate the Open More Layout command, uncheck the box next to Close Existing Windows First:.
Open the Key Mappings window and choose Mappings > New Mapping to create a new key mapping.
Use the list in Appendix B, “CueStation Keyboard Shortcuts” to find a key mapping that is not already used by CueStation.
Set the Action to Recall, and the Target Type to Subcue.
For the Target ID, enter the ID number of the Open Layout subcue you created previously.
You have now created a key mapping that opens a saved layout. You can create additional key mappings that open different layouts using the same procedure.
Custom Utility Buttons
User-customizable utility buttons can be added to the bottom of any CueStation window. These buttons are defined with the Custom Utility Button Properties Editor. Layout > Add Cus- tom Utility Button opens the Custom Utility Button Property Editor.
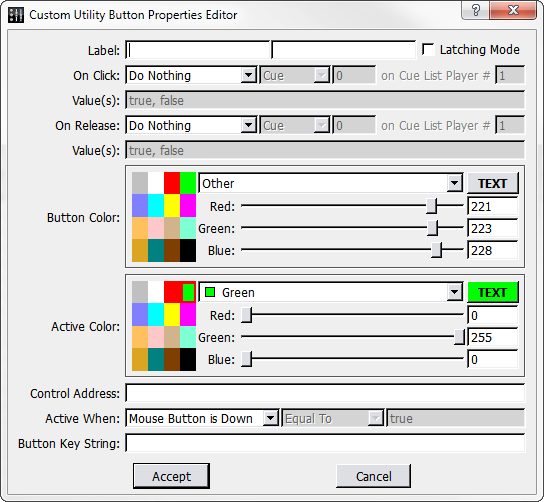 |
Custom Utility Button Properties Editor Window
You can set custom buttons to execute cue or subcue recalls, control points, cue/subcue updates, or text commands. The buttons function by recognizing click and release events, allowing you to assign actions to these events. The actions are: Do Nothing, Do Text Com- mand, Recall, Update, and Set Value.
To add a utility button to a CueStation window:
Choose Layout > Add Custom Utility Button.
Type a new label for the button. Optionally, in the next text box, enter a different name to be displayed when the button is active.
Optionally, select Latching Mode to create a button that stays depressed with the first click and releases with a second click. This behavior is visual only.
Choose an On Click: action: Do Nothing, Recall, Update, or Set Value.
If you chose Recall or Update, select the cue or subcue to be affected. If you chose Set Value, enter the control point's target value.
Optionally, choose an On Release action, which will be triggered when the button is released.
If you wish, alter the color of the button for its normal and active modes. For example, if the button toggles a channel mute, you might wish to make the Active Color red. You can select from the basic, premade colors to the left, or create a custom color using the RGB sliders.
If you chose Set Value above, type the name of the control point in the Control Address text box, and then enter the desired values in the On Click and Release Value fields.
The Active When: parameters control when the button appears active. If it is set to Mouse Button is Down, the button will only be active momentarily. This setting is useful for cue recalls and other momentary actions.
Alternatively, if you want the state of the button to reflect the state of a control point, change Active When: to either Value is or Value is not, and enter a value. Or, set Active When: to Never or Always if you don't want the active state to change. See the next sec- tion, “Utility Button Example” on page 203, for an example on how this function is used.
Optionally, add a Button Key String. Custom utility buttons can be controlled by subcues, and the button key string allows each button to be changed separately.
Click Accept to add the button to the bottom of the window.
Utility Button Example
In this example, there are three cue lists: one Speaker Check cue list and two Show Cue lists. The following procedure will create custom utility buttons that switch between the cue lists when clicked.
Open the Transport window.
Choose Layout > Add Custom Utility Button to open the Utility Button dialog.
Change the Label: from New Button to Speaker Check.
Choose On Click > Set Value.
Enter the ID of the Speaker Check cue list into the On Click Value field.
For the Control Address, type Automation 1 Active CueList ID.
In the next line, select Value is, Equal To, and type the ID of the Speaker Check cue list again.
Click Accept to create the first button. For the other two buttons, these options will mostly stay the same, except:
The button label should reflect the name of the cue list.
The Active When: and Equal To value will be the ID of the Cue List.
When complete, three buttons are displayed at the bottom of the Transport window. Click them to switch between active cue lists.
To edit or delete a custom button, right-click the button and select Edit or Delete.
Key Mappings window
The Key Mappings window provides an area to bind keys to cue and subcue recalls and updates.
 |
Key Mappings Window
Tip
Client Control External Command subcues can be used to bring any window to the front, complete with a specification for the window to display. By using Key Mappings in conjunction with this subcue, you can create a set of custom key map- pings to show you particular sets of windows.
To choose from available Key and Modifier settings, right-click each field. Multiple simultane- ous mappings can be configured for each combination of Modifiers and Keys. Each mapping is represented by a row in the window. Each row consists of several fields.
Field | Description |
|---|---|
ID | A unique index for the mapping. |
Modifiers | Specifies which combination of modifiers are assigned to this mapping. Right-click this field to display the available set of modifiers in a context menu. |
Key | Specifies which keystroke is pressed in conjunction with the modifiers to trigger the mapping’s action. Right-click this field to display the available set of keys in a con- text menu. |
Action | Specifies whether to Recall or Update the specified target cue or subcue. |
Target Type | Specifies whether Target ID refers to a cue or subcue. |
Target ID | Specifies the ID of the target cue or subcue. |
Client Name(s) | Either the IP address of a particular computer running CueStation, or any computer running CueStation detected on the network. |
Comment | An editable text field for a comment. |
NOTE: A complete list of the default key mappings can be found in Appendix B, “CueStation Keyboard Shortcuts.”
Mappings Menu
The Mappings menu contains commands for mapping management.
Command | Function |
|---|---|
New Mapping | Create new mapping. |
Duplicate Mapping | Duplicate the selected mapping. |
Delete Mapping | Delete the selected mapping. |
Project Notes and Reports
The Project Notes window provides an area to type free-form unformatted text. This text is stored within the project file. Project Notes are a convenient place to store information about the configuration of the system, the purpose of certain cues, or other useful information related to the project.
Notes Menu
The Notes menu contains commands for managing project notes.
Command | Function |
|---|---|
Clear Notes | Remove all notes. |
Save Notes As | Save the notes to a new text file. |
Save Notes | Save the notes over the previously saved version. |
Generate Report
Projects > Generate Project Report will create a text file that includes information about the project, including project notes, mixer configuration, cue lists, cues, subcues, and control points. This report is useful for archival purposes, or for transforming the information into a different format, such as a spreadsheet or database.
Chat and paging
The Chat window provides a means for communication between members of the cue-pro- gramming team.
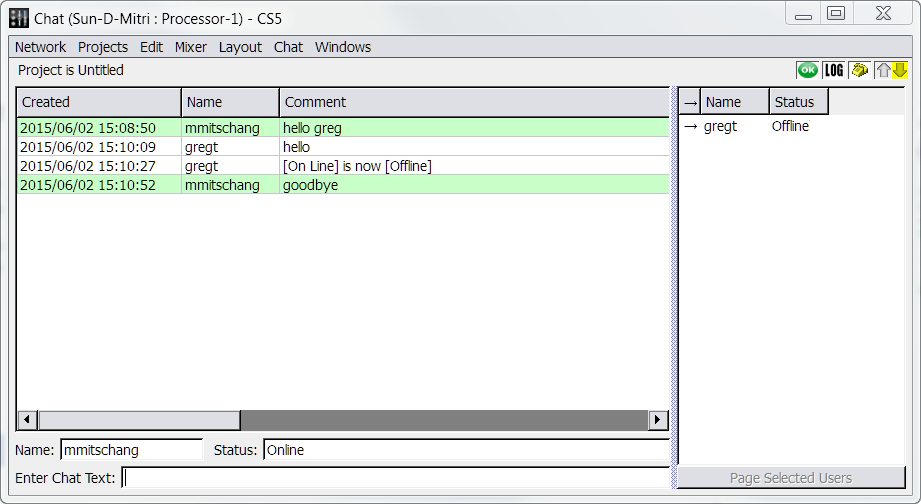 |
Chat Window
The window provides three panels of information:
Chat Log, containing the chat messages with a timestamp and the sender’s name.
Member Log, listing the Name and Status for each member of the team.
Message Entry area, providing Name:, Status:, and Enter Chat Text: boxes.
Page Selected Users button, for paging members of the team.
To send a message to the team, type your name in the (smaller) Name: box and your message in the Enter Chat Text: box. Press Enter and your message will be displayed in the Chat Log panel of your team members’ Chat windows.
To page another user, click the Page Selected Users button, and select the name of the per- son you wish to page. On the paged person's screen, all CueStation windows will flash cyan once, and the telephone icon will flash continuously until the page is answered.
Chat Menu
The Chat menu contains commands for managing the displayed chat log.
Command | Function |
|---|---|
Clear Chat | Clears the chat log. |
Save Chat As | Saves the chat log to a new text file. |
Save Chat | Saves the chat log over the previously saved version. |