Rain Hoods
Weather-protected LINAs include a rain hood for indoor/outdoor touring and sheltered outdoor installations. Meyer Sound offers three rain hood models: A fixed rigid rain hood for permanent installations, a collapsible hood for portable applications, and an Ultra Weather Protection rain hood that has improved corrosion resistance (see Appendix C, “ULTRA Weather Protection Version” and Appendix D, “LINA UW Rain Hood and Shield Attachment”). Please specify the desired rain hood when ordering.
Rigid Rain Hood
The LINA rigid removable rain hood is easily attached and removed with the included four screws, as shown in the figure below.
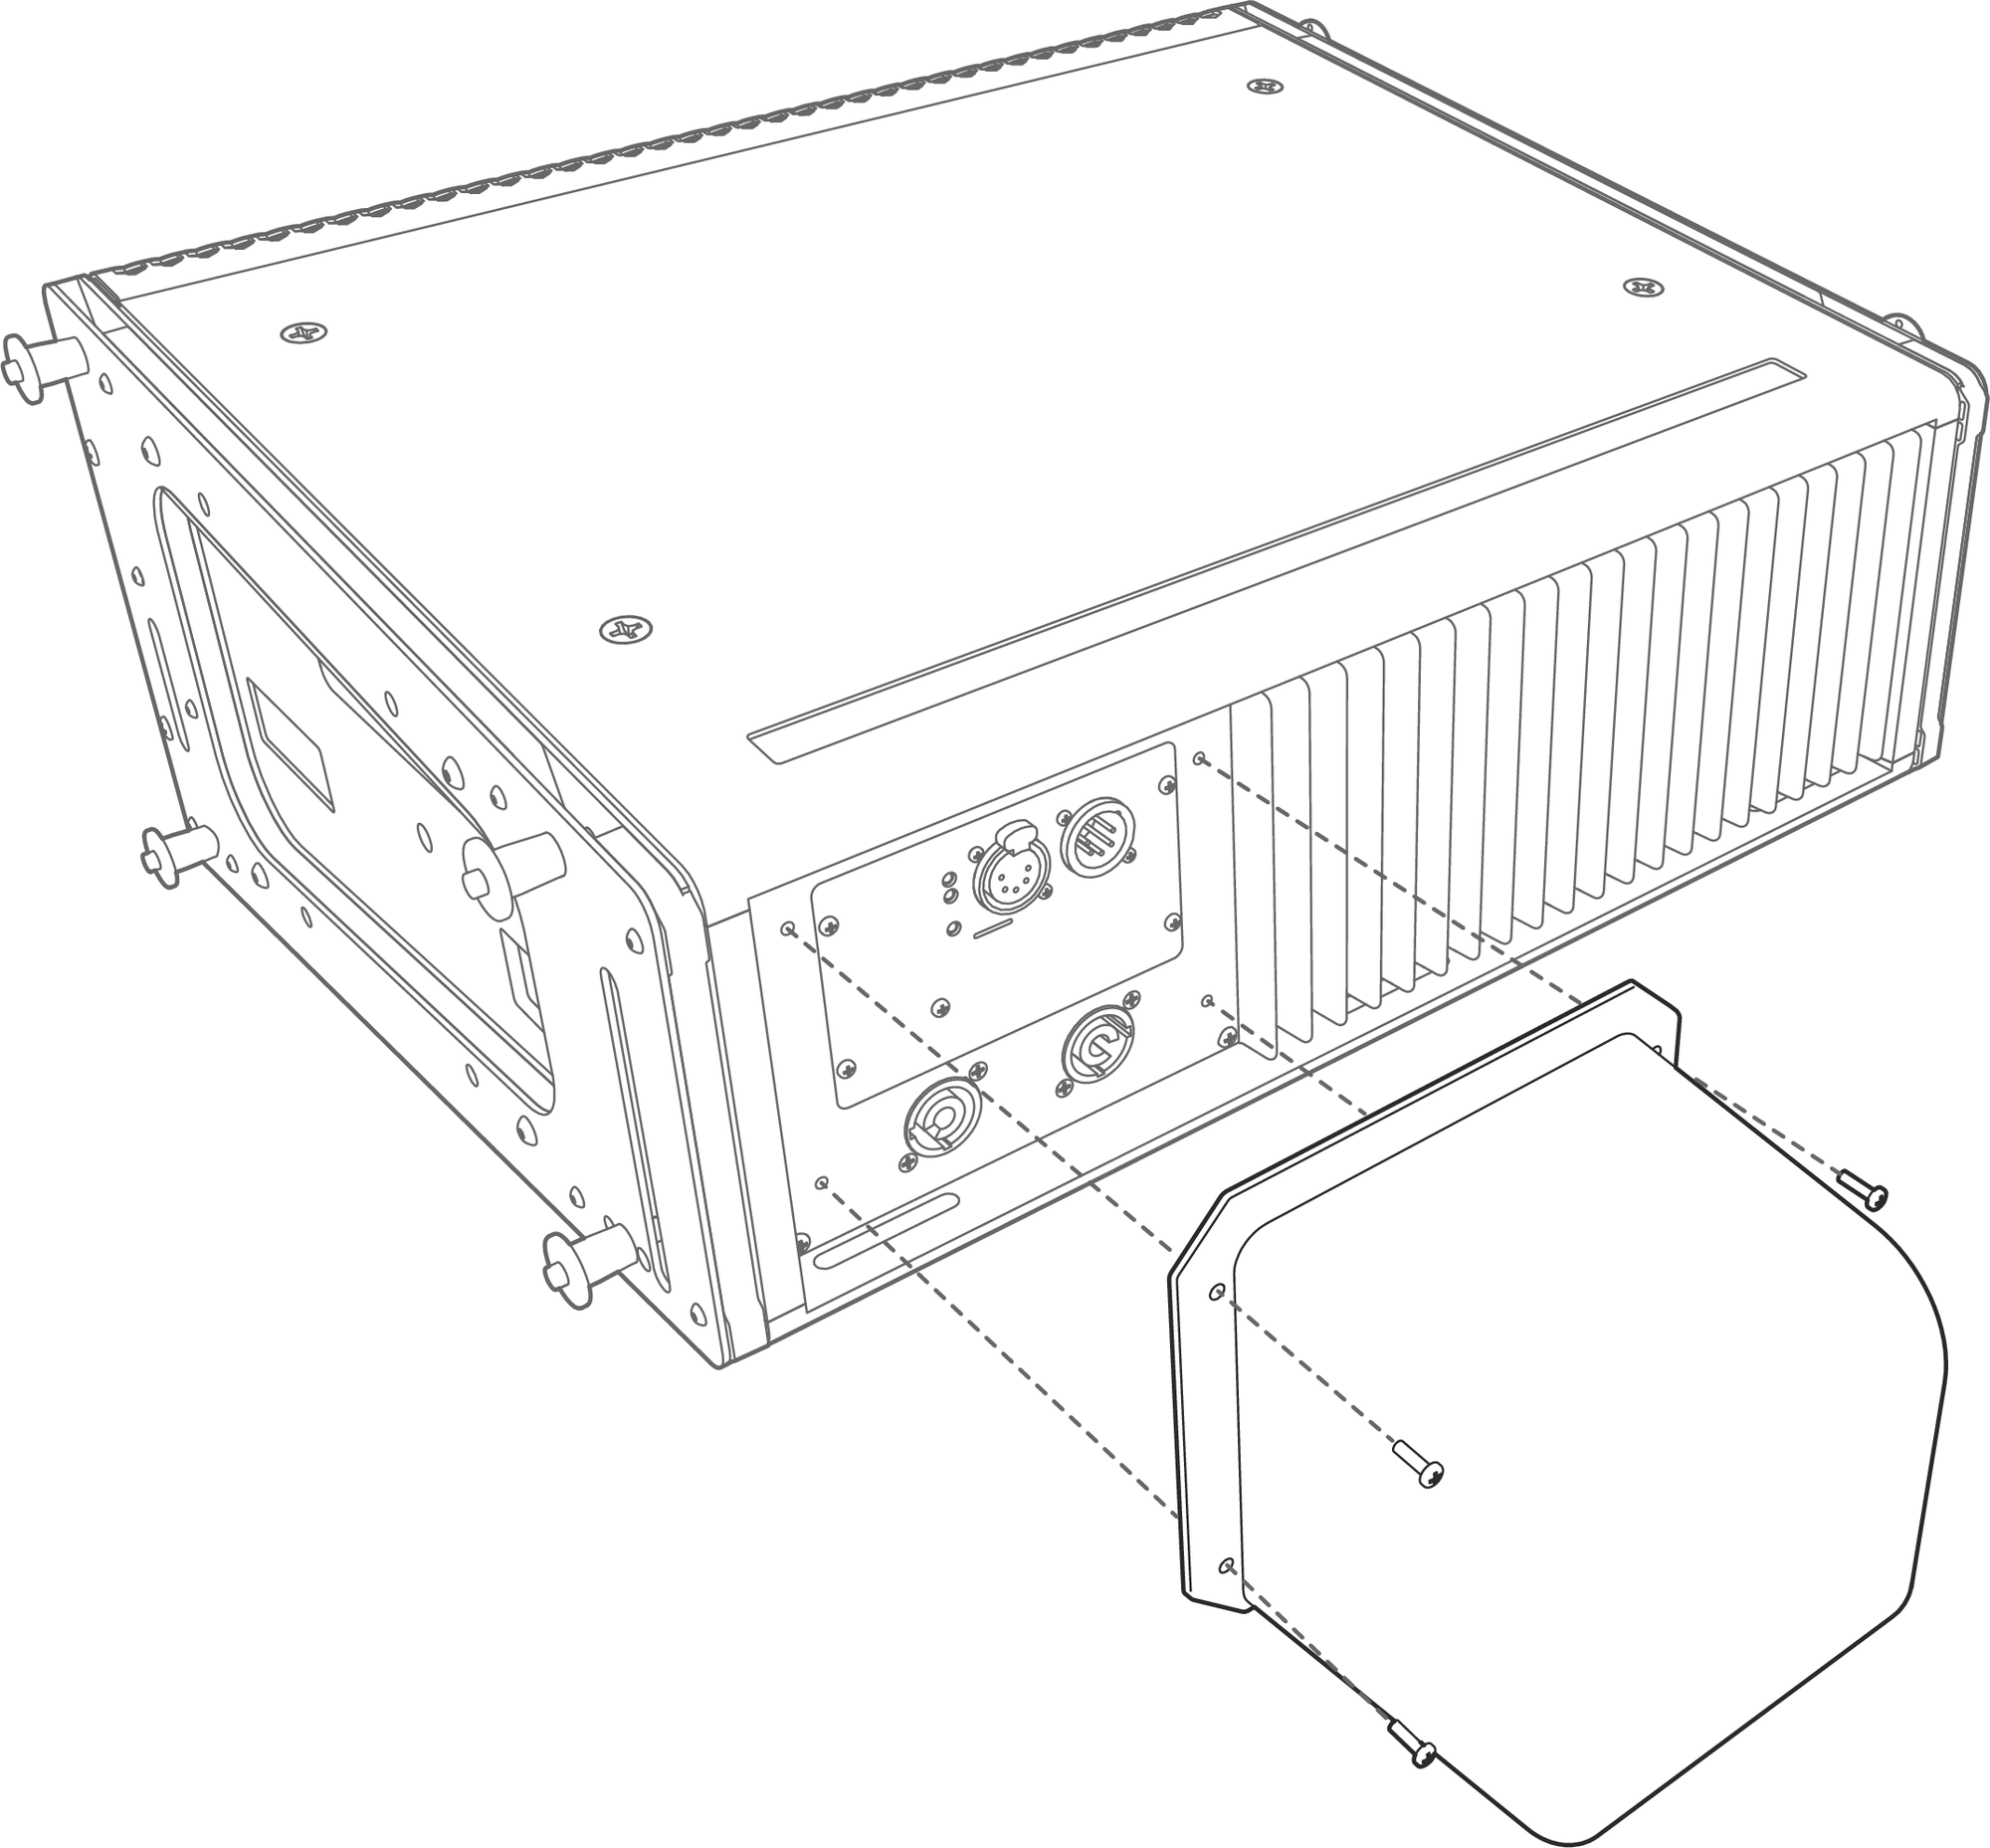
LINA with rigid rain hood
Attach any required cables to the LINA loudspeaker.
Attach the rain hood to the user panel, and secure it to the center of the panel with its four 6-32 screws.
Make sure to tighten the screws to create a good seal against the user panel. The recommended torque value for rainhood screws is 10–12 in-lbs (1.1-1.4 N·m).
Caution
There is only one proper loudspeaker orientation once the rainhood is installed, as shown in the figure above.
The weather-protected LINA must be mounted with a 0° tilt, or preferably with a slight down-tilt. This angle shields the driver from the elements and does not allow water to accumulate. Do not tilt the cabinet up, as the drivers and cabinet will accumulate water.
Note
Weather-protected units using the rigid rainhood are rated IPX4 for water intrusion.
Collapsible Rain Hood
The LINA collapsible rain hood is installed on the unit when shipped. Four screws secure its frame permanently, as shown in the figure below.
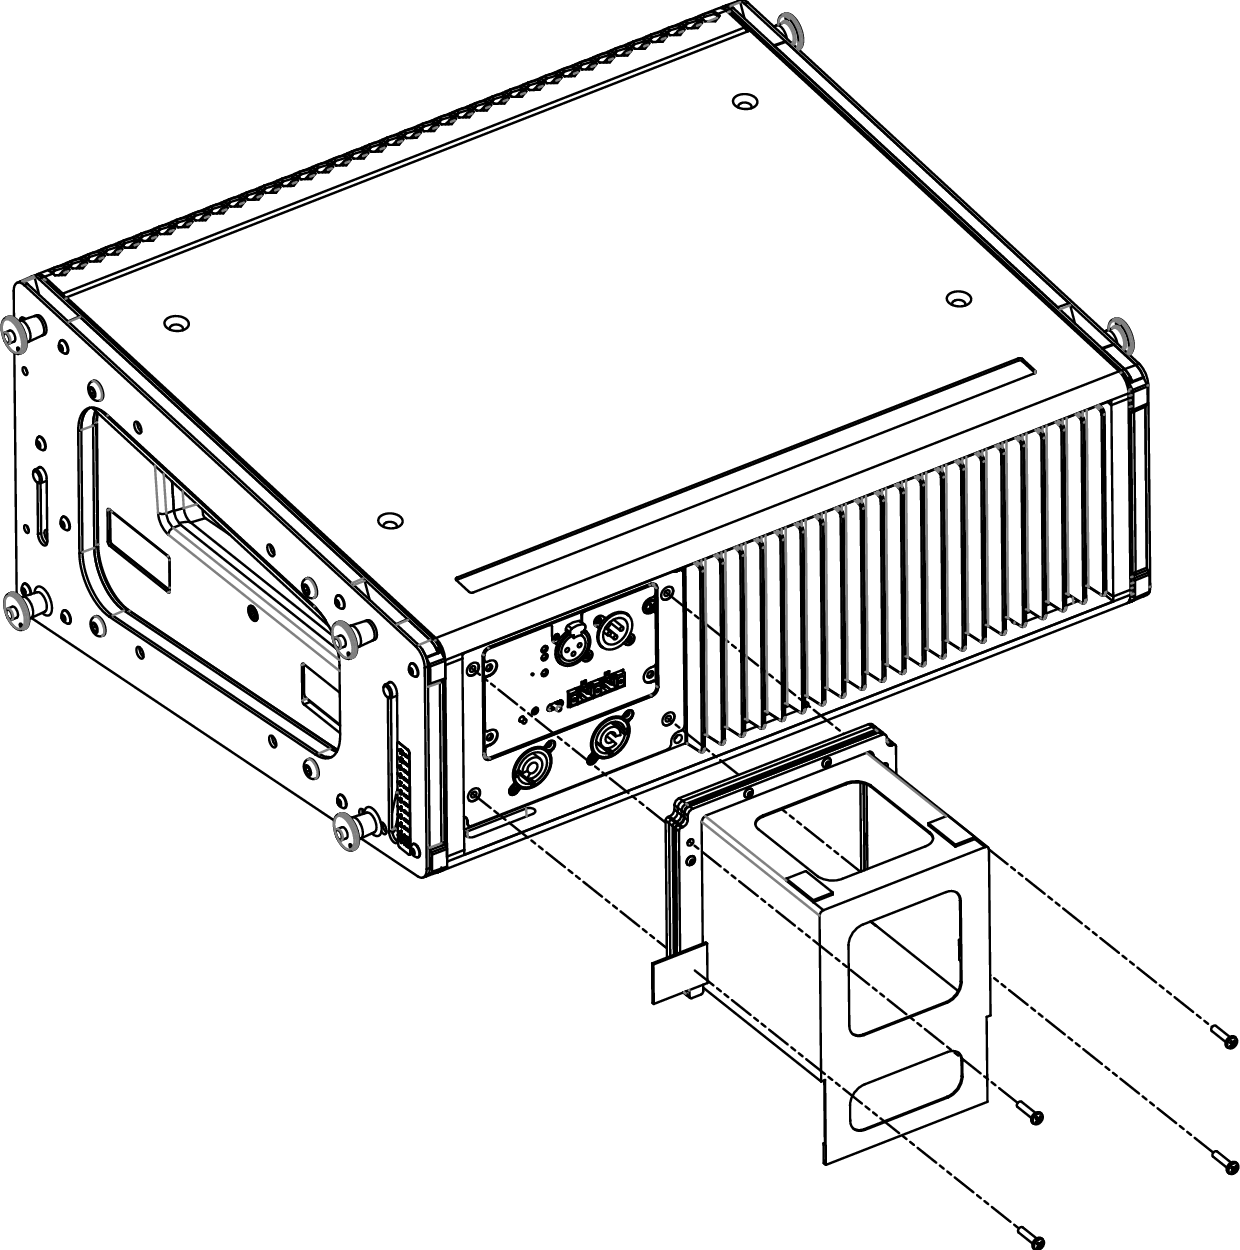
LINA with collapsible rain hood
Detach the Velcro straps and extend the rain hood.
Extend the lower flap for splash protection.
Attach any required cables to the LINA.
The clear windows let you easily locate the connectors on the user panel.
To stow the rain hood, reverse the steps.
Caution
There is only one proper loudspeaker orientation once the rainhood is installed, as shown in the figure above.
The weather-protected LINA must be mounted with a 0° tilt, or preferably with a slight down-tilt. This angle shields the driver from the elements and does not allow water to accumulate. Do not tilt the cabinet up, as the drivers and cabinet will accumulate water.
LINA UW Rain Hood and Shield Attachment
Parts List
The Ultra Weather Protection LINA Rain Hood includes the following parts:
LINA Rain Hood with attached gasket (PN 45.268.035.03)
LINA UW Rain Hood Shield (PN 64.268.129.01)
4 pan head Phillips 6-32 x 0.5-inch stainless-steel screws (PN 101.031)
ULTRA Weather Protection Version
Ultra Weather Protection is recommended for applications where loudspeakers will experience exposure to a salt air environment or chemicals, that have no sheltering from corrosive spray or UV exposure, and that cannot be covered or removed during their service life. Examples would include cruise ship exterior areas, ocean-side visitor attractions, swimming pool areas, and themed attractions with wind-carried water spray.
For installations in extremely harsh environments, Meyer Sound offers an Ultra Weather Protection option for the LINA loudspeaker, which includes all of the components of standard Weather Protection, plus the following:
Extended cabinet finishing with extra thick proprietary coatings
Special printed circuit board treatments
Improved corrosion-resistant coatings and materials on select metallic components
Table 6 provides a list of user-accessible hardware component differences for LINA loudspeakers that are ultra weather protected.
Table 6: LINA Ultra Weather Protection Version Part Differences
LINA Part/LINA Accessory | Current Part | UW LINA Part Replacement | Comment |
|---|---|---|---|
MG-MINA/LINA/750-LFC Multipurpose Grid | MG-MINA/LINA/750-LFC Multipurpose grid (PN 40.207.101.01) | MG-LINA/750-LFC Multipurpose Grid, black (PN 40.207.101.06) or MG-LINA/750-LFC Multipurpose Grid, white (PN 40.207.101.05) | |
MG-MINA/LINA/750-LFC Grid to Loudspeaker Fasteners | Grid quick-release pins (with lanyard) 0.25 in x 0.90 in PN 134.036, qty 8 | UW bolts, PN 101.629, qty 8 UW nylock nuts, PN 109.059, qty 8 | The shoulder bolts and nuts replace the longer quick-release pins (with lanyard) used for both hanging arrays and groundstacking |
LINA Loudspeaker to Loudspeaker Fasteners | Loudspeaker quick-release pins 0.25 in x 0.53 in PN 134.039, qty 8 | UW lock pins, 0.25 in x 0.53 in PN 134.133, qty 8 | |
LINA Loudspeaker Part | Rear GuideALink | — | For ultra weatherized versions of the LINA, the 11° Splay Angle position of the Rear GuideALink (see “Rear GuideALinks” on page 14) is not available. |
ULTRA Weather Protect Rain Hood and UW Shield Installation
The LINA rigid removable rain hood plus UW rain hood shield are easily attached and removed with the included four screws, as shown in the figure below.
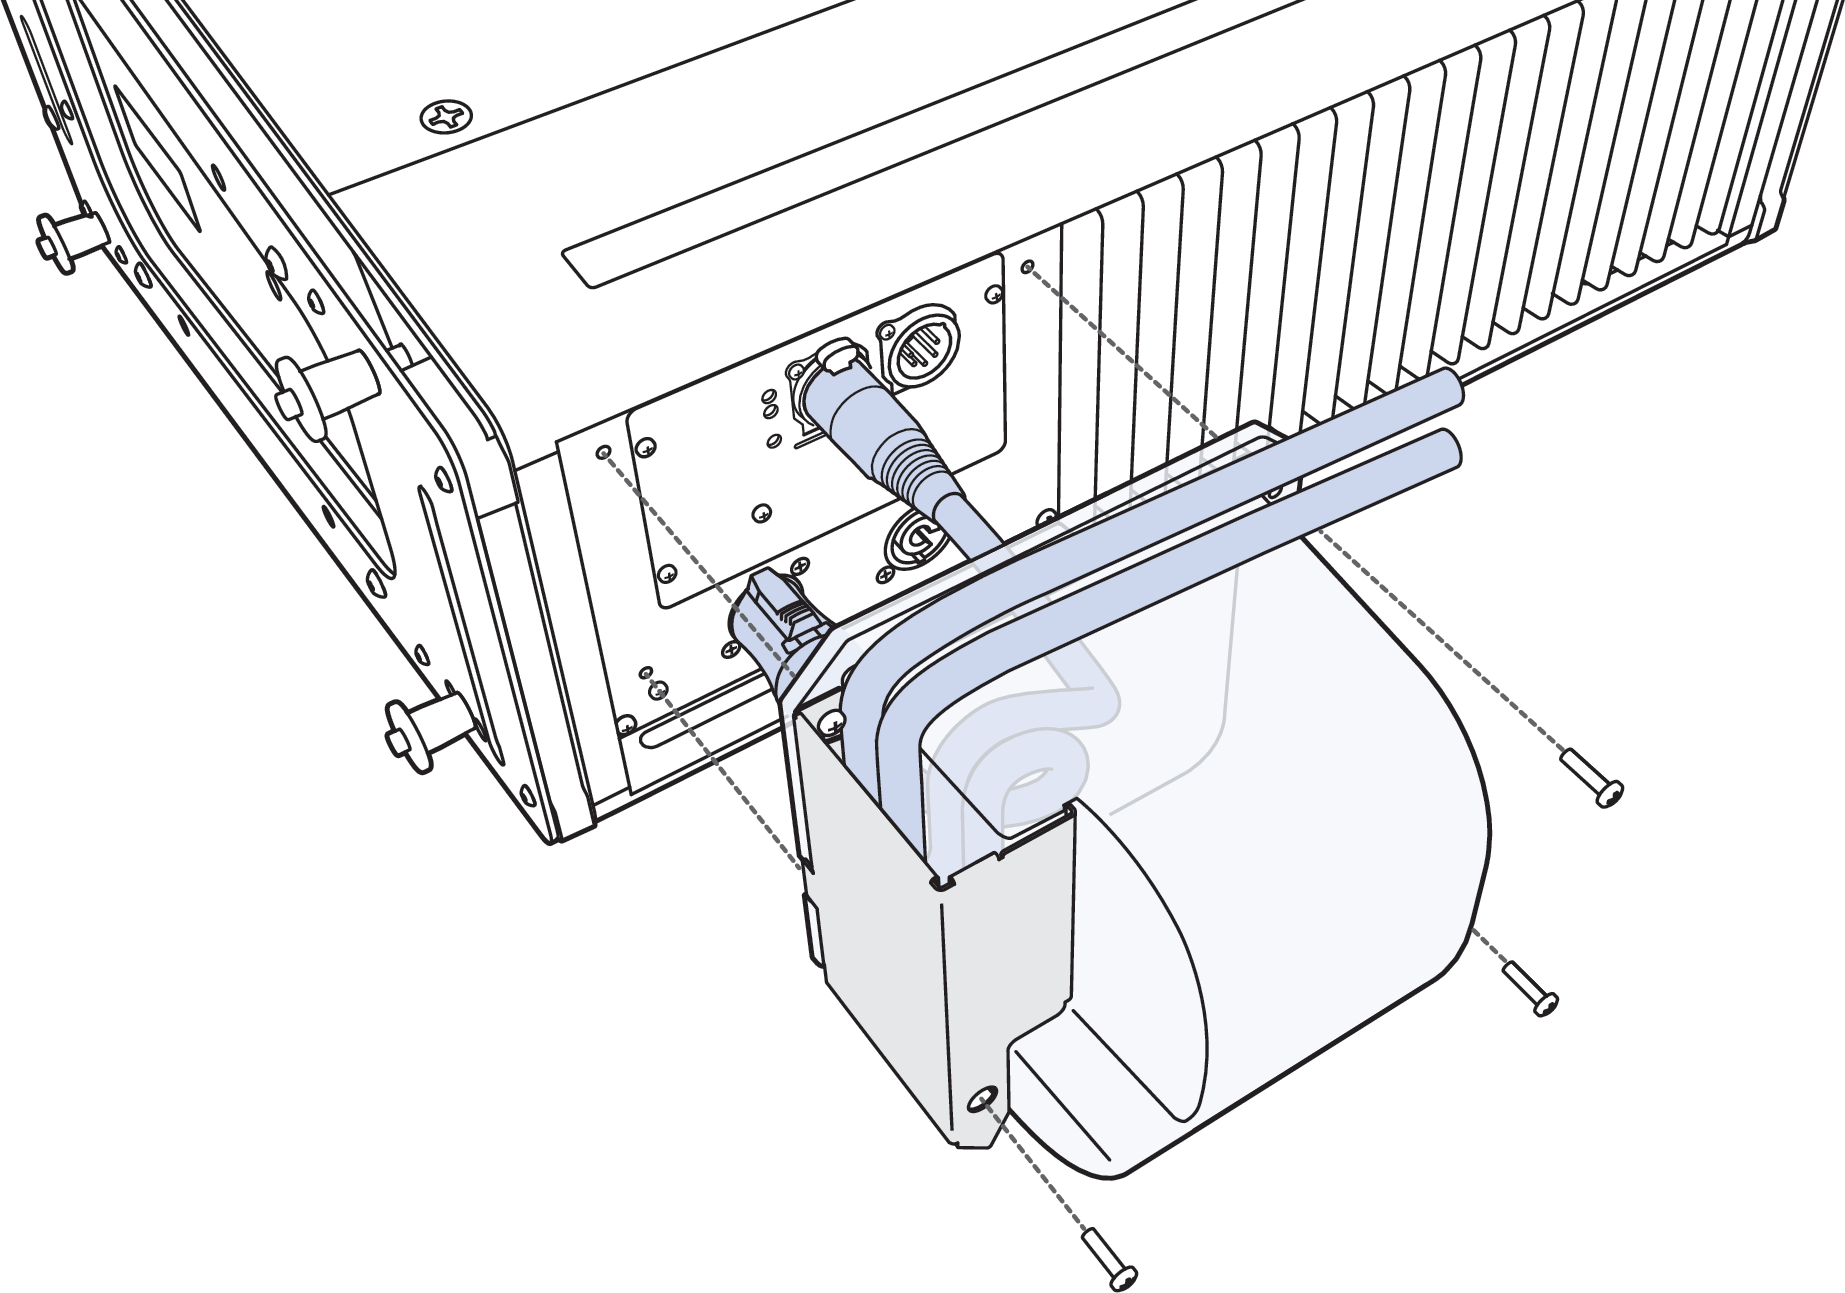
LINA with Rain Hood and UW Shield (left) and Inside Rain Hood view of Cable Routing over Inner Wall (right)
Attach any required cables to the LINA loudspeaker.
Carefully route the cables, so that they wrap over and down the inner rain hood wall (see [→ _bookmark94]Figure 48, right), and exit through the slot.
Attach the rain hood to the user panel and loosely secure it to the center of the panel with its four 6-32 x 0.5-inch screws.
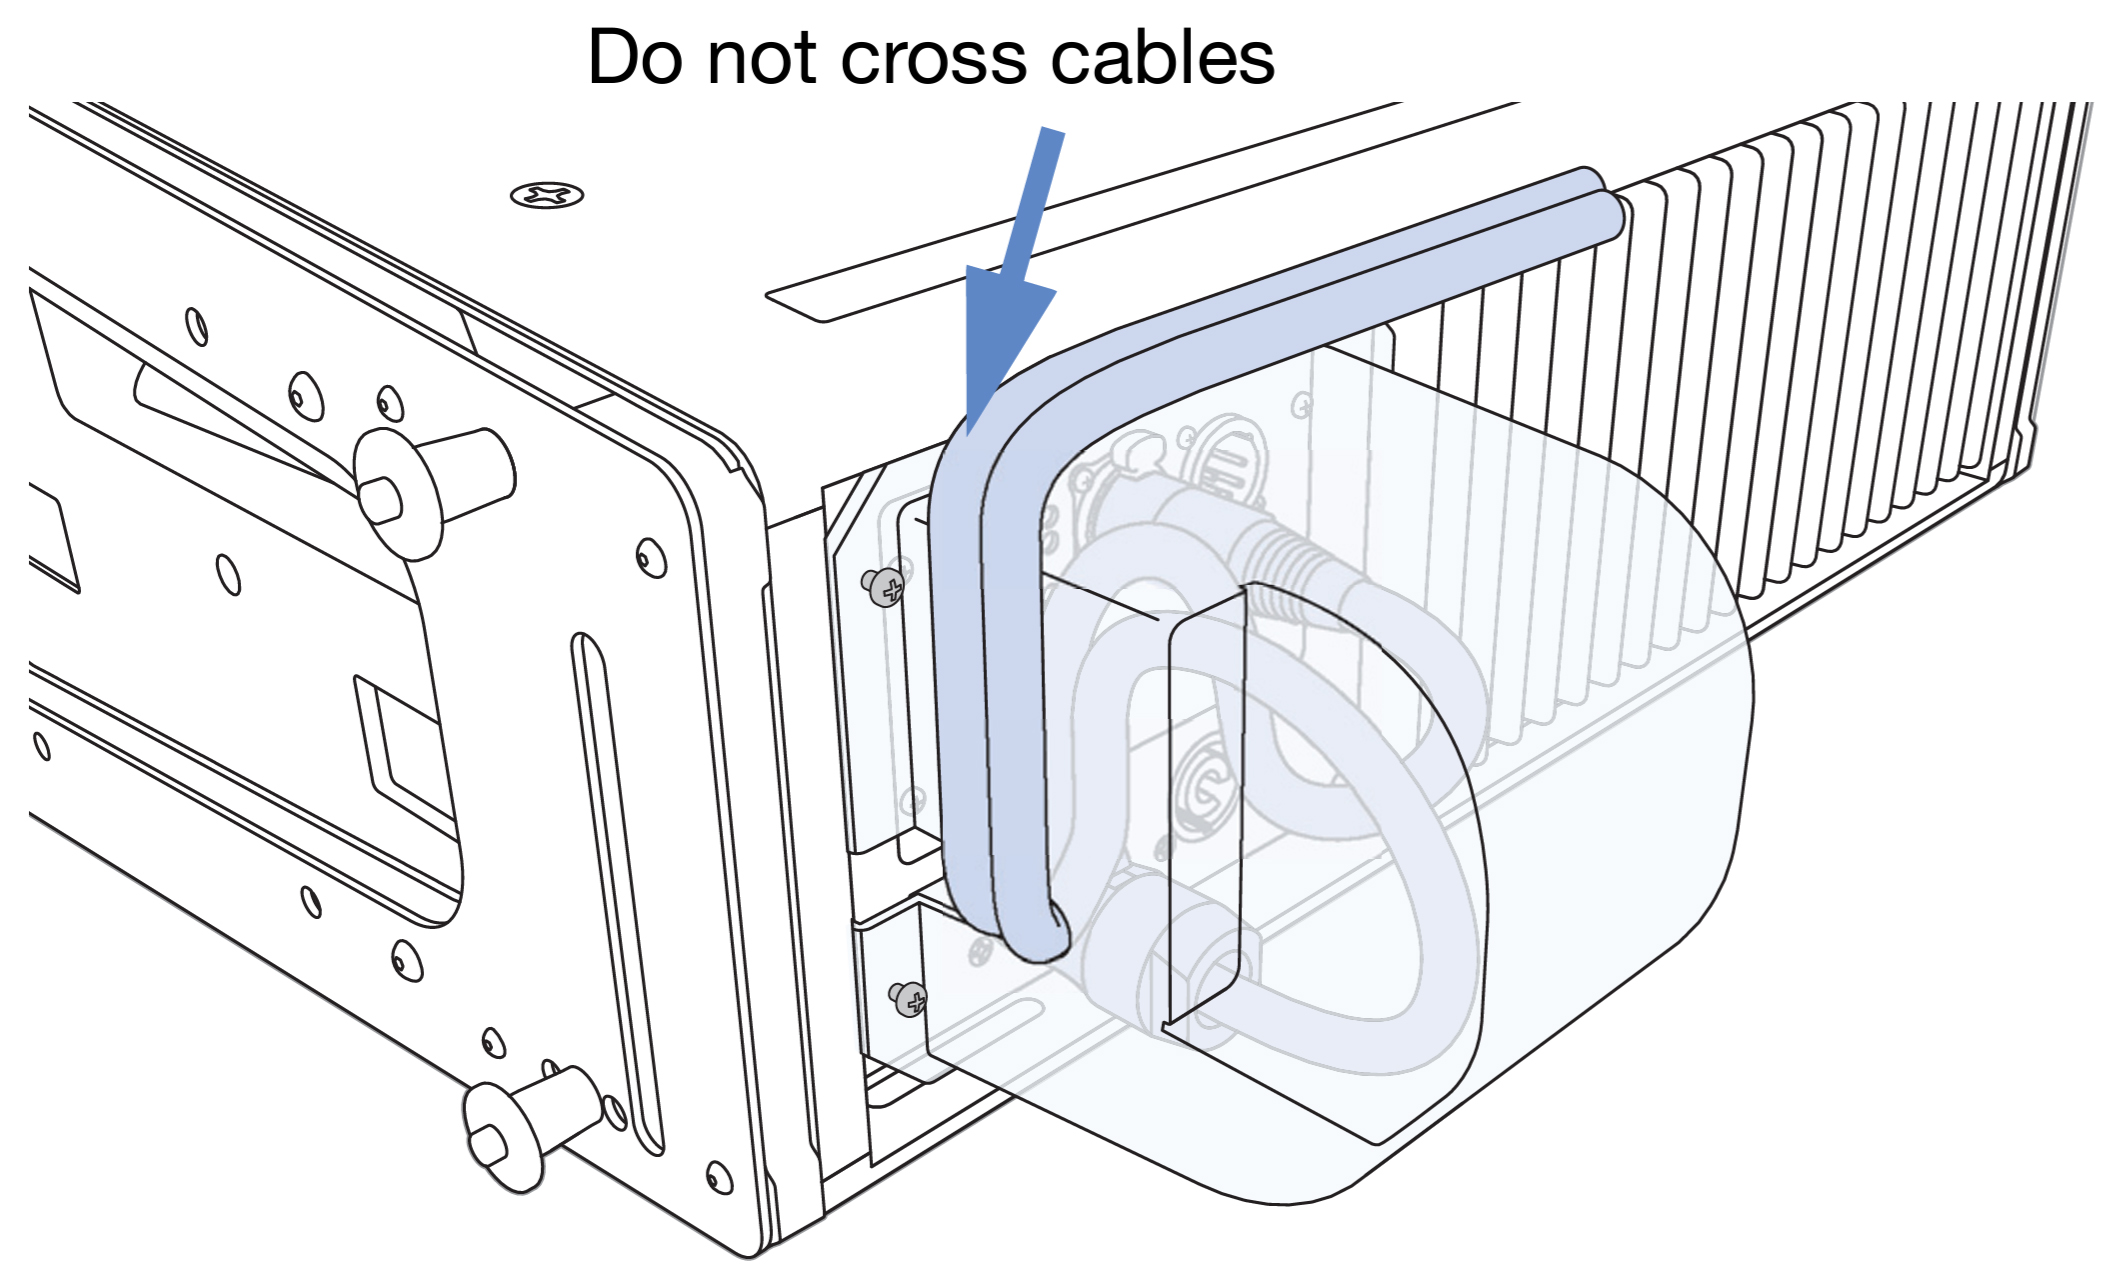
Engage 2-3 threads on the upper- and lower-left screws. The cables should exit to the left when viewing from the rear of the loudspeaker. Do not cross the cables at the rain hood opening (see [→ _bookmark95]Figure 49, right).
Route the cables up and over the top of the rain hood between the shield and the rain hood. Do not cross the cables (see [→ _bookmark95]Figure 49, left).
Angle the shield and hook the slots in the L-shaped UW shield over both upper- and lower-left screws (when facing the rear of the loudspeaker, as shown in the figure below.
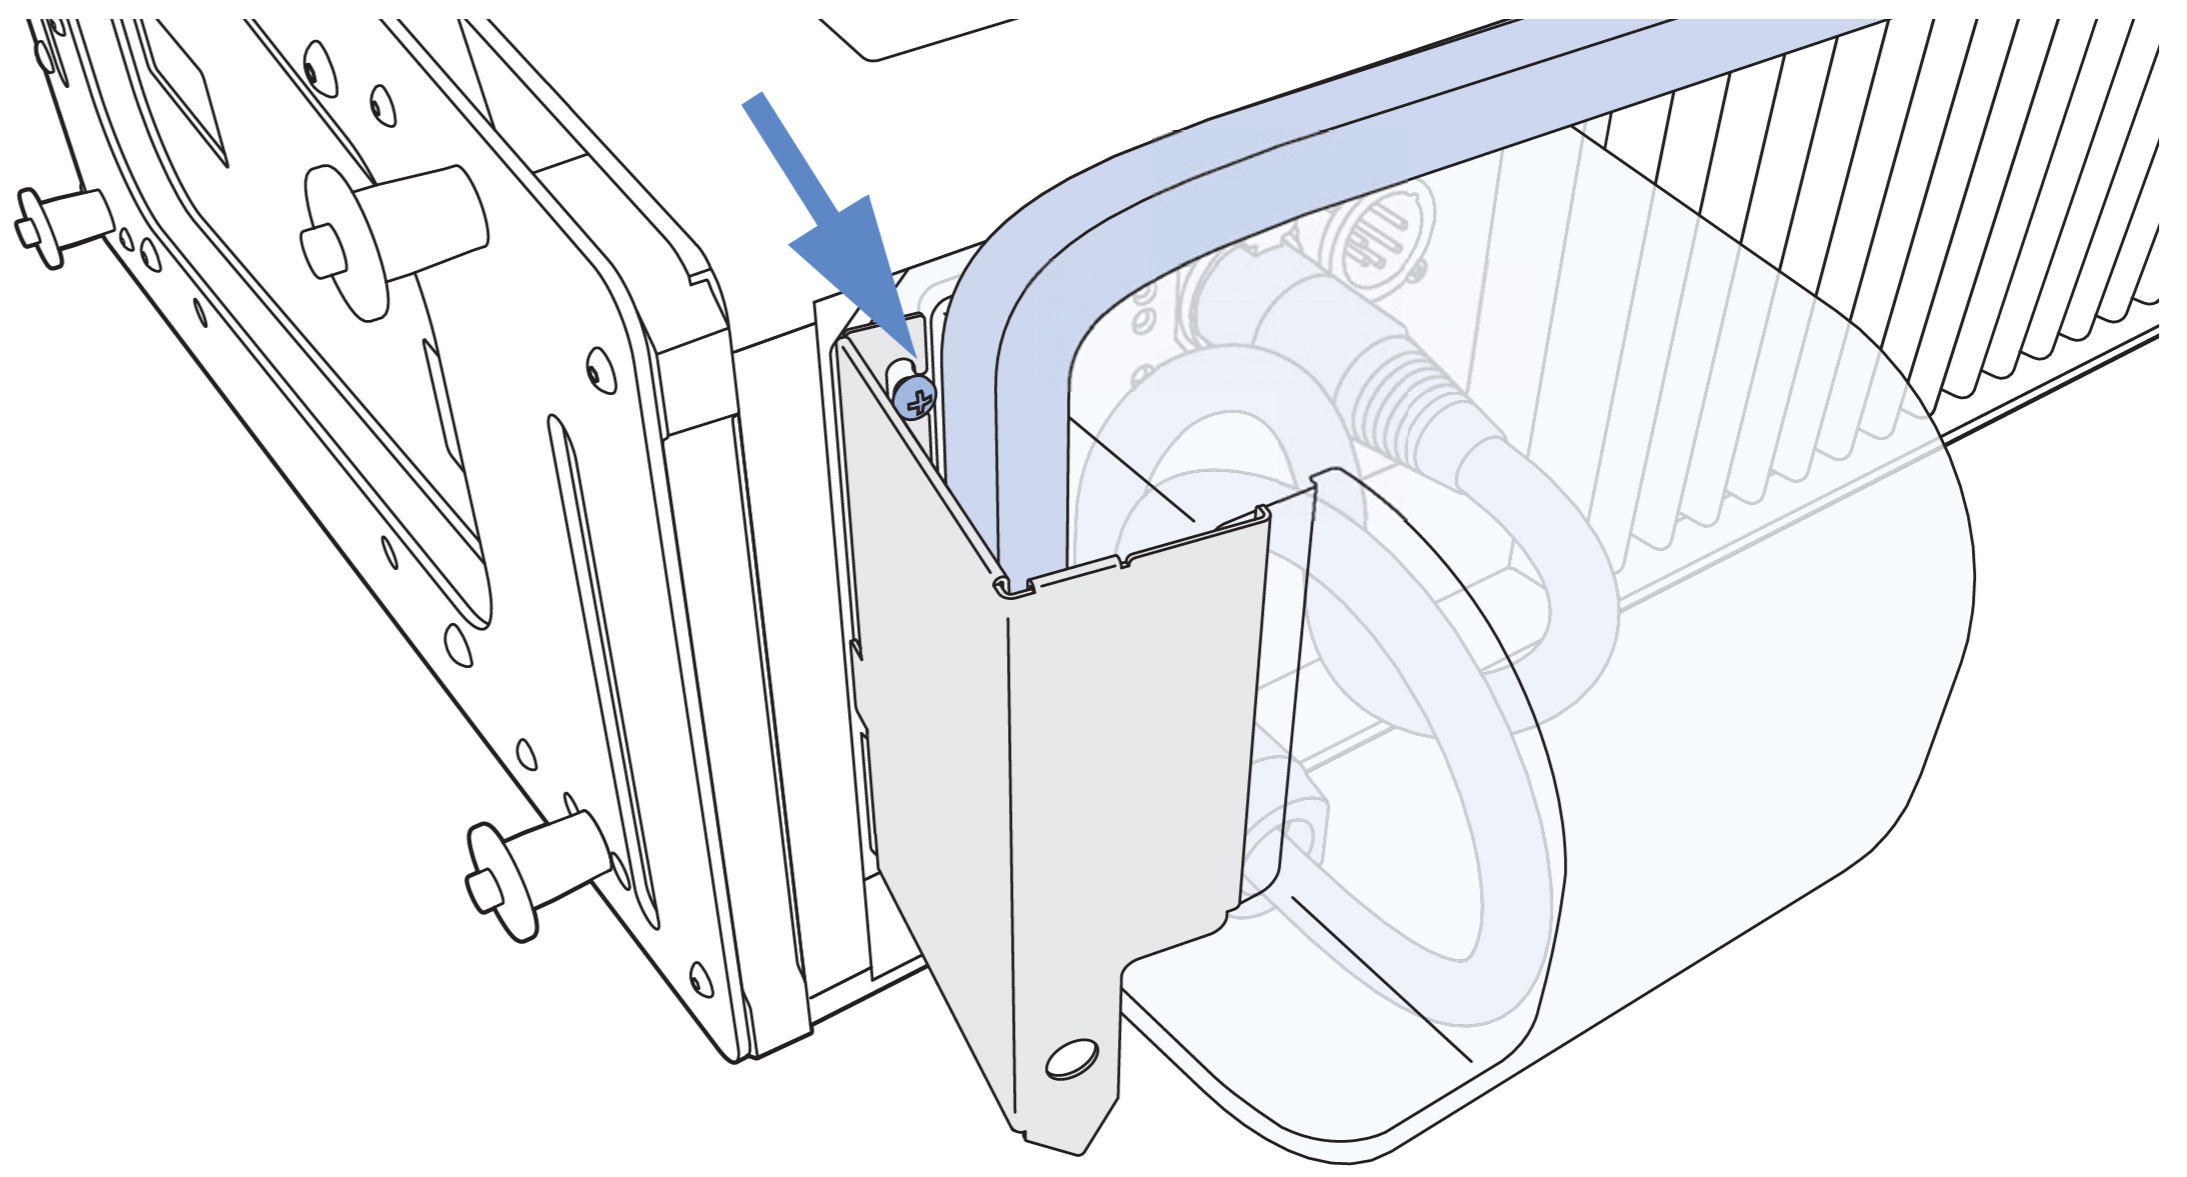
Routing Cables over Rain Hood (left) and Hooking Shield over Securing Screws (right)
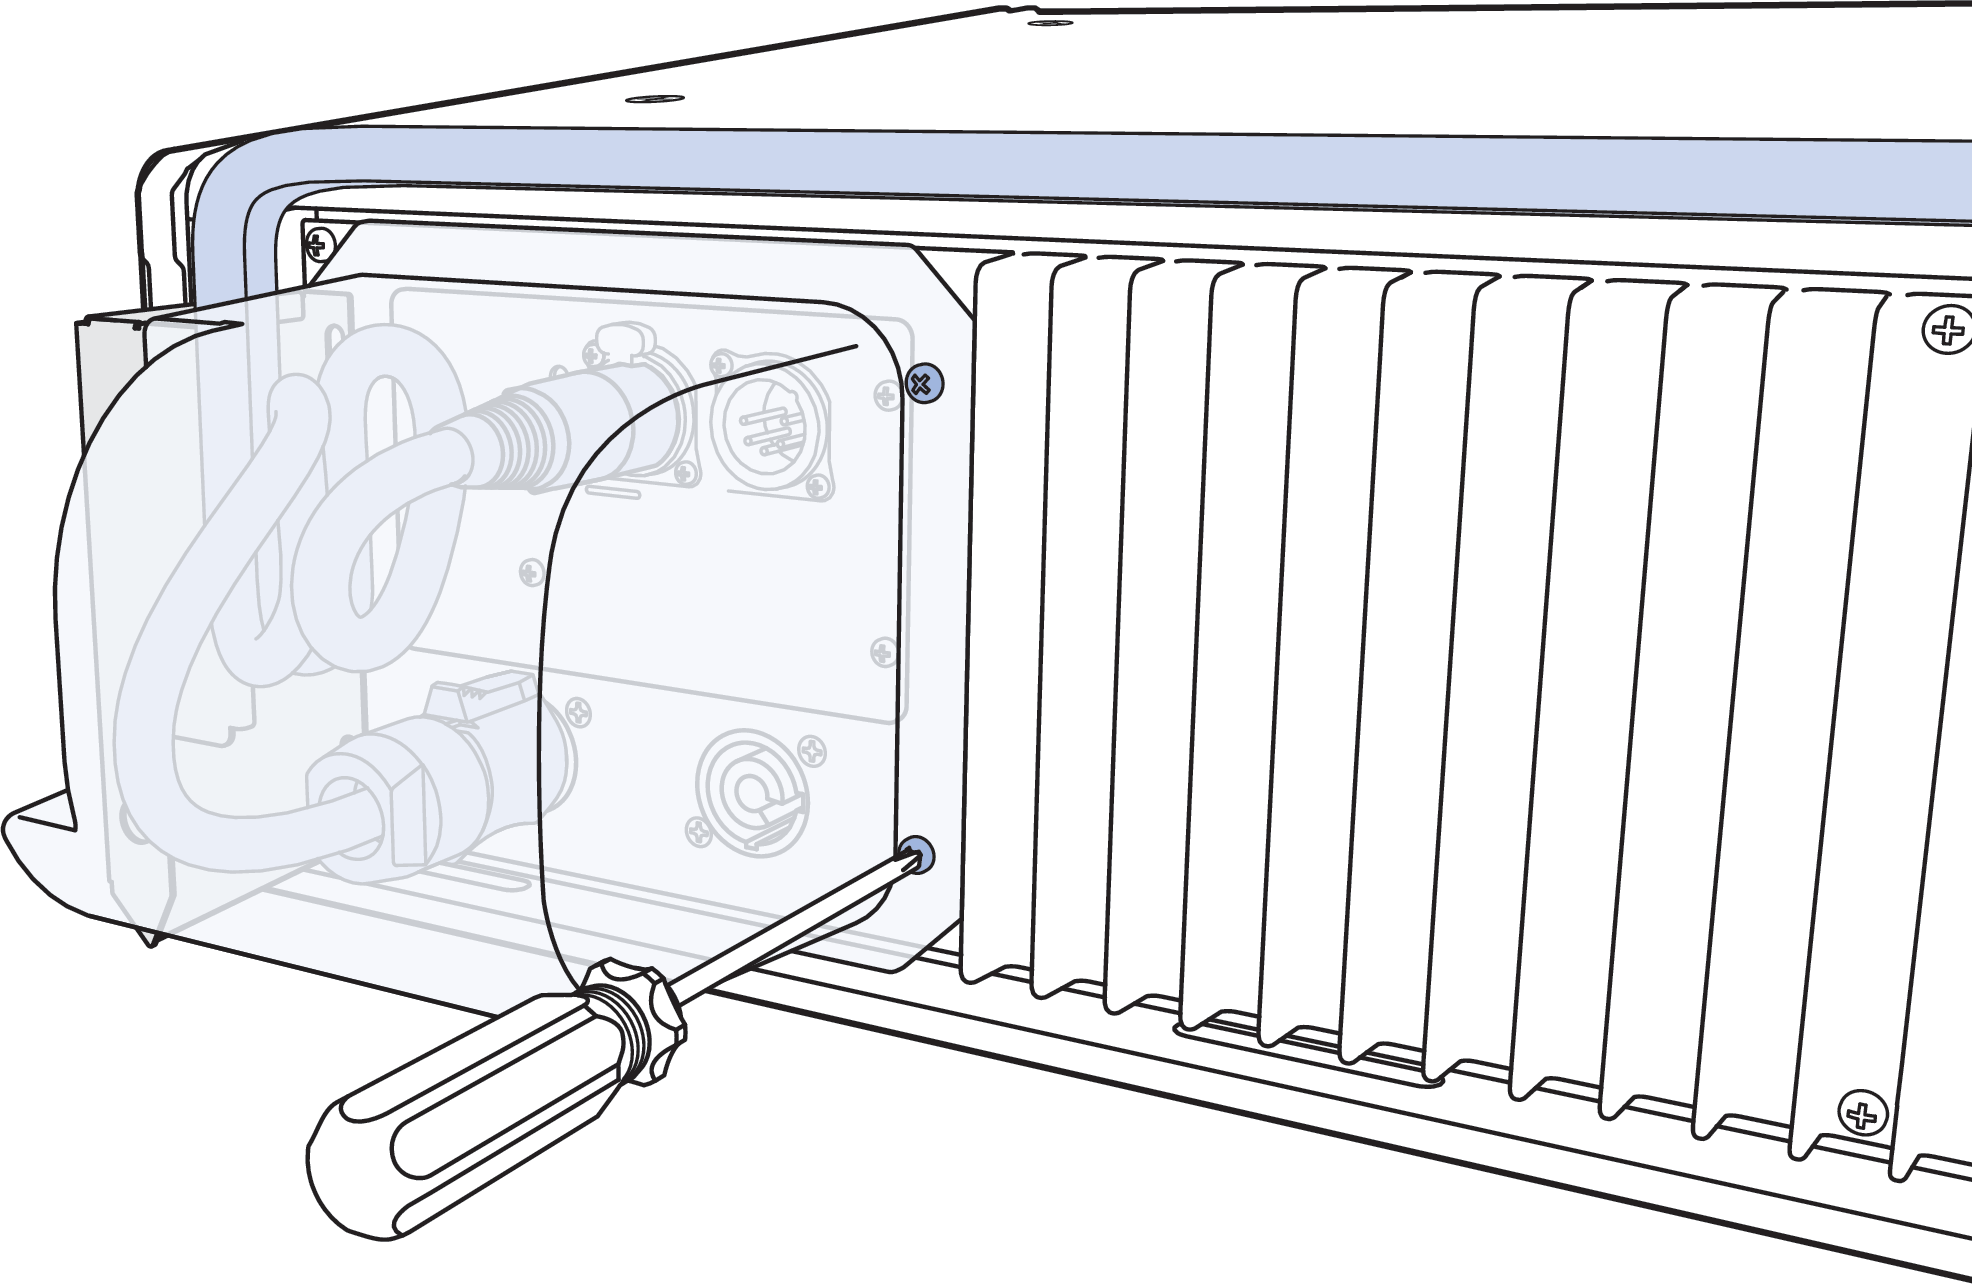
Tighten the upper and lower screws on the left side of the rain hood, as shown in the figure below. The recommended torque value for all four screws is 10–12 in-lbs (1.1-1.4 N·m).
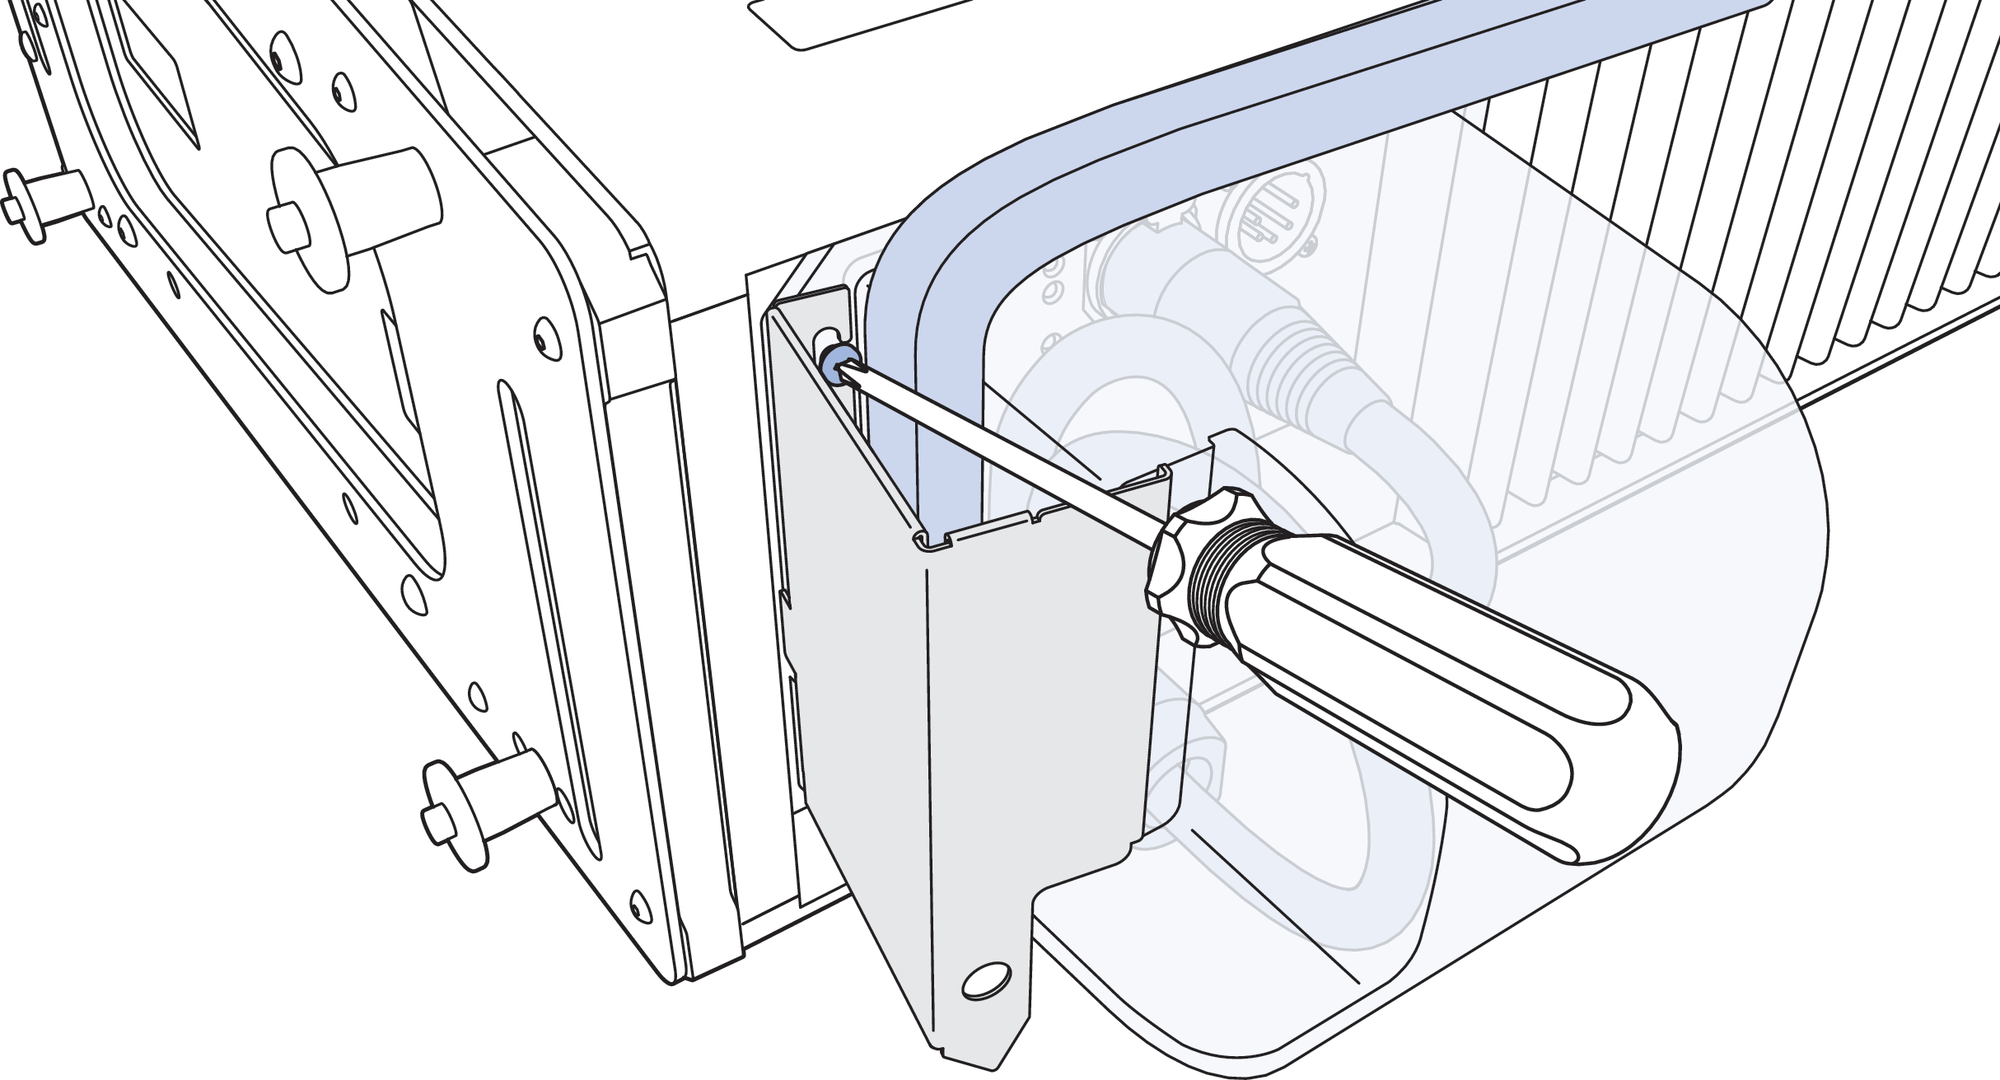
Tightening Screws on Left Side of Rain Hood
Push the shield toward the rain hood until its edge clicks into place over the rain hood lip, as shown in the figure below.
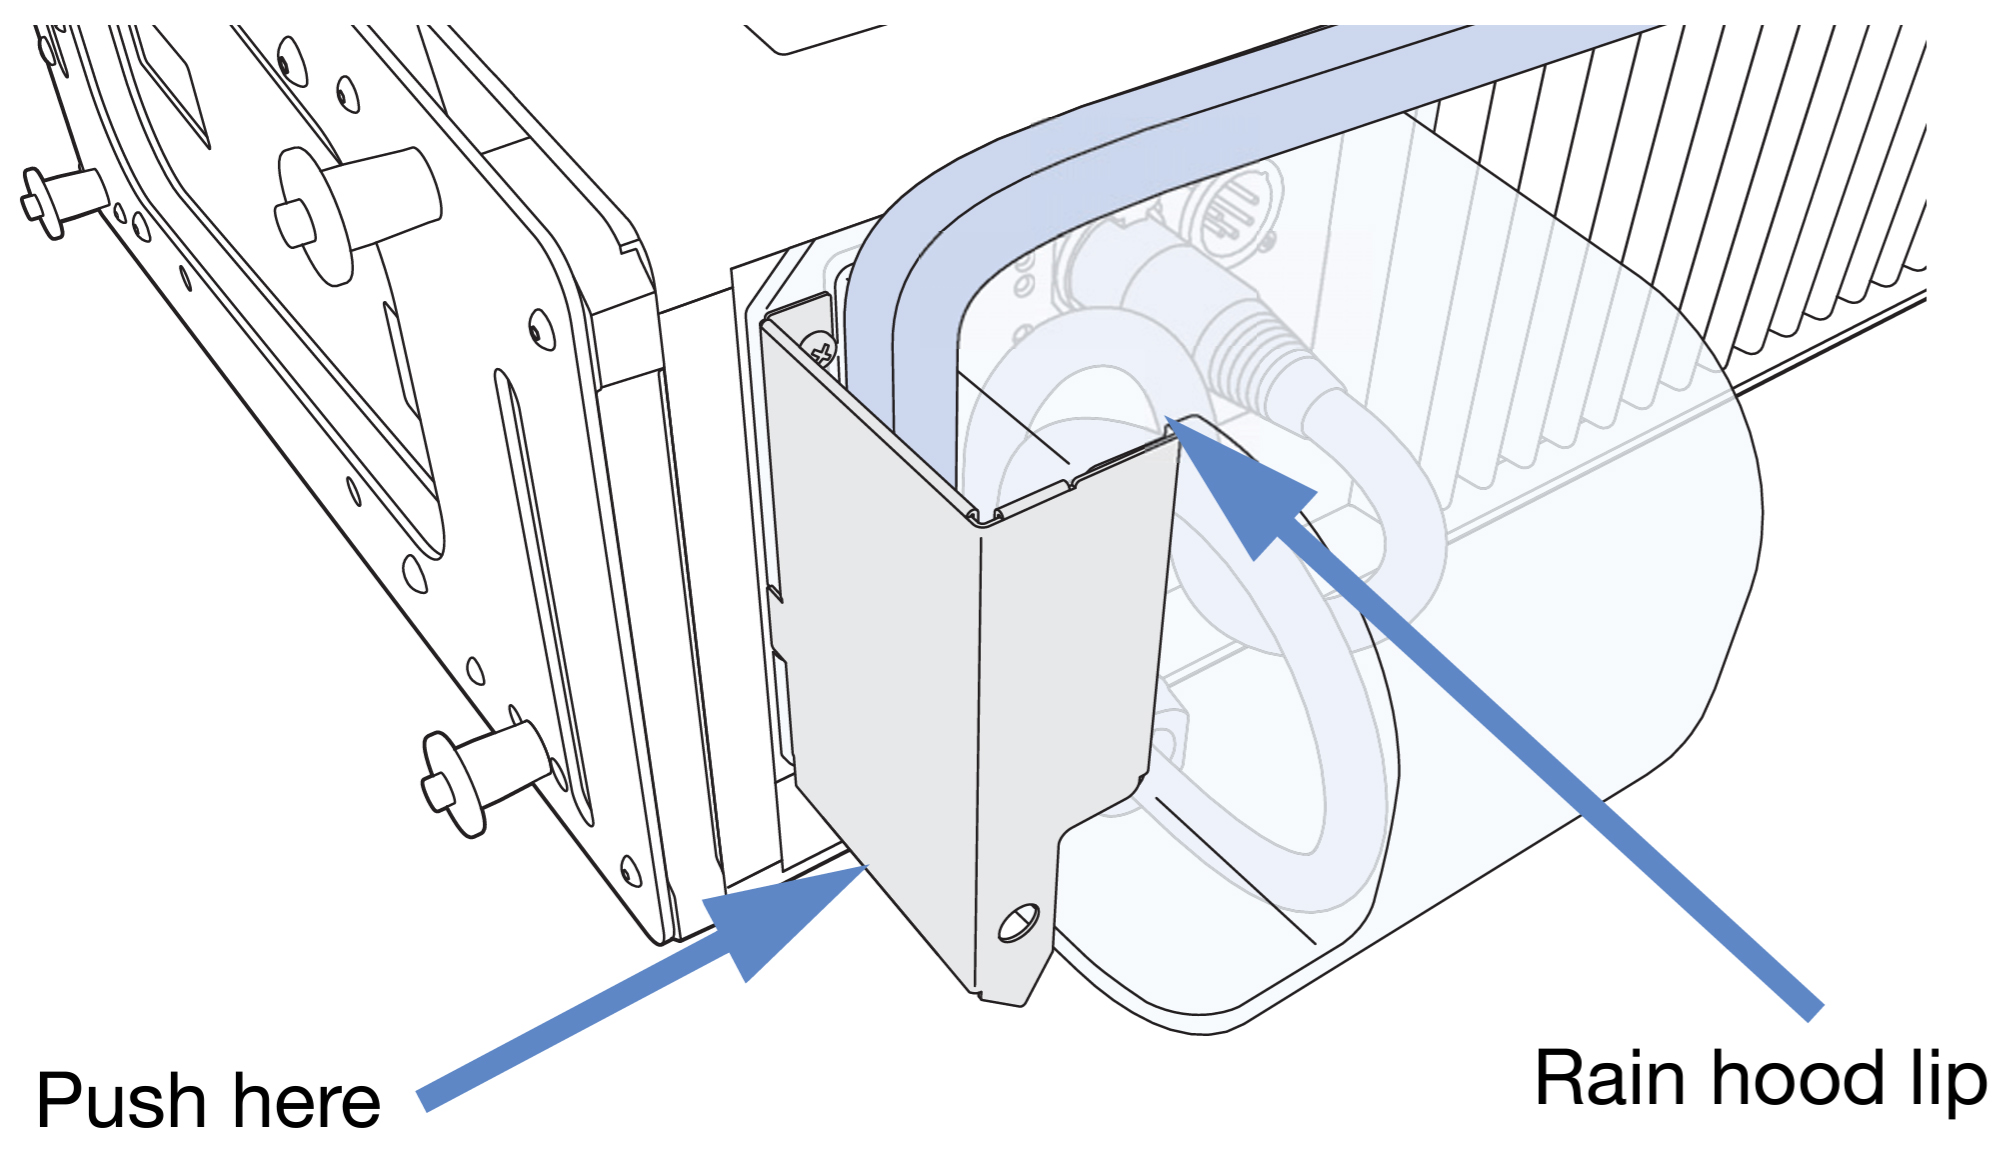
Pushing Shield Toward Rain Hood
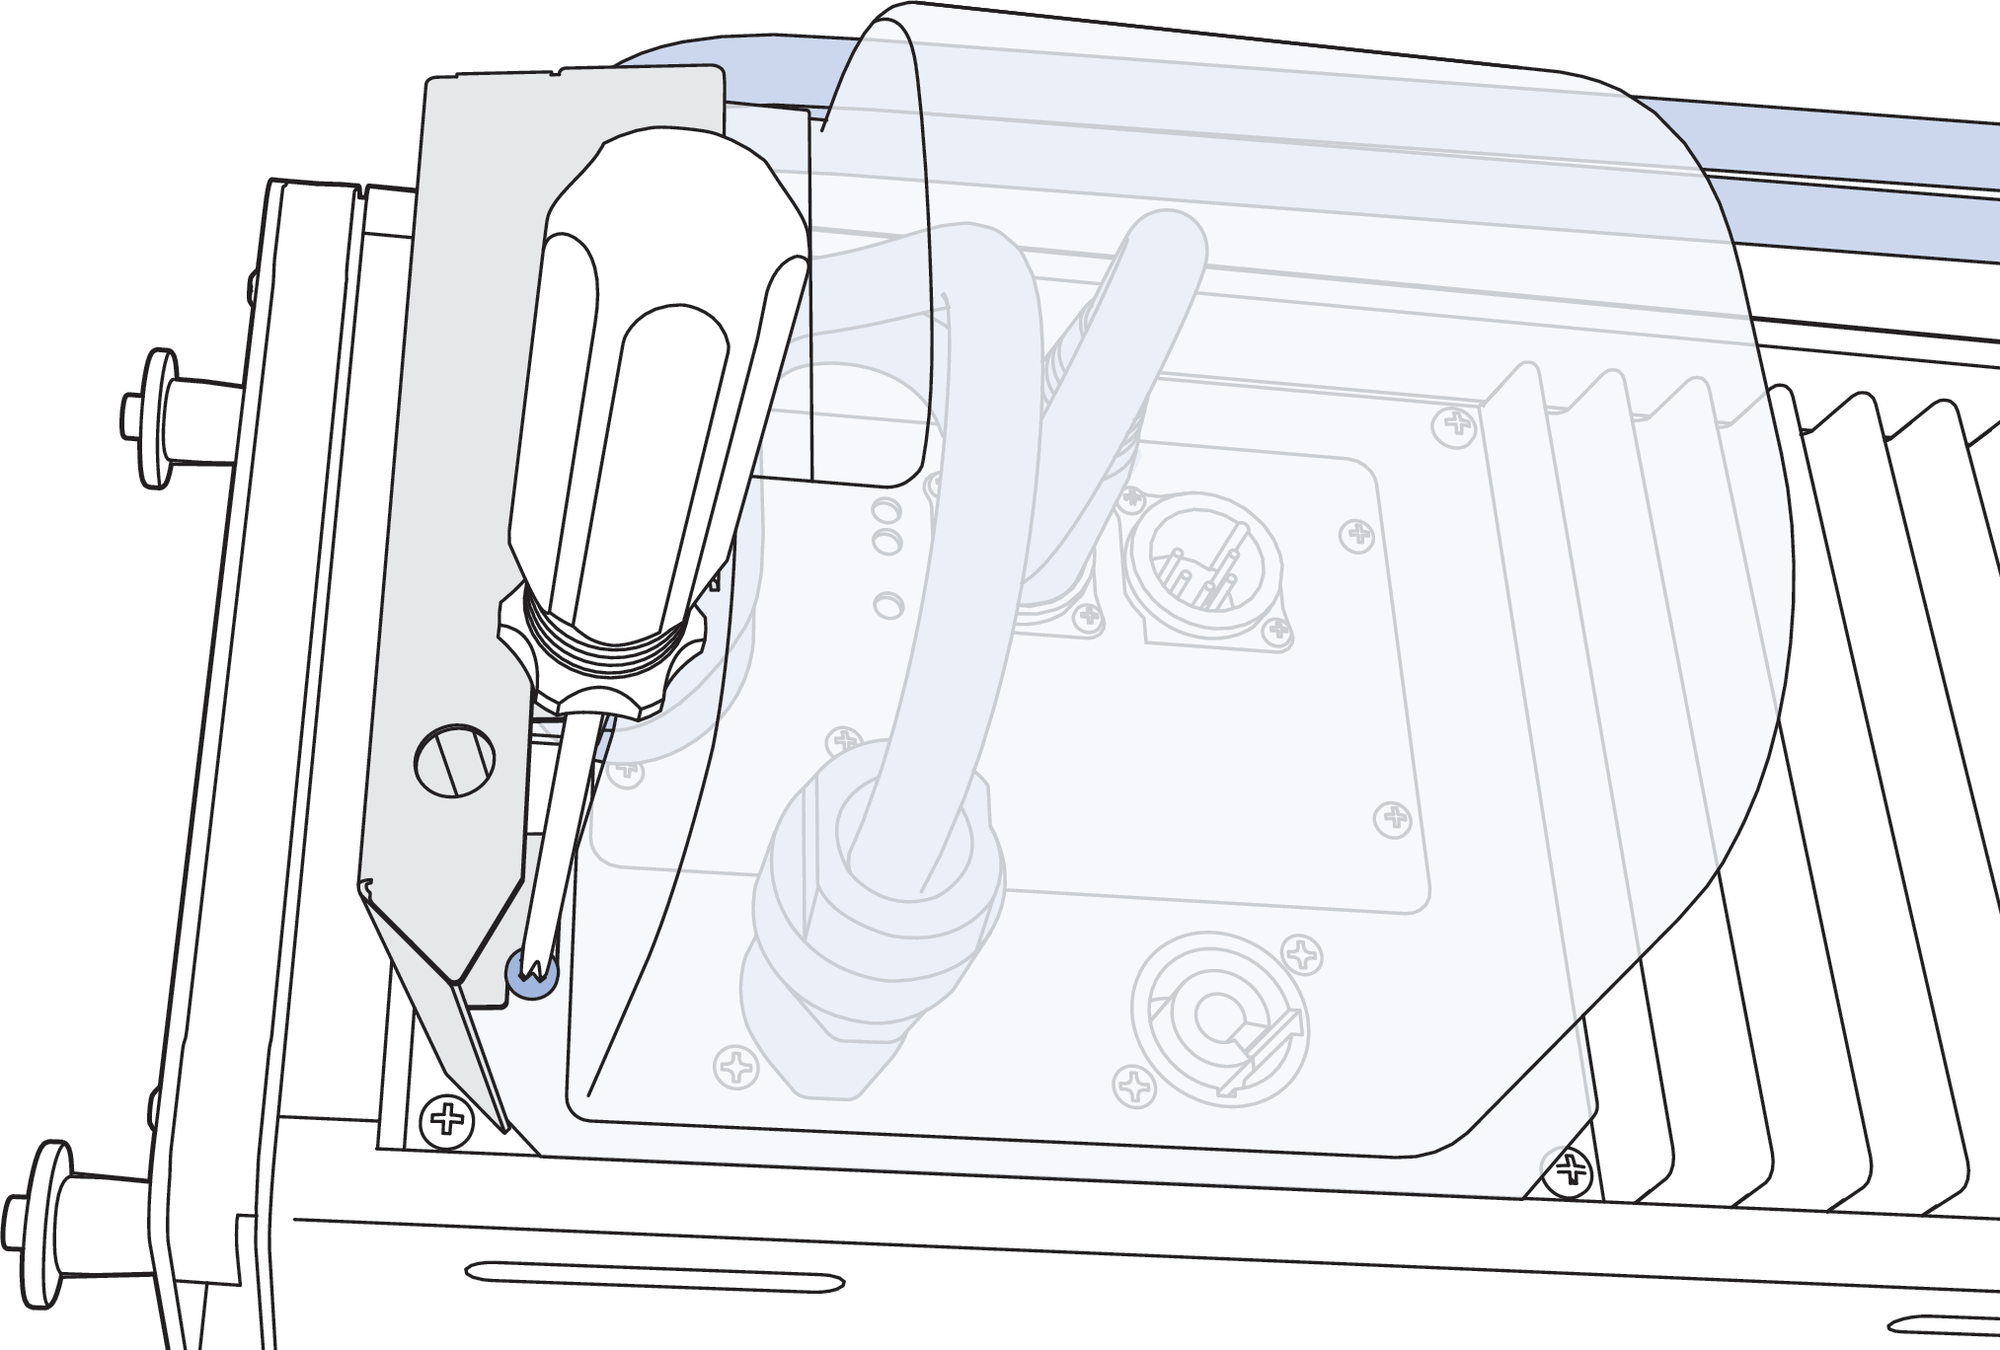
Tighten the upper and lower screws on the right side of the rain hood, as shown in the figure below.

Routing Cables over Rain Hood (left) and Hooking Shield over Securing Screws (right)
To remove the rain hood, reverse the steps.
Caution
Make sure cables are not crossed either at the rain hood opening or between the shield and the rain hood.
Make sure to tighten the screws to the recommended torque value of 10–12 in-lbs (1.1-1.4 N-m) in order to create a good seal against the user panel.
There is only one proper loudspeaker orientation once the rainhood is installed. See [→ _bookmark94]Figure 48.
The weather-protected LINA must be mounted with a 0° tilt, or preferably with a slight down-tilt. This angle shields the driver from the elements and does not allow water to accumulate. Do not tilt the cabinet up, as
Note
Ultra Weather Protected units using the rigid rainhood and shield are rated IPX4 for water intrusion.
LINA Dimensions
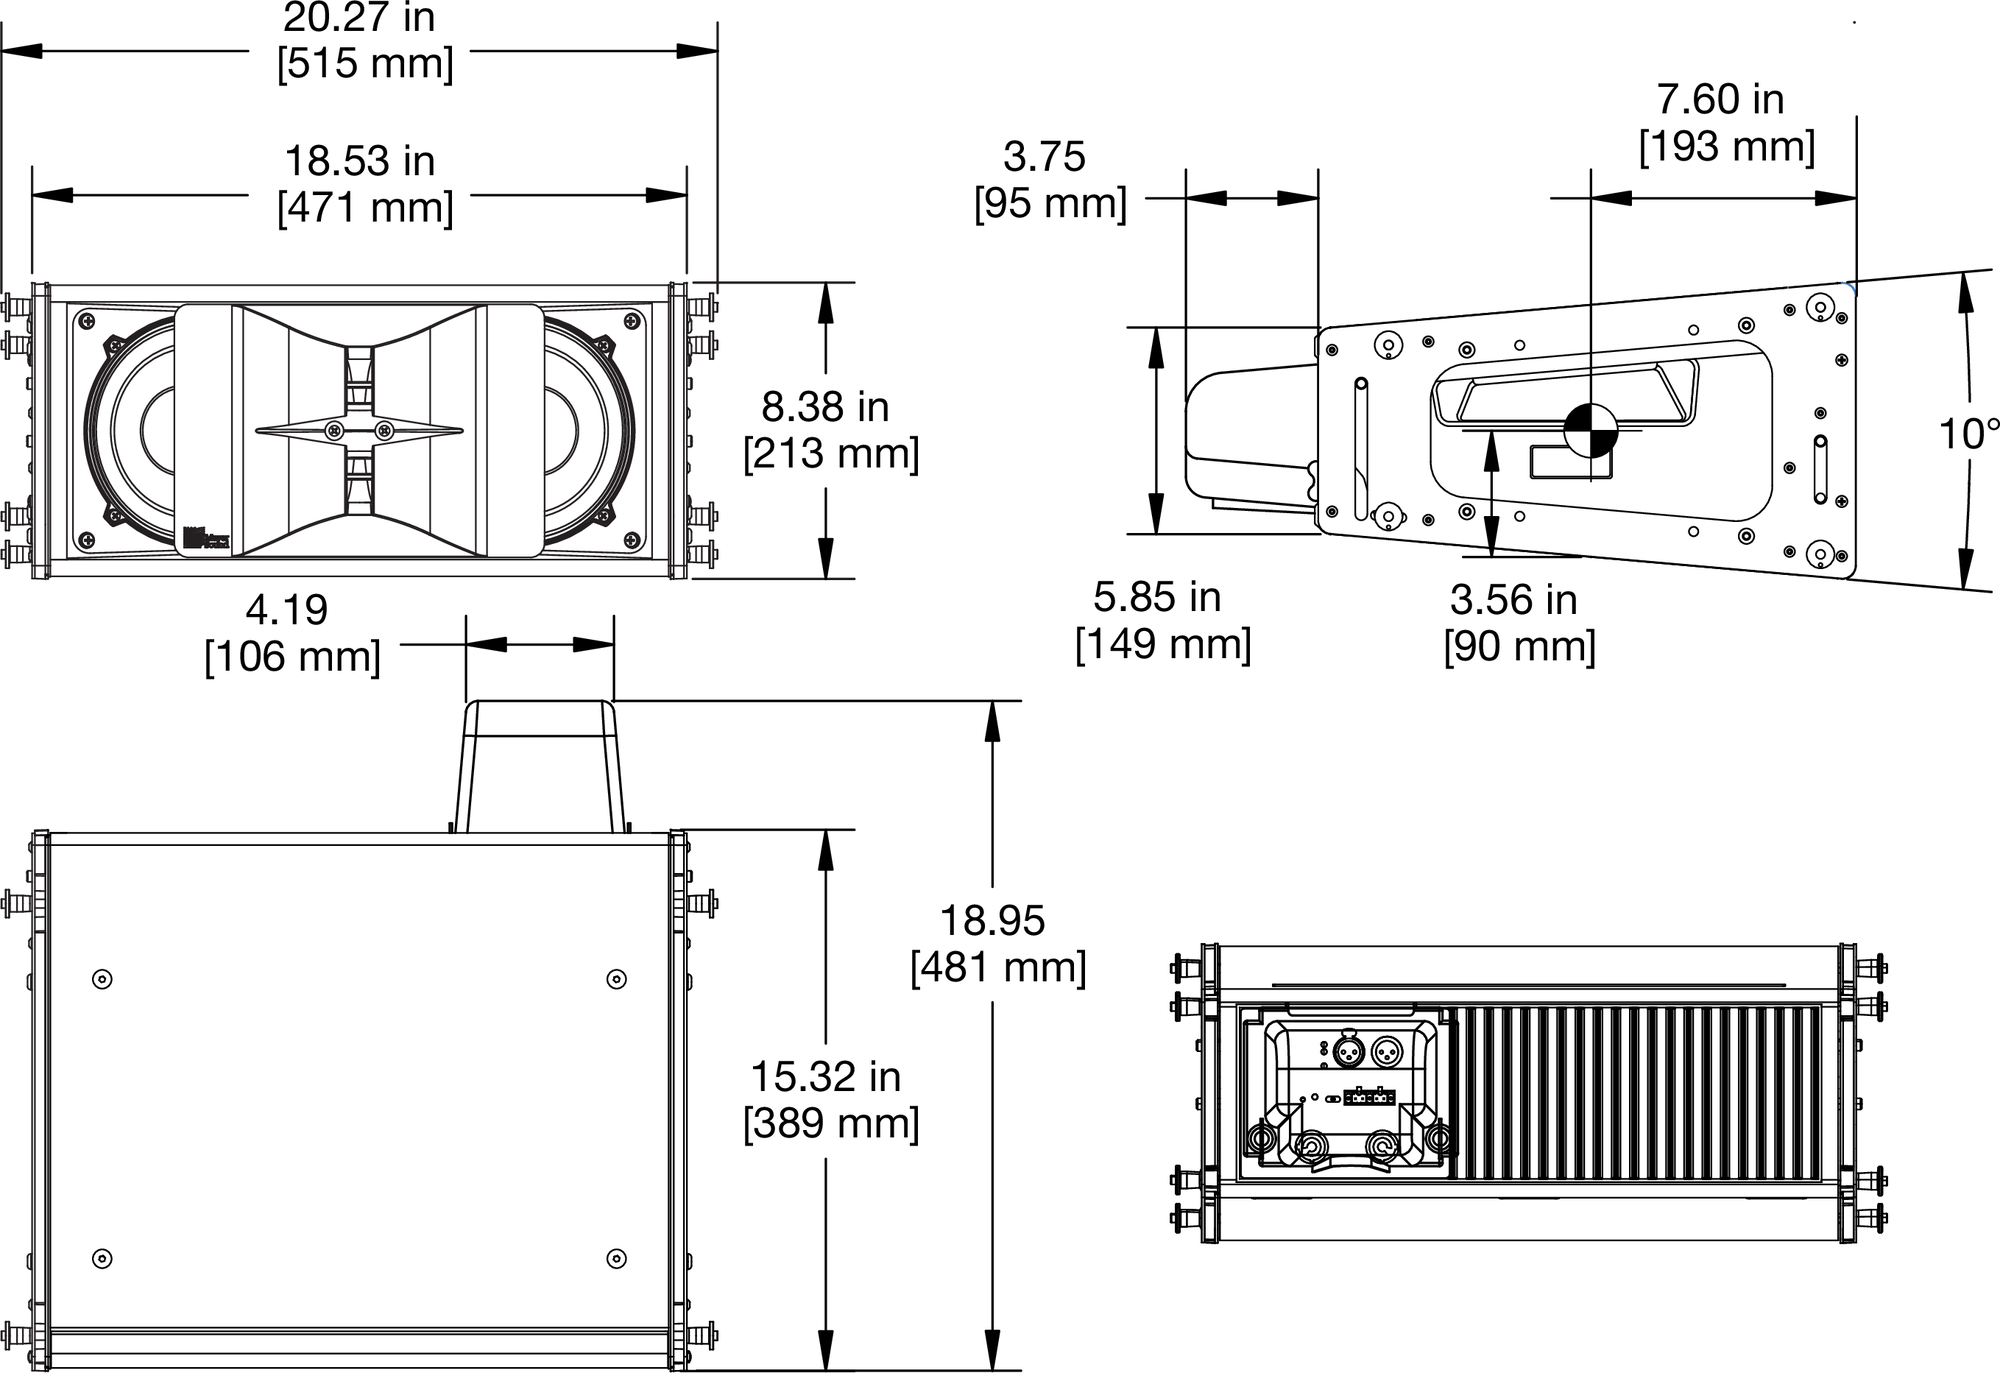
LINA Dimensions with Rain Hood
