Getting started
System requirements
Spacemap Systems include Galileo GALAXY processors, an Ethernet network, loudspeakers, and an iPad running the Spacemap Go app or third-party controllers. Systems with multiple processors require an Avnu-certified network switch.
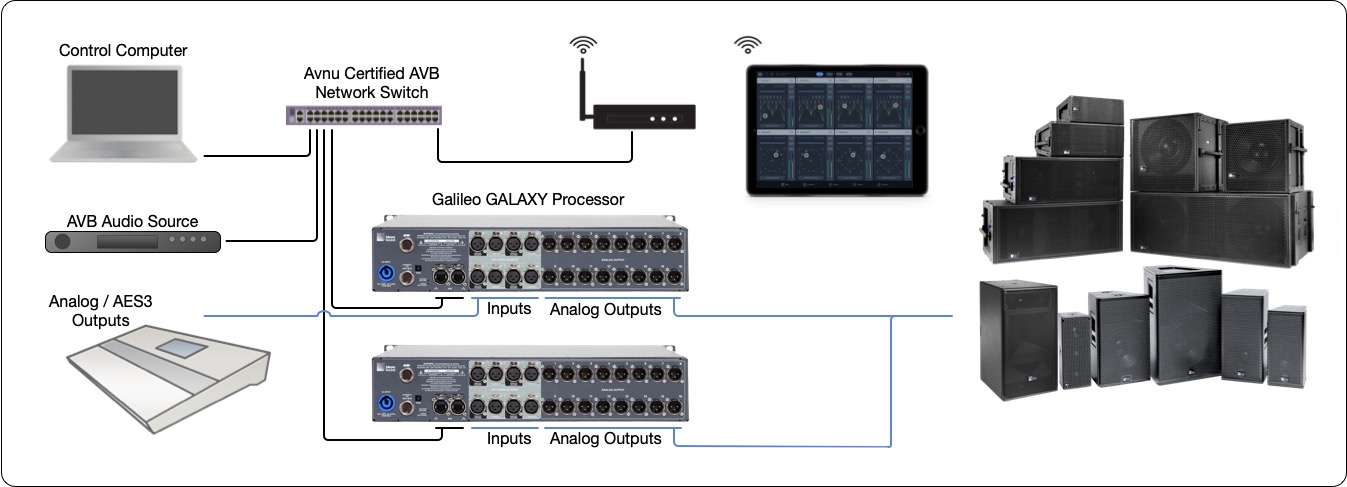
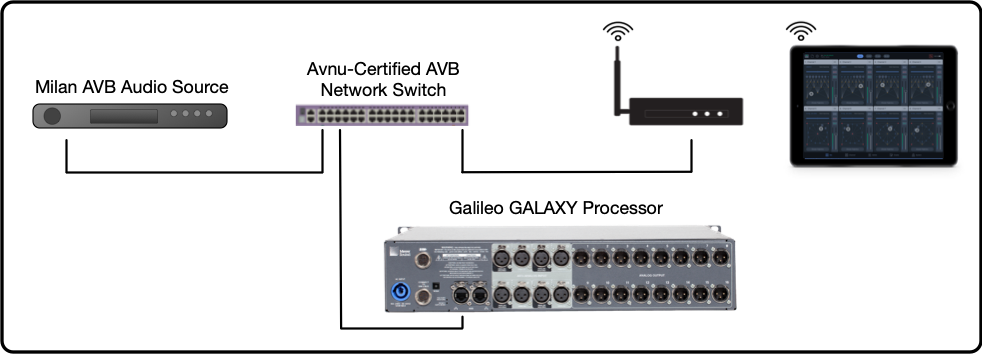
Example System – Hardware, Audio and Ethernet Connections
Compass | Compass GO | GALAXY Firmware | Spacemap Go app |
|---|---|---|---|
4.9.2 | 2.8.3 | 2.4.2 | 1.2.0 |
4.9.1 | 2.8.2 | 2.4.1 | 1.1.0 |
4.9.0 | 2.8.1 | 2.4.0 | 1.0.1 |
iPad
An Apple iPad with iPadOS 14 or later.
Multiple iPads running Spacemap Go can be used with a system to:
Enable multiple system operators
Display different app views for a system operator
Control instances requiring simultaneous cue recall and Spacemap control
Note
iOS 15 privacy settings need to be enabled for Compass GO and Spacemap Go apps. When enabled, these apps can discover GALAXY processors on the network. On the iPad, go to Settings > Privacy > Local Network and allow the apps access for Compass Go and Spacemap Go.
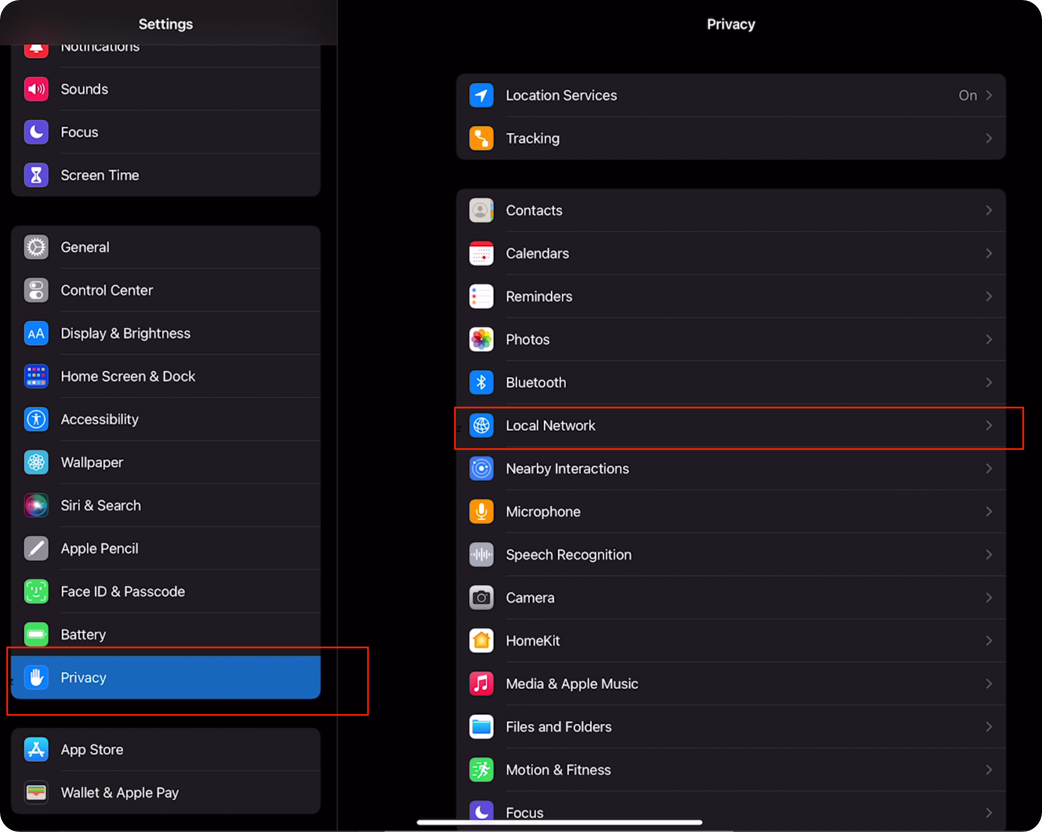
iOS 15 Privacy Settings to Allow Discovery of GALAXY Processors
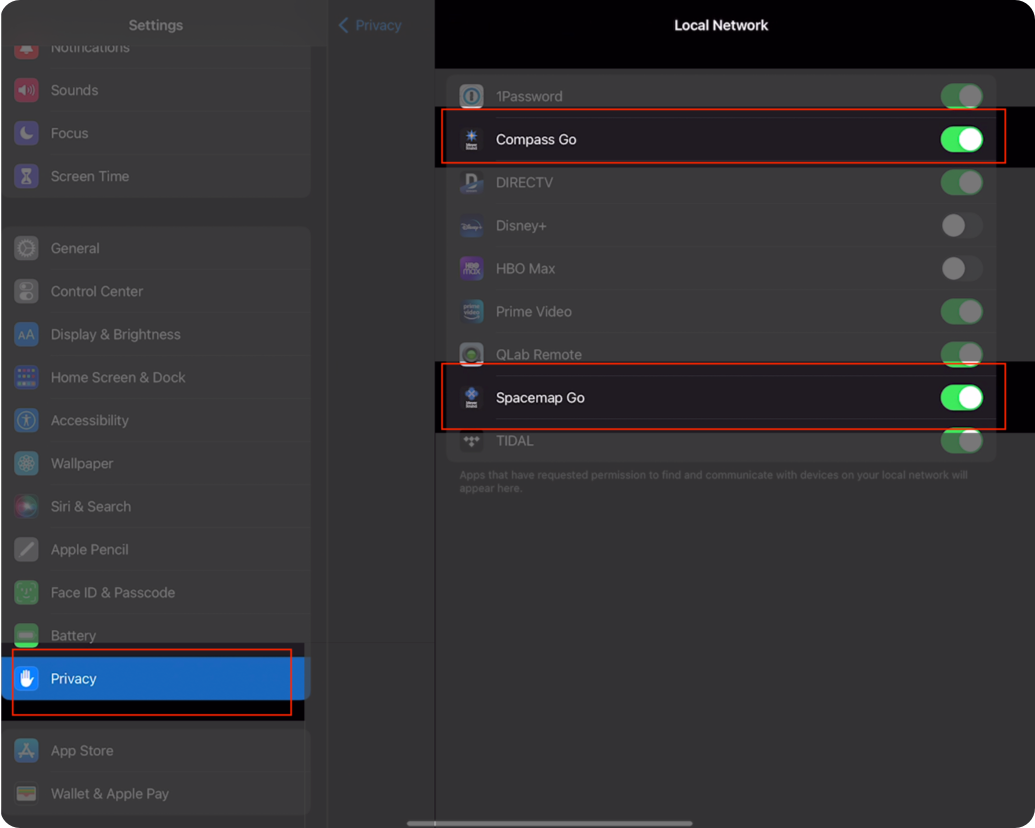
iOS 15 Privacy Settings to Allow Discovery of GALAXY Processors
Spacemap Go app
The Spacemap Go iPad app is available from the Apple App Store at no cost. Visit the App Store from the iPad to install.
Galileo GALAXY processor(s)
Galileo GALAXY processors are used in a Spacemap System. Each system supports up to 32 inputs and 256 outputs, depending on the number of processors and audio input format(s). Any of the GALAXY models can be used, except the GALAXY Bluehorn 816. Firmware that includes the Spacemap Mode boot option is required.
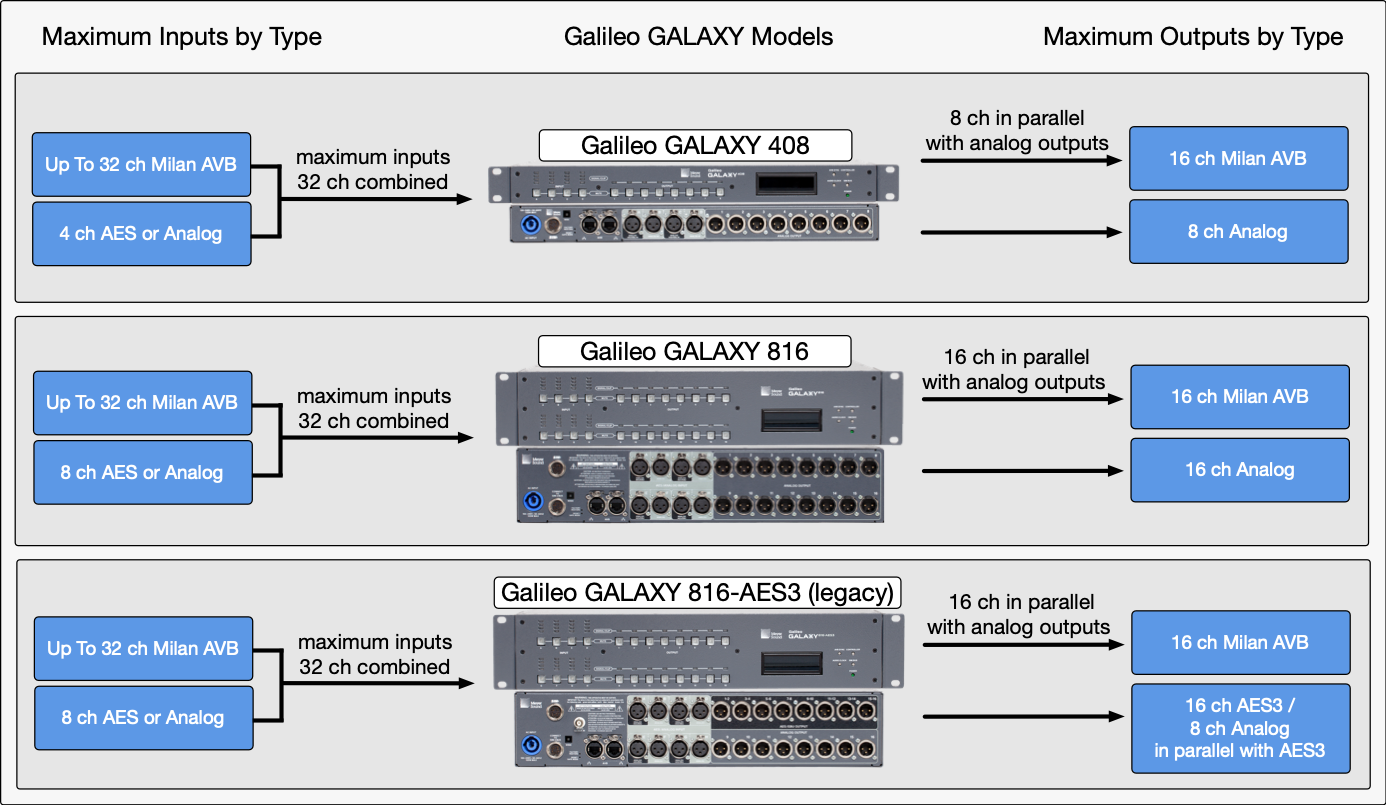
Galileo GALAXY Processor Models – Maximum Number of Inputs and Outputs by Model
Spacemap Go system inputs
The maximum number of Spacemap System inputs is 32, whether one or sixteen processors are used. The system inputs can be analog, AES3, or Milan AVB—usually transmitted by a mixing console, playback device, or an AVB source. See the Spacemap System Audio Signals section on the Operations page for further explanation.
Maximum number of inputs by processor model:
GALAXY 408: 32 channels total, 4 channels can be AES3 or analog XLR inputs, reducing the maximum of 32 Milan AVB inputs
GALAXY 816: 32 channels total, 8 channels can be AES3 or analog XLR inputs, reducing the maximum of 32 Milan AVB inputs
GALAXY 816AES (legacy): 32 channels total, 8 channels can be AES3 or analog XLR inputs, reducing the maximum of 32 Milan AVB inputs
All GALAXY processor models support up to 32 Milan AVB inputs, with input processing available for inputs A-H (8 channels). Milan AVB inputs 9-32 are routed directly to the matrix inputs.
The GALAXY processors comply, and are certified by the Avnu Alliance as Milan compliant:
“Every device will connect with any other device using a variety of agreed-upon formats and market-required definitions in the protocol. Milan adds essential agreements about the implementation of AVB technology, including requirements for compatible and compliant media formats, media-clocking, redundancy, and controller software, while ensuring those requirements are implemented correctly through compliance testing and certification of end devices.” -Avnu Alliance
The stream format GALAXY processors use is: AAF-PCM 24-bit in 32 integer, 8-channels of 12 samples at 96kHz or 48kHz.
AVB inputs from devices that are not Milan certified, may establish stream connections and transport audio successfully. However, these connections may not:
Successfully re-establish after power cycling equipment (persistent connection)
May not support the Milan network redundancy schemes
May not maintain clocking between devices
For these reasons, we do not recommend using AVB input sources that are not Milan certified for show critical applications. Certification guarantees functionality, because all certified devices are rigorously tested for inter-connectivity and reliability. We cannot ensure the functionality of non-certified devices and we encourage users to contact the device manufacturer to inquire about their certification status, and how to make AVB connections to GALAXY processors.
Spacemap Go system outputs
The maximum total number of Spacemap System outputs is 256. The outputs are usually connected directly to self-powered loudspeakers, which typically have analog inputs. See the Spacemap System Audio Signals section on the Operations page for further explanation.
Milan AVB outputs are in parallel with the analog or AES3 outputs.
Maximum number of outputs by processor model:
GALAXY 408: 8 analog XLR outputs, 16 Milan AVB outputs
GALAXY 816: 16 analog XLR outputs, 16 Milan AVB outputs
GALAXY 816AES (legacy): 16 AES3 channels / 8 XLR connectors , 8 analog XLR outputs (in parallel with output channels 9-16), 16 Milan AVB outputs
Compass control software
The current version of Compass software is needed. The GALAXY firmware included with this and future releases supports GALAXY Spacemap Mode. Compass also supports virtual GALAXY processors booted to Spacemap Mode, enabling off-line configuration and programing.
Ethernet network
A network connection between the iPad(s) and the GALAXY processor(s) is needed for control. The connection can be wireless or wired. For control-only networks, Avnu Alliance certified network switches are not required. Currently, IPv6 is used for network connectivity between the Spacemap Go app on an iPad and GALAXY processors. Please ensure the wireless access point and the network switch are IPv6 enabled. The connection between a computer and a single Galileo GALAXY does not require a network switch.
If the system inputs are sent via Milan AVB, or if more than one GALAXY processor is used in a system, an Avnu-certified AVB network switch connects the GALAXY processors and optional AVB sources. For the latest list of Avnu-certified hardware, including switches, visit the Avnu Alliance website. Note that network switches certified as AVB compliant meet the Avnu Milan specification. No network switches are certified as Milan AVB compliant.
Milan AVB sources
Avnu-certified Milan AVB devices are fully supported. For a list of devices, see Avnu's Certified Product Registry list.
Non-certified devices may successfully connect. These devices may require additional configuration and may not be capable of establishing or re-establishing a persistent, error-free connection during normal operation and/or power cycling. Meyer Sound is working with other manufactures to make interoperability advancements.
Hardware connections
Both Ethernet network and audio signal connections are necessary to create an operational Spacemap Go system. The Ethernet connections are for system control, Milan AVB audio transport between processors, and optional Milan AVB inputs. Analog and AES3 audio signal inputs are connected to the Galileo GALAXY processor(s). The processor outputs are connected to loudspeakers or other audio devices. The Spacemap Go app is used to configure the inputs and outputs of the system.
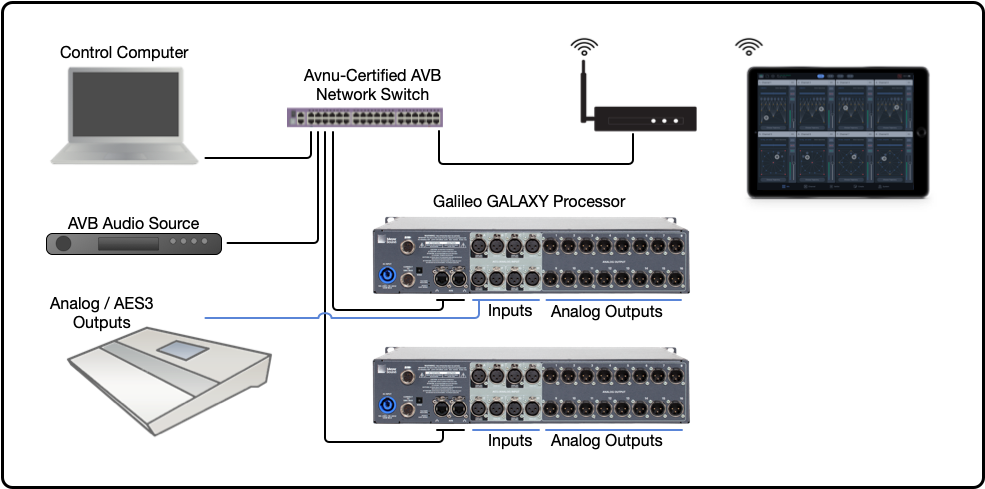
Example Ethernet and Audio Connections
Audio input/output configurations
Source audio signals are connected to the Galileo GALAXY processor XLR inputs or via the RJ-45 connectors for Milan AVB audio streams.
Galileo GALAXY audio inputs
The iPad app Spacemap Go includes a connection wizard that configures the inputs and outputs of the GALAXY processors. For systems that include multiple processors, the wizard also configures the Milan AVB transport used to share input signals across the system processors. The configuration wizard assumes the first input is connected to input A and that additional inputs are contiguous.
Analog: make connections starting with Input A, then Input B, C, D, E, and FAES3: make connections starting with Input A, then Input C, E, and G
AES3: make connections starting with Input A, then Input C, E, and G
Milan AVB: Any processor input can be selected to receive a Milan AVB stream. Matrix Inputs 9–32 of the GALAXY 816 models and Matrix Inputs 5–32 of the GALAXY 408 model are only used for Milan AVB inputs.
The AVB input stream format GALAXY processors accept is: AAF-PCM 24-bit in 32 integer, 8-channels of 12 samples at 96kHz or 48kHz.
AVB inputs from devices that are not Milan certified, may establish stream connections and transport audio successfully. However, these connections may not:
Successfully re-establish connection after power cycling equipment (persistent connection)
May not support the Milan network redundancy schemes
May not maintain clocking between devices
For these reasons, we do not recommend using AVB input sources that are not Milan certified for show critical applications. Certification guarantees functionality, as all certified devices are rigorously tested for inter-connectivity and reliability. We cannot ensure the functionality of non-certified devices and encourage users to contact those device manufacturers, inquire about their certification status and how to make stable, persistent AVB connections to GALAXY processors.
See the Galileo GALAXY User Guide for further information about inputs and outputs.
Galileo GALAXY audio outputs to loudspeakers
Analog and AES3: The outputs of Galileo GALAXY processors are analog, except for the 816AES model (legacy), which has 16 AES3 output channels available on XLR connectors 1–8, with analog copies of Outputs 9–16 available on XLR connectors 9–16. The outputs are typically connected directly to self-powered loudspeakers.
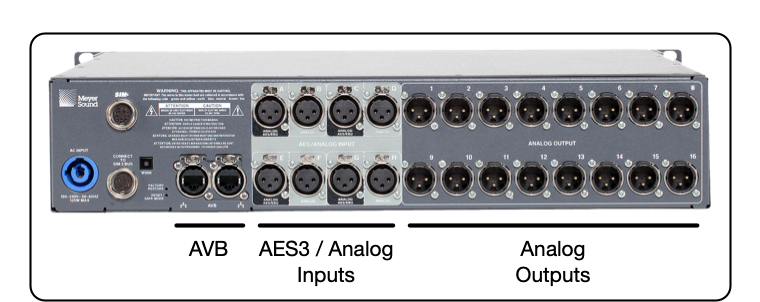
GALAXY 816 Audio Connections
Milan AVB: All GALAXY models have 16 outputs that are available as Milan AVB outputs. The output stream format is Milan compliant, AAF, 8-channel streams. Both 96 kHz and 48 kHz sample rate streams are available, Stream Output 0, 1, 4, and 5 below.
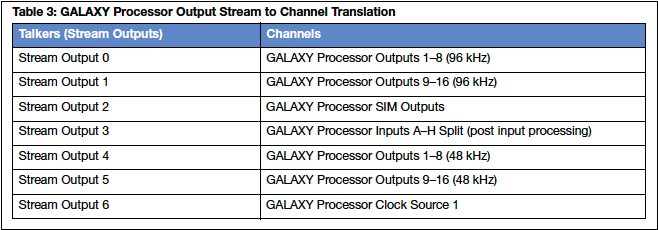
GALAXY Milan AVB Output Streams
See the Galileo GALAXY User Guide for further information about inputs and outputs.
Network connections
Both the iPad and Galileo GALAXY processors must be connected to the same Ethernet network for control during system operation. iPad connections can be wireless. During processor configuration, a computer running Compass software is also connected to this network.
Ethernet
IPv6 is used for network connectivity between the Spacemap Go app on an iPad and GALAXY processors. Please ensure the wireless access point and the network switch are IPv6 enabled. The connection between a computer and a single Galileo GALAXY does not require a network switch.
Each GALAXY processor has two RJ-45 Ethernet connectors used for network connectivity and support a variety of redundant network schemes. Download the Galileo GALAXY User Guide for details.
When facing the rear of a processor, make primary network connections using Ethernet Port 1 (left connector) for standardization. Use Ethernet Port 2 (right connector) for connection to a redundant network. The ports are identical in function, sending and receiving different types of data. Compass, Compass GO, Spacemap Go, and devices that send and receive OSC commands are used to make changes to the processor settings. These ports also send and receive Milan AVB audio streams.
The two ports have different network speed capabilities:
Port 1 (left) is capable of both 1000bT and 100bT connections
Port 2 (right) is 1000bT, or Gigabit Ethernet only
Devices capable of 100bT connections can only be connected to Port 1 for proper functionality. Many older or less functional network switches and access points (WiFi) are capable of only 100bT connections.
When using more than one GALAXY processor in a Spacemap Go system or when the system input source format is Milan AVB, an Avnu Alliance certified network switch is needed. Avnu-certified network switches are specialized switches, capable of supporting the underlying Milan AVB protocols and that have been certified for interoperability. Extreme network switch configuration instructions are available here. Generic network switches do not support Milan AVB audio streams but can be used for “control only” networks.
When GALAXY processors are booted into Spacemap Mode, the inputs of the processors are shared with the other processors over the Ethernet network using the Milan AVB protocol.
System example: 1
Analog or AES3 audio inputs are connected to the GALAXY input XLR connectors.
A wireless access point (WiFi) is connected to GALAXY Ethernet Port 1.
An iPad running Spacemap Go is connected via wireless Ethernet (Wi-Fi) to the wireless access point.
GALAXY processor analog XLR outputs are connected to loudspeakers (not shown below).
Note
An Avnu-certified network switch is not needed for this system because the network is not transporting any AVB streams. It is only used for control.
Example System – Analog/AES3 Inputs, Galileo GALAXY Processor, Wi-Fi Access Point, and an iPad (Loudspeakers Not Shown)
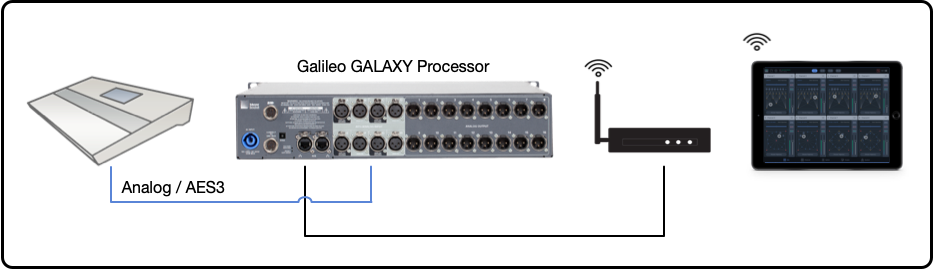
System example: 2
This example uses Milan AVB signal inputs and requires an Avnu Alliance certified AVB network switch. The source audio is sent via Milan AVB to the Galileo GALAXY.
System Example Two: Milan AVB Audio Input and Analog Output
System example: 3
This example uses two GALAXY processors. The Milan AVB digital audio protocol is used to share the analog/AES3 inputs with the second processor. An Avnu Alliance-certified network switch is needed. The GALAXY XLR outputs or the Milan AVB output streams can be used to connect to loudspeakers or other Milan AVB devices connected to the network switch.
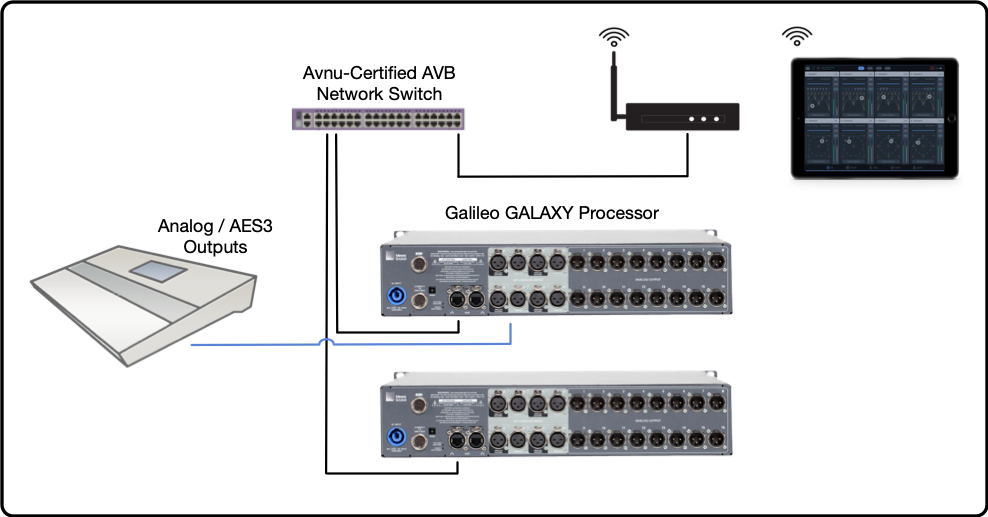
Example 3: Two Processors Used, Requires Avnu Certified Switch
AVB Milan network redundancy
A secondary/redundant network can be connected in case the primary network experiences an issue, which ensures continuous Milan AVB transport and system control connection.
AVB clock considerations
The connections of the AVB media clock will be automatically set when the Spacemap Go system configuration is completed.
Configure GALAXY processors
The steps listed below assume that the audio and network connection instructions have been completed.
Select one of the three possible scenarios listed below for the appropriate configuration steps:
Configure Galileo GALAXY Hardware – New Processor
The “New Steps” below overwrite all the processor settings and stored Snapshots. Follow these steps to upload new firmware and reboot Galileo GALAXY processors to Spacemap Mode.
Configure Galileo GALAXY Hardware – In-Use Processor
The “Use Steps” below preserve the settings of the input and output processing of Galileo GALAXY processors (EQ, delay, gain adjustments, etc.) by storing and recalling a GALAXY Snapshot before and after recalling factory defaults. The matrix levels will later be overwritten by Spacemap Go. Make any necessary Output Channel Gain adjustments to compensate.
Configure Virtual Galileo GALAXY
If Galileo GALAXY hardware is not available, Compass can create virtual processors. All the functions of Spacemap Go are available without passing audio signals. Using virtual processors facilitates learning, testing, and programming off-line.
AVB connection management
Compass software manages the AVB connections of GALAXY processors in Normal Mode. Spacemap Go manages AVB connections of processors in Spacemap Mode.
Entity and group names
Each AVB device has an Entity Name, a human-readable identification of a specific AVB device. Use unique Entity Names for each GALAXY processor and all other AVB devices.
Each AVB device also has a Group Name, a human-readable label that is used to group devices for control.
Important
When a GALAXY processor is in Spacemap Mode, Spacemap Go manages the AVB connections of all GALAXY processors that have the same Group Name, even if some processors are in Normal Mode. Use a different Group Name for Normal Mode processors, allowing AVB connection management using Compass software. AVB connections for the Normal Mode processor are not possible until the Group Name is changed to one that does not include a processor in Spacemap Mode.
Configure a new GALAXY processor
The following procedure updates the GALAXY processor firmware and boots the processor(s) to Spacemap Mode.
Tip
Compass software includes an option to update all connected processors simultaneously. When configuring multiple processors, it is more efficient to connect the processors and the Compass computer to a standard or Avnu-certified network switch.
Power on the network switch (if used), Wi-Fi access point, and all GALAXY processors
Download, install, and launch the current version of Compass software (4.8 or later).
Select the PROCESSORS > INVENTORY
Click CONNECT for each processor used in the Spacemap System. Click through the firmware warning message.

Compass Software – Inventory Tab, Click Connect and Firmware Mismatch Warning
Select the tab related to the first processor.
Select the SETTINGS > NETWORK tab.
Click the REBOOT WITH FACTORY DEFAULTS button.
Repeat Step 7 for each processor.
Note
The processor(s) will disconnect from Compass while rebooting (about 45 seconds) and then reconnect.
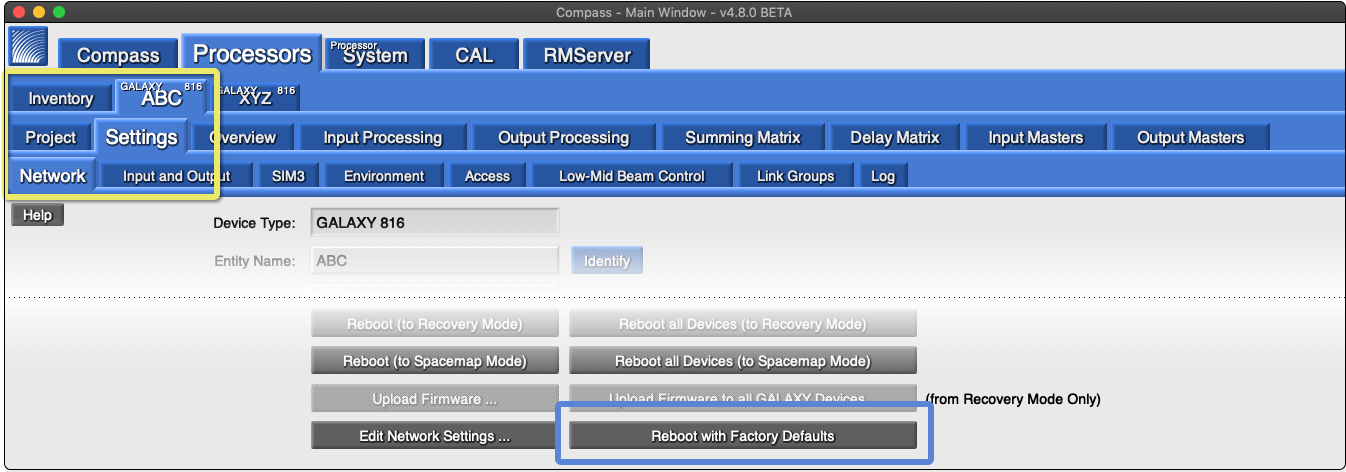
Compass Software – Network Tab, Click Reboot with Factory Defaults
Enter an Entity Name—unique for each processor (e.g., SMG-1, SMG-2…).
Enter a Group Name—use an identical name for all processors of a Spacemap System (e.g., show or venue name).
Repeat Steps 8 and 9 for each processor.
Note
All processors require the same Group Name to be recognized as part of a Spacemap System.
The Entity and Group Names cannot be changed after the processor is booted to Spacemap Mode.
Multiple Spacemap Systems can be created by using a different Group Name for the processors of additional system(s).
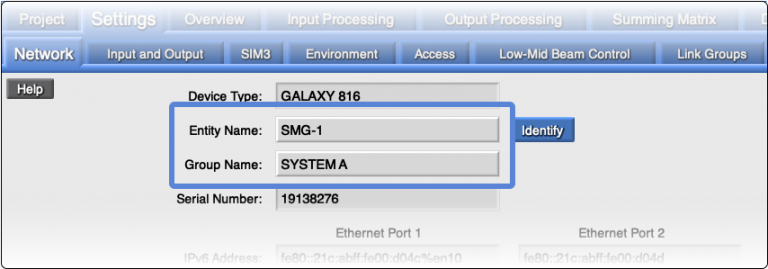
Compass Software – Network Tab, Enter Entity Name (Unique) and Group Name (Identical for All Processors)
Click the REBOOT ALL DEVICES (TO RECOVERY MODE) button.
Note
The processor(s) will disconnect from Compass while rebooting (about 30 seconds) and then reconnect in Recovery Mode.
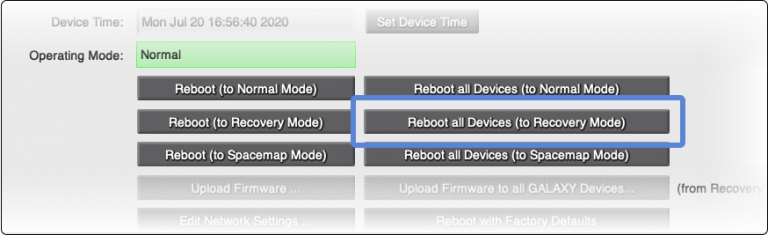
Compass Software – Reboot to Recovery Mode
Click the UPLOAD FIRMWARE TO ALL GALAXY DEVICES button.
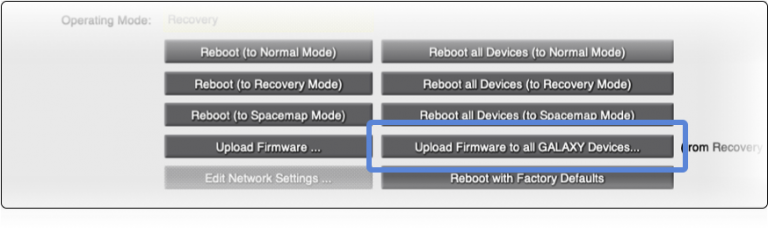
Compass Software – Upload Firmware to all GALAXY Devices
Select the
.galaxyFirmwarefile included with the Compass software. The firmware version will be newer than the illustration below.Default Compass installation directories:
MacOS: /Applications/Compass > <current version>/Win: /Program Files (x86)/Meyer Sound/Compass <current version>/
Note
The processor(s) will disconnect from Compass while rebooting (about 30 seconds) and then reconnect.
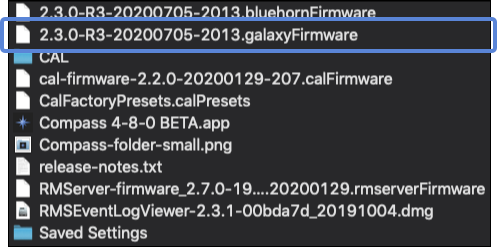
MacOS Finder – Compass Directory Files, GALAXY firmware file
Click OPEN to start uploading the firmware.
Note
The processor(s) will disconnect from Compass during the upload and reboot process (about three minutes) and then reconnect in Normal Mode.
Click the REBOOT ALL DEVICES (TO SPACEMAP MODE) button.
Note
The processor(s) will disconnect from Compass while rebooting (about 30 seconds) and then reconnect.
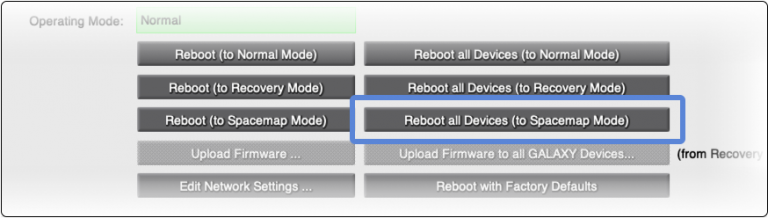
Compass Software – Reboot to Spacemap Mode
Compass indicates that a processor is in Spacemap Mode by changing the color of the processor tab.

Compass Software – Tab Color Indicates Spacemap Mode
Configure a GALAXY processor that's in use
Follow these steps to save existing input/output processing settings, upload firmware and reboot Galileo GALAXY processors to Spacemap Mode. The saved processor settings will be recalled during the procedure.
Power on the network switch (if used) and all GALAXY processors.
Launch the currently used version of Compass software.
Click the PROCESSORS > INVENTORY tab.
Note
Processors should be auto-discovered and listed. If not, click the FIND DEVICES button.
Click CONNECT for each processor used in a Spacemap System.
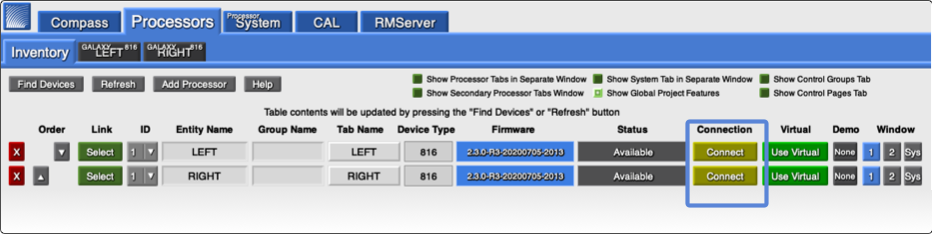
Compass Software – Click CONNECT for Each Processor
Select SHOW GLOBAL SNAPSHOT FEATURES, upper-right.
Click GLOBAL SNAPSHOT OPTIONS button, lower-right.
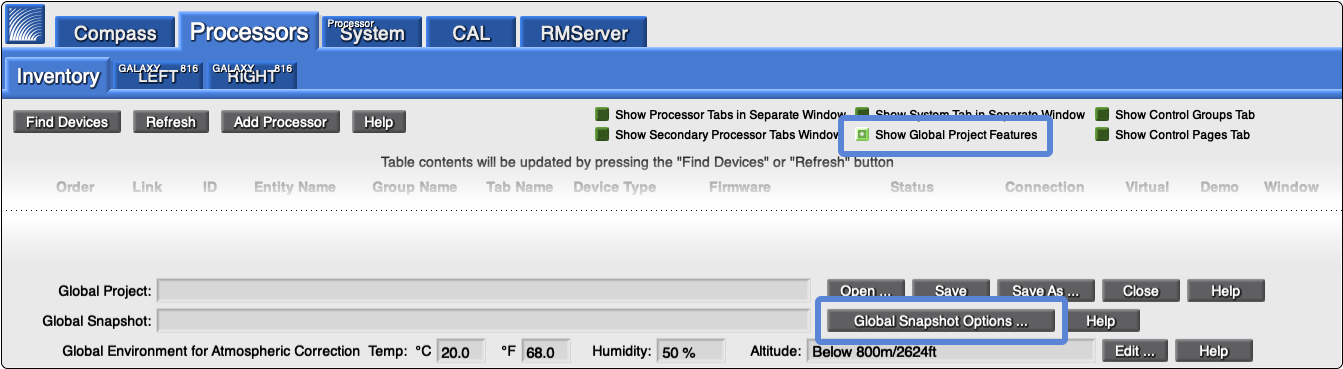
Compass Software – Inventory Tab, Show Global Project Settings and Global Snapshot Options
Click CREATE NEW in the pop-up dialog.
Enter the Snapshot name: SMG MIGRATION; click OK and CLOSE.
Note
This step creates a Snapshot in each GALAXY named SMG MIGRATION, which is recalled later and then saved by the Spacemap Go app as a Spacemap System Snapshot.
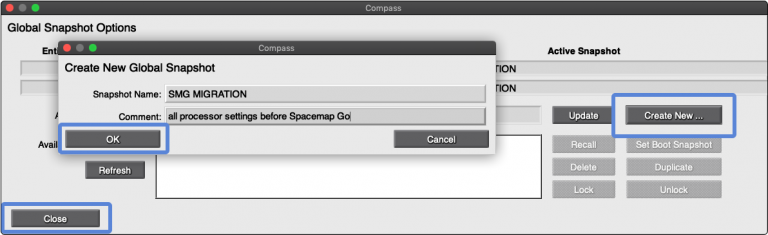
Compass Software – Global Snapshot Options, Create New, Enter Snapshot Name
Click the Global Project SAVE AS button.
Select a directory/folder and enter the file name: SMG MIGRATION; click SAVE.
Note
This step saves a Global Project on the computer as a backup

Compass Software – Save As Global Project
Close the older version of Compass.
Download, install, and launch the current version of Compass software (version 4.8 or later).
Click the PROCESSORS > INVENTORY tab.
Note
Processors should be auto-discovered and listed. If not, click FIND DEVICES.
Click CONNECT for each processor used in a Spacemap System, then YES for the firmware mismatch warning.

Compass Software – Inventory Tab, Click Connect and Acknowledge Firmware Mismatch
Select the tab related to the first processor.
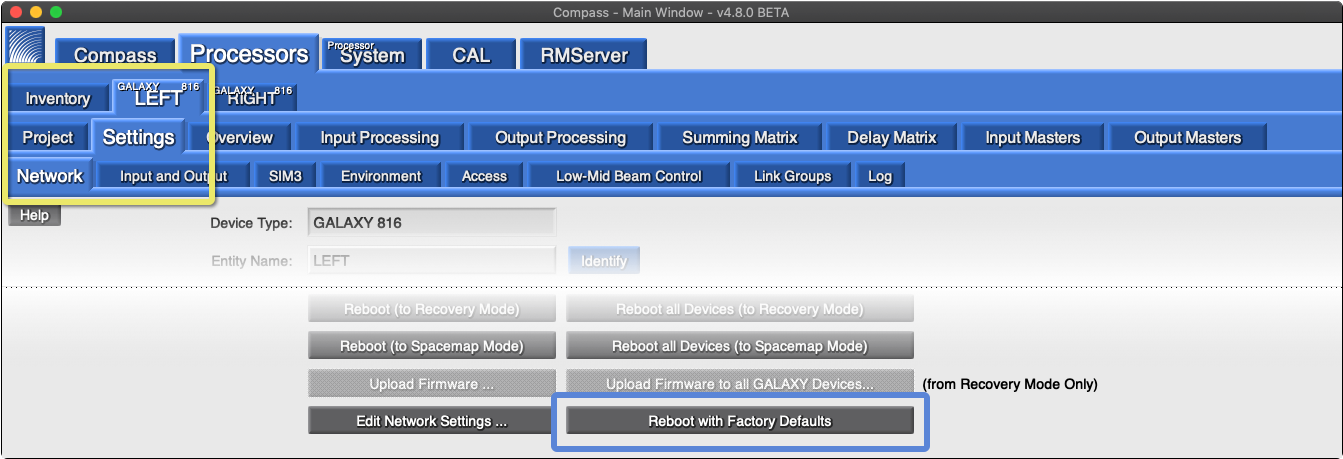
Select the SETTINGS > NETWORK tab.
Click the REBOOT WITH FACTORY DEFAULTS button.
Repeat Step 17 for each processor.
Note
The processor(s) will disconnect from Compass while rebooting (about 45 seconds) and then reconnect.
Compass Software – Network Tab, Reboot with Factory Defaults
Enter an Entity Name—unique for each processor (e.g., SMG-1, SMG-2…).
Enter a Group Name—use an identical name for all processors of a Spacemap System (e.g., show or venue name).
Repeat Step 18 and 19 for each processor.
Note
All processors require the same Group Name to be recognized as part of a Spacemap System.
The Entity and Group Names cannot be changed after the processor is booted to Spacemap Mode.
Multiple Spacemap Systems can be created by using a different Group Name for the processors of additional system(s).
Click the REBOOT ALL DEVICES (TO RECOVERY MODE) button.
Note
The processor will disconnect from Compass during the upload period (about 30 seconds) and then reconnect.
Compass Software – Reboot to Recovery Mode
Click the UPLOAD FIRMWARE TO ALL GALAXY DEVICES button.
Compass Software – Upload Firmware to all GALAXY Devices
Select the
.galaxyFirmwarefile included with the Compass software. The firmware version will be newer than illustrated below.Click OPEN to start uploading the firmware.
Note
The processor(s) will disconnect from Compass during the upload/reboot (about three minutes) and then reconnect.
MacOS Finder – Compass Directory Files, GALAXY firmware file
Click the REBOOT ALL DEVICES (TO SPACEMAP MODE) button.
Note
The processor(s) will disconnect from Compass while rebooting (about 30 seconds) and then reconnect.
Compass Software – Reboot All Devices to Spacemap Mode
Compass indicates that a processor is in Spacemap Mode by changing the color of the processor tab.
Compass Software – Tab Color Indicates Spacemap Mode
Configure a virtual GALAXY processor
If Galileo GALAXY hardware is not available, Compass can create virtual processors. All the functions of Spacemap Go are available without passing audio signals. Using virtual processors facilitates learning, testing, and programming off-line.
Quick start example configuration
Follow the steps in this example to quickly configure the Spacemap Go system and pass audio.
Prerequisites:
This quick start example configuration assumes that the audio and network connection instructions and one of the Galileo GALAXY processor configuration methods have been successfully completed.
Step 1: Configure system inputs and outputs
This quick start example configuration uses the Spacemap Go app to define the inputs and outputs of a Spacemap Go system, including:
Inputs: 2 analog, 2 AES3, and 28 Milan AVB channels from an AVB source
Outputs: 16 analog channels
Processors: one GALAXY 816
Network switch: one Milan AVB, Avnu Alliance certified network switch with the AVB license pack installed and configured
Step 2: Set up a quick start example configuration
Note
Ensure the GALAXY processors are booted to Spacemap Mode and the Group Names of each processor are identical.
Power off or disconnect loudspeakers from the GALAXY processor.
Caution
This step prevents the possibility of inadvertently reproducing very loud sounds. After the system is configured, the loudspeakers are powered on or reconnected.
Connect the iPad to a Wi-Fi network connected to the Internet
Install the Spacemap Go app on an iPad. The app is available at no cost from the Apple App Store.
Connect the iPad to the Spacemap Go Wi-Fi network.
Launch the Spacemap Go app.
Note
When Spacemap Go launches, the Group Name assigned to all of the processors is displayed as an available Spacemap System.
Tap a Spacemap Go System Name.
For this example: tap SYSTEM A
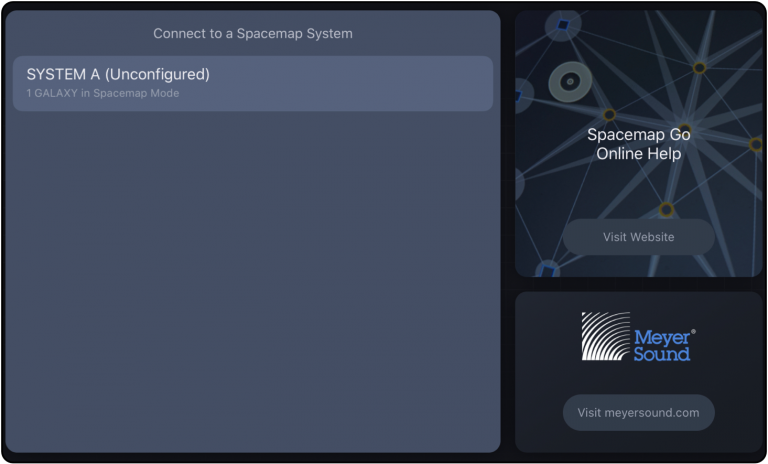
Connection Wizard – Tap a Spacemap System to Connect
If a system has no physical audio inputs (AVB only), tap PROCEED and go to Step 10.
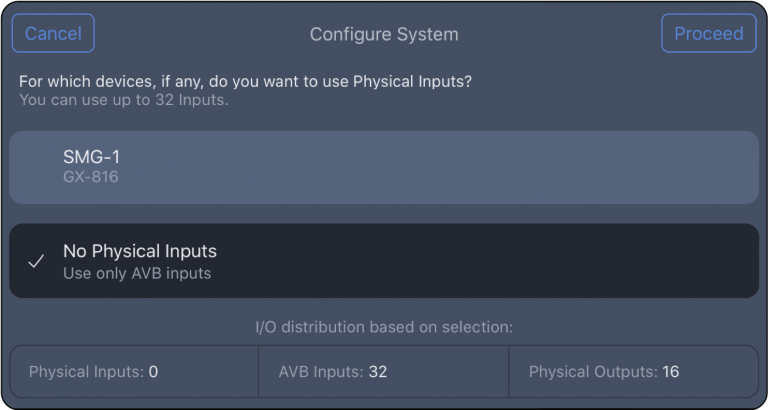
Spacemap Go – No Physical Inputs
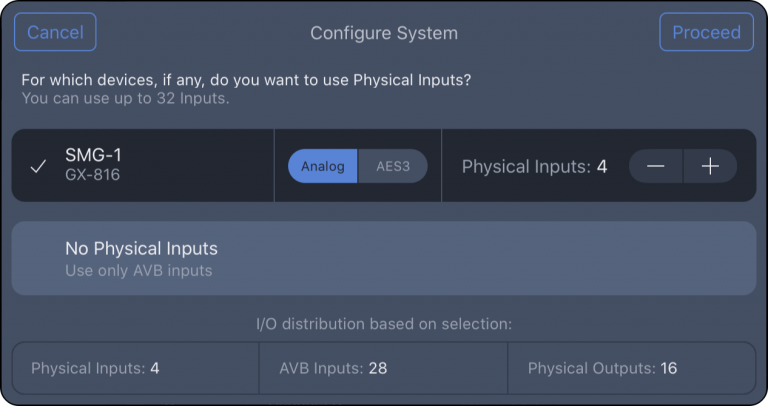
Tap the GALAXY processor(s) with physical audio inputs (analog or AES3).
Select Analog or AES3, then tap
 buttons to adjust the total number of analog plus AES3 inputs for each processor; tap PROCEED.
Note
If inputs for a processor are both analog and AES3, individual signal types are selected later.
For this example, tap SMG-1 and set Physical Inputs to 4.
Use the
buttons to adjust the number of AVB inputs used for the system (0–32 selectable). If the system only shares analog or AES inputs, set the AVB Inputs to “0.” Tap SAVE TO SYSTEM.For this example, 28 AVB inputs are used:
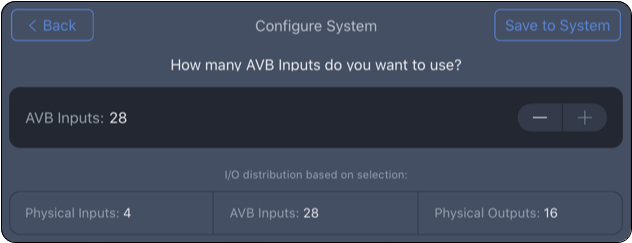
Configure System – Select Number of AVB Inputs
Tap CONNECT AVB.
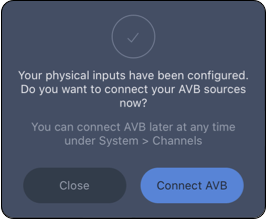
Spacemap Go App, Connect AVB Sources
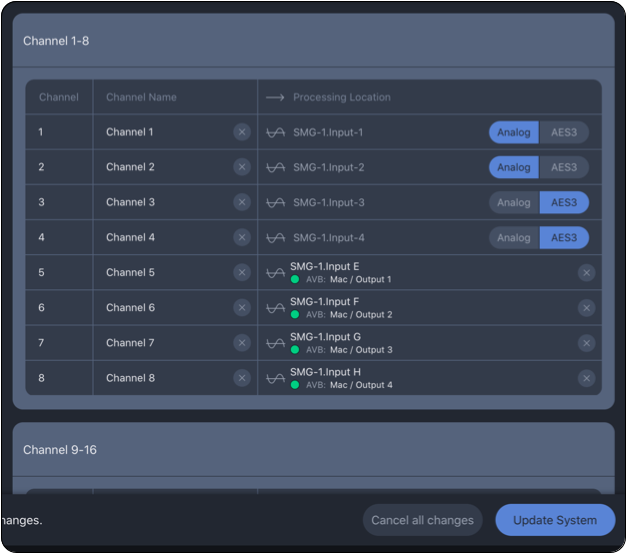
Select Analog or AES3 for individual inputs, tap UPDATE SYSTEM and confirm.
For this example: Inputs 1 and 2 are analog, Inputs 3 and 4 are AES3.
Spacemap Go – Input Type Selections for Analog and AES3
If the GALAXY processor is in-use and the settings need to be preserved, continue to the next Step 3 (optional): Keep GALAXY settings when using an in-use processor.
If this is a new processor and the GALAXY processor settings do not need to be preserved, continue on to Step 4: Create a mix snapshot.
Step 3 (optional): Keep GALAXY settings when using an in-use processor
From the GALAXY Configuration procedure, if a processor is part of a system that is in use, the optimization settings were stored as a Global Snapshot in Compass. This is the appropriate time to recall that Global Snapshot and save the settings to a Spacemap Go System Snapshot.
Using Compass software, from the INVENTORY tab, click the OPEN button (lower-right) to open the Global Project created earlier.
Select the SMG MIGRATION Global Project file; click OPEN.
Click the GLOBAL SNAPSHOT OPTIONS button.
Select SMG MIGRATION Global Snapshot; click RECALL.
Exit the Compass software. It is not used beyond this step.
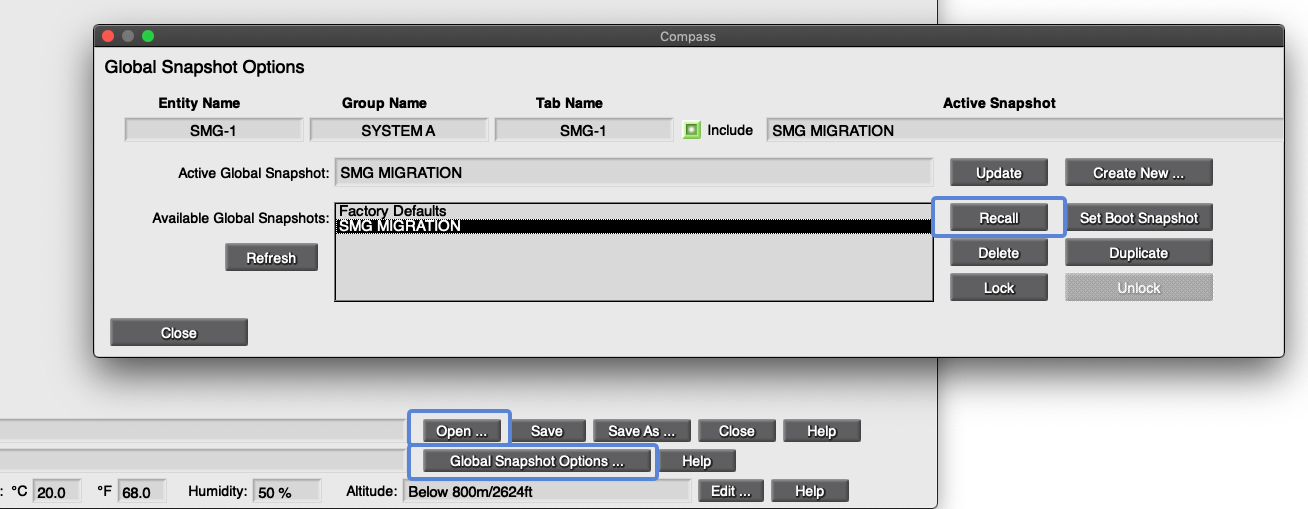
Compass Software – Open Global Project, Recall Global Project
In Spacemap Go, tap SETTINGS VEIW, tap INPUTS and RECONFIGURE INPUTS.
Make physical and AVB input selections again and tap SAVE TO SYSTEM.
In Spacemap Go, tap
 , SYSTEM SNAPSHOTS. Tap More (three-dot icon) next to User System Defaults and select UPDATE SYSTEM DEFAULT SNAPSHOT.
Note
This step captures processor optimization settings. The System Default Snapshot is automatically recalled when app is started.
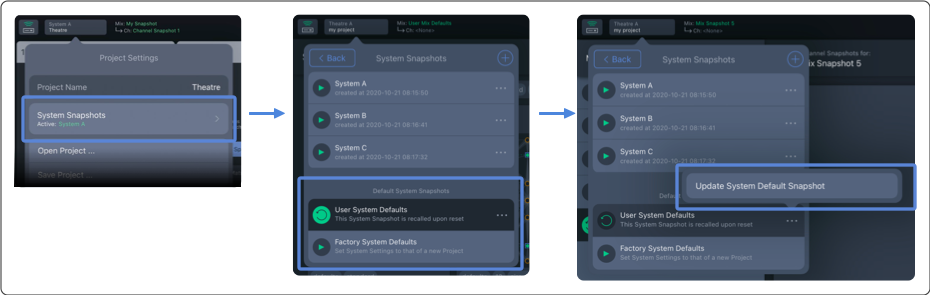
Spacemap Go, Project Settings – Update User Default Snapshot
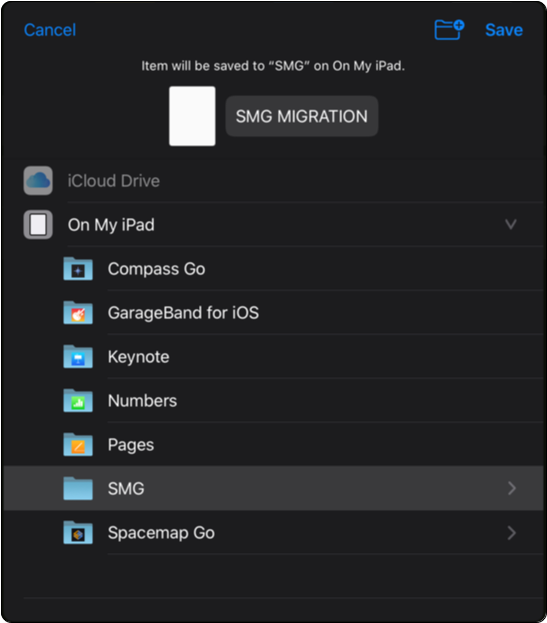
Tap
, and then tap SAVE PROJECT.Select Save to File… and/or Save to GALAXY, tap PROCEED.
iPadOS: select SAVE TO FILES.
Add a new folder or select the Spacemap Go folder.
Tap the file name to edit it.
Tap SAVE.
iPadOS – Save Spacemap Go Project File
Step 4: Create a mix snapshot
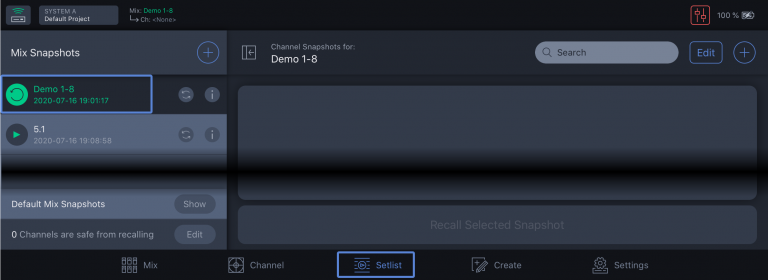
Tap the SETLIST view.
Tap Demo 1–8.
Tap RECALL to confirm.
Spacemap Go – Setlist View, Select Demo 1-8
Tap
 to create new Mix Snapshot.
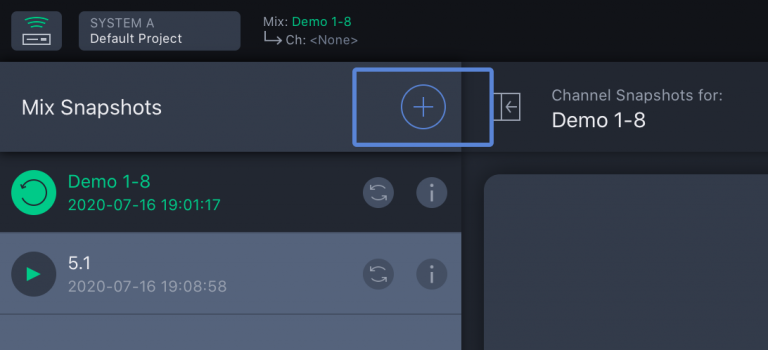
Spacemap Go – Add New Mix Snapshot
Enter
My First Mix Snapshot, tap CAPTURE.
Step 5: Check inputs and adjust levels
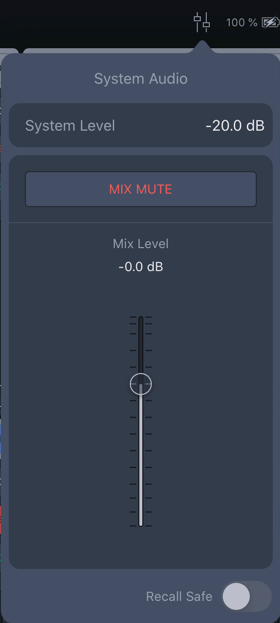
Click
 and set the MIX LEVEL fader to -40 dB.
Caution
This step prevents very loud sounds from being reproduced by the loudspeakers when audio is passed. There is also a MUTE button available.
Note
Tap drag the fader or tap the numeric value and enter a value.
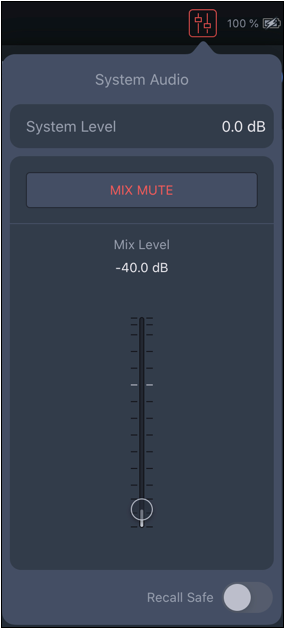
Spacemap Go – System and Mix Levels
Tap MIX VIEW.
Mute each input and move each input fader to -90 dB. Use the four buttons at the top to view all 32 inputs.
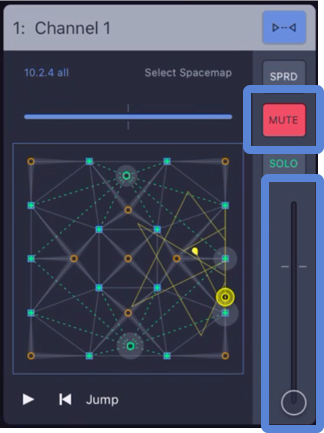
Spacemap Go – Mute and Input Fader Down
Connect or power on the loudspeakers.
Start sending audio from the playback device(s) and confirm audio input levels.
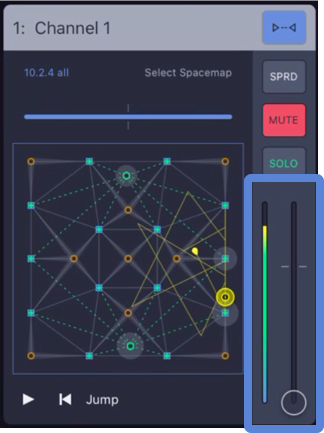
Spacemap Go – Input Meter and Input Fader
Similar to an input of a console, unmute each input and slowly raise the input fader. If the fader of the channel cannot be comfortably set to the nominal (0 dB) level, increase or decrease the Mix Level accordingly. Listen for the expected output.
Tip
One way to use the Mix and System Level is to treat the Mix Level as a “master fader” of the system and the System Level as a system-wide offset. Once the inputs are confirmed and a relative listening level is established, set the System Level to match the Mix Level and return the Mix Level to nominal (0 dB) for better fader resolution during operation. The Mix Level is stored with a Mix Snapshot. The System Level is saved with a System Snapshot.
Spacemap Go – System Levels
Simple troubleshooting
If sound is not being reproduced by the loudspeakers, please check:
Input metering is indicated next to the channel in Mix View (to the right of the Spacemap of each channel).
The mix or system level is not too low or muted.
Mix View, for a channel receiving input, move the Spacemap Panner so that a Speaker Node with a connected loudspeaker indicates level.
Loudspeakers are connected to assigned processor outputs (for Demo 1-8 Mix Snapshot, Spacemap Go Ch 1-2 have Speaker Nodes associated with processor outputs 1-14).
Loudspeakers are powered on and patched.
At this point, if there is no sound coming from your loudspeakers, please contact us! Not only would we like to help you get things working, but we may also discover ways to make improvements to the app.