ULTRA Weather Protection Version
Ultra Weather Protection is recommended for applications where loudspeakers will experience exposure to a salt air environment or chemicals, that have no sheltering from corrosive spray or UV exposure, and that cannot be covered or removed during their service life. Examples would include cruise ship exterior areas, ocean-side visitor attractions, swimming pool areas, and themed attractions with wind-carried water spray.
For installations in extremely harsh environments, Meyer Sound offers an IPX5-rated, Ultra Weather Protection version of the LEOPARD loudspeaker, which includes all of the components of standard Weather Protection, plus the following:
Extended cabinet finishing with extra thick proprietary coatings
Special printed circuit board treatments
Improved corrosion-resistant coatings and materials on select metallic components
Rigging changes for improved corrosion resistance
Rain hood splash guard for improved water resistance
The table bekow provides a list of the accessories and user-accessible hardware component differences for LEOPARD loudspeakers that ship from the factory as Ultra Weather Protection versions.
LEOPARD Accessory/Part | UW LEOPARD Accessory/Part | Comment |
|---|---|---|
MG-LEOPARD/900-LFC Grid (PN 40.243.080.01) | MG-LEOPARD/900-LFC UW Grid, white (PN 40.243.180.05) or MG-LEOPARD/900-LFC UW Grid, black (PN 40.243.180.06) | See entries on “Grid to Loudspeaker Fasteners” and “Blanking Screws” in the UW LEOPARD Accessory/Part Column. NoteUW grids require the GROUNDSTACK KIT UW (40.243.163.05 or 40.243.163.06) in order to be usable for ground-stacking. |
Not applicable | MG-LEOPARD/900-LFC Blanking Screws 8-32 x 0.5-inch pan head Phillips stainless steel screw (PN 101.167), qty 12 | Two of these “blanking screws” are inserted around each grid pinhole location to prevent corrosion at unused pin locations. Those at locations where the speaker links will be attached must be removed before attaching a speaker to the grid. See the first figure below the table. NoteFor the LEOPARD loudspeaker, the front and middle blanking screws must be removed. For the 900-LFC loudspeaker, the front and rear blanking screws must be removed. |
MG-LEOPARD/900-LFC Grid to Loudspeaker Quick-release pins (with lanyard) Red 5/16 in x 0.875 in with 6-inch lanyard (PN 134.025), qty 10 | MG-LEOPARD/900-LFC Grid to Loudspeaker Fasteners UW lock pin clamp, 5/16-inch with gasket, qty 4 (PN 45.010.506.05), white OR (PN 45.010.506.06), black Hex head screw with washer 8-32 x 3/4-inch, qty 12 (PN 45.010.934.05), white OR (PN 45.010.934.06), black CautionThese screws have a ! pre-applied thread-locking patch and cannot be reused. UW lock pin 5/16-in x 0.63-inch (PN 61.010.504.01), qty 4 | The clamps, screws, and lock pin replace the quick-release pins (with lanyard). Torque screws to 12 in-lb (1.36 N·m). |
LEOPARD Loudspeaker to Loudspeaker quick-release pins Black 5/16 in x 0.63 in (PN 134.024), qty 8 | LEOPARD Loudspeaker to Loudspeaker Fasteners UW lock pin clamp, 5/16-inch with gasket, qty 8 (PN 45.010.506.05), white OR (PN 45.010.506.06), black Hex head screw with washer 8-32 x 3/4-inch, qty 20 (PN 45.010.934.05), white OR (PN 45.010.934.06), black UW lock pin 5/16-in x 0.63-inch (PN 61.010.504.01), qty 8 | The clamps, screws, and lock pin replace the quick-release pins (with lanyard). See the second figure below the table. Torque screws to 12 in-lb (1.36 N·m). |
GROUNDSTACK KIT: MG- LEOPARD/900-LFC (PN 40.243.163.01) (Kit does not include quick-release pins because the angle feet are secured with the quick-release pins included with the grid.) | GROUNDSTACK KIT: MG-LEOPARD/900-LFC UW, white (PN 40.243.163.05) or MG-LEOPARD/900-LFC UW, black (PN 40.243.163.06) | These UW kits include: MG-LEOPARD/900-LFC Grid Tilt Assembly (PN 45.243.163.05 or 45.243.163.06), qty 2 LEOPARD UW/900-LFC UW Grid Links, (PN 61.243.191.05 OR 61.243.191.06), qty 4. Shoulder bolts 5/16x1-inch with 1/4-20 thread (PN 101.529), qty 10 Hex Nut, 1/4-20 thread, self-locking (PN 109.107), qty 10. The shoulder bolts and hex nuts replace the grid quick-release pins. |

Blanking Screws (6 per side) to Prevent Corrosion at Unused Pin Locations for Ultra Weather Protection Grid
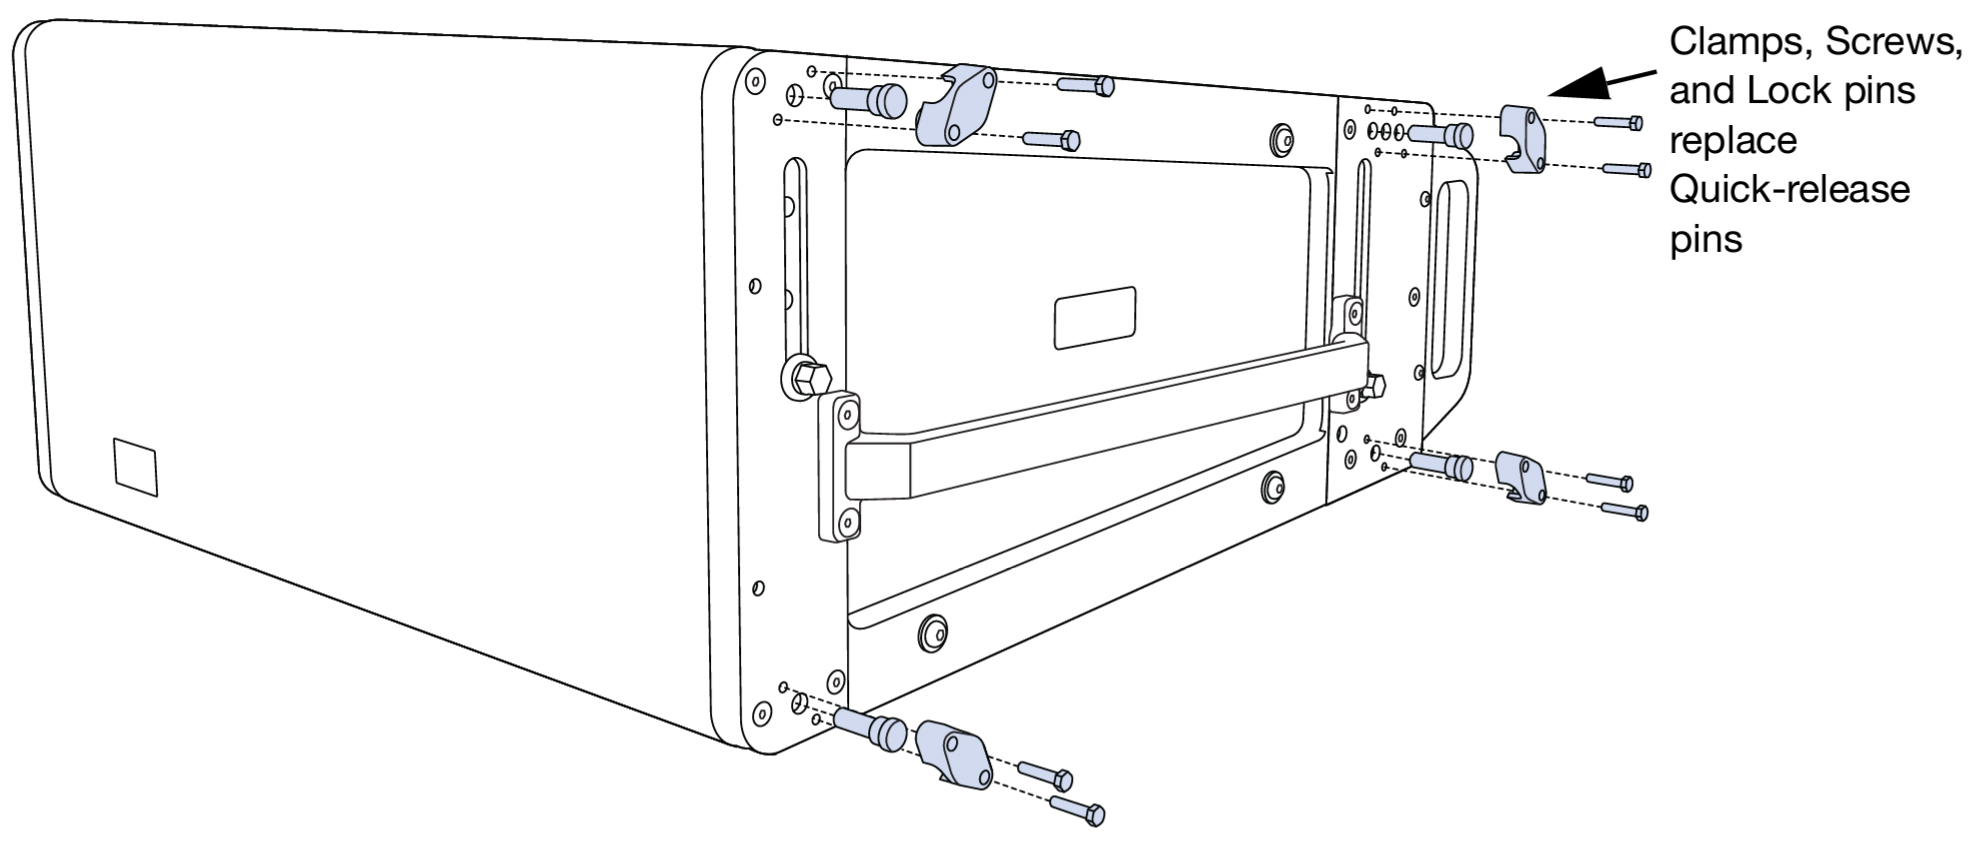
Ultra Weather Protection LEOPARD Loudspeaker Version has Clamps, Screws, and Lock pins that replace standard version quick-release pins
Caution
The use of corrosion-resistant material reduces the strength of the LEOPARD UW loudspeaker compared to the standard or weather-protected versions. LEOPARD UW loudspeaker versions should not be rigged together with LEOPARD standard or weather-protected loudspeaker versions. Contact Meyer Sound for guidance on loading limitations.
Ultra LEOPARD/900-LFC Rain Hood Kit
The ULTRA-weather-protected LEOPARD/900-LFC kit includes a quick-clip removable rain hood. The Ultra Weather Protection LEOPARD/900-LFC Rain Hood Kit includes the following parts:
LEOPARD/900-LFC Quick Clip Rain Hood with Splash Shield Assembly (PN 45.243.241.01)
LEOPARD Rain Hood Baffle (PN 64.243.104.01)
2 pan head Phillips 6-32 x 0.25-inch 316 stainless-steel screws (PN 101.405)
Rain Hood Baffle Installation
Gather the LEOPARD/900-LFC Rain Hood Baffle (PN 64.243.104.01) and the two pan head Phillips 6-32 x 0.25-inch stainless steel screws (PN 101.405).
Turn the loudspeaker so that the rear is accessible.
Locate the two screw holes beneath the powerCON connectors on the user panel (left side of the loudspeaker).
Attach the Baffle in the orientation shown in Figure 27 using the two provided screws. The recommended torque value for both screws is 10–12 in-lbs (1.1–1.4 N·m).

Attaching Rain Hood Baffle to LEOPARD Loudspeaker User Panel
Routing Cables and Attaching Rain hood
After installing the baffle, install the necessary audio and power cables.
Attach the rain hood to the user panel, slipping it under the rain hood retainer flange at the top of the user panel.
Route the cables through the rain hood on either side of the baffle and through the bottom of the rain hood.
Push the rain hood flush against the loudspeaker.
Secure it to the loudspeaker by giving the two captive wing-head stud fasteners on either side of the rain hood a quarter turn, so they fully lock.
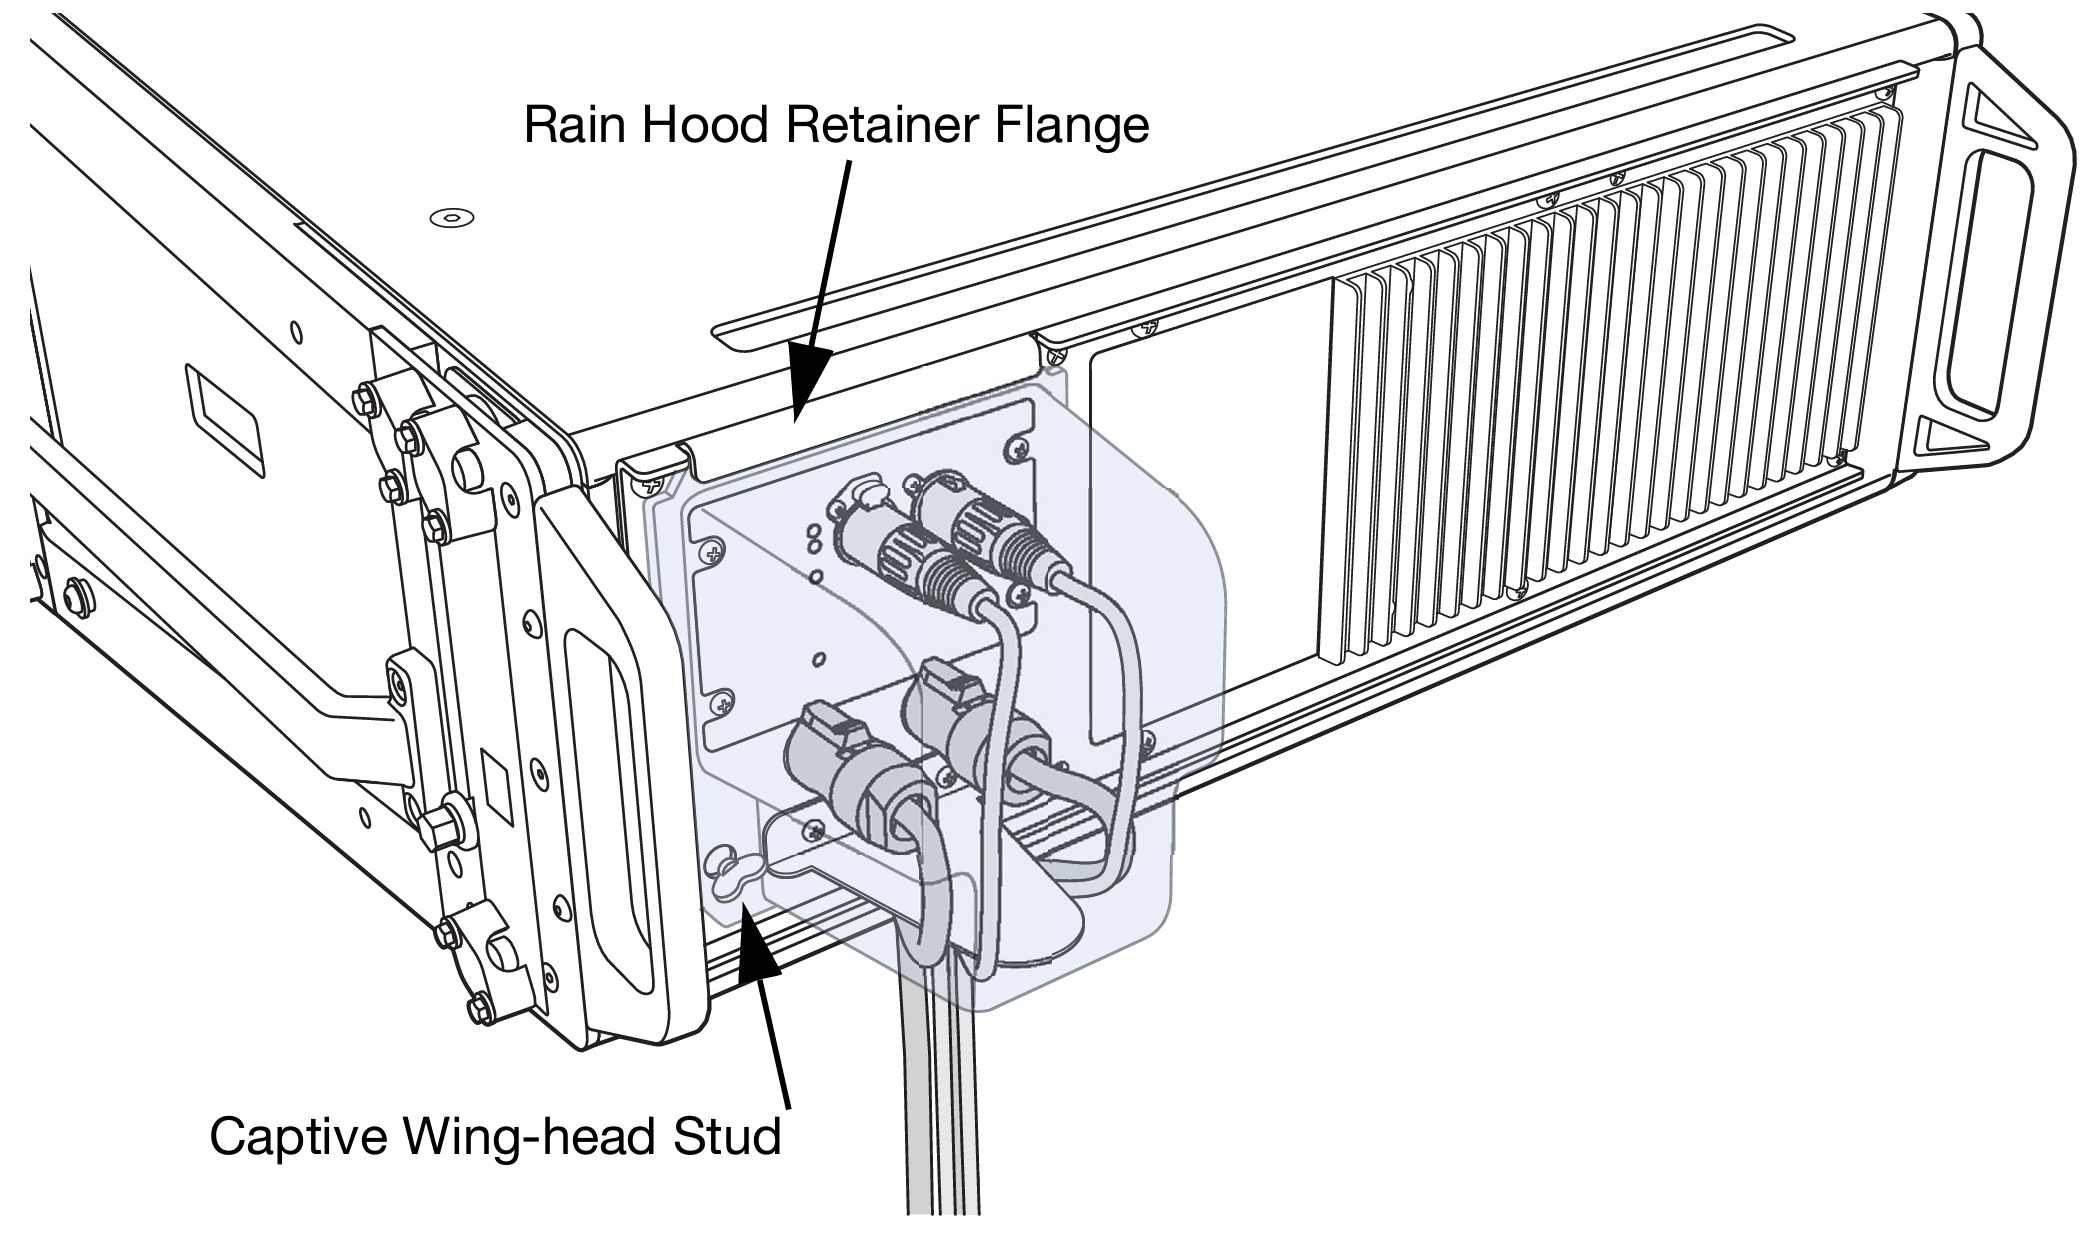
Routing Signal and Power Cables Through Rain Hood and Around Baffle
Note
Ultra Weather Protected units using the LEOPARD/900-LFC UW Rain Hood are rated IPX5 for water intrusion.