Custom layouts
Custom Layouts let you use a single control to adjust settings on multiple Galileo, Galileo GALAXY, and Galileo Callisto devices. Custom Layouts can be spread across multiple views and can include background images. Views can be reordered and deleted.
Users with an iPad Pro can take advantage of the larger screen size by setting the Canvas Size to Large Canvas from the Tools menu (Small Canvas is the default setting).
Note
Setting a normal iPad to Large Canvas makes part of the screen not visible. Tap and drag to scroll the screen to see the extra screen space.
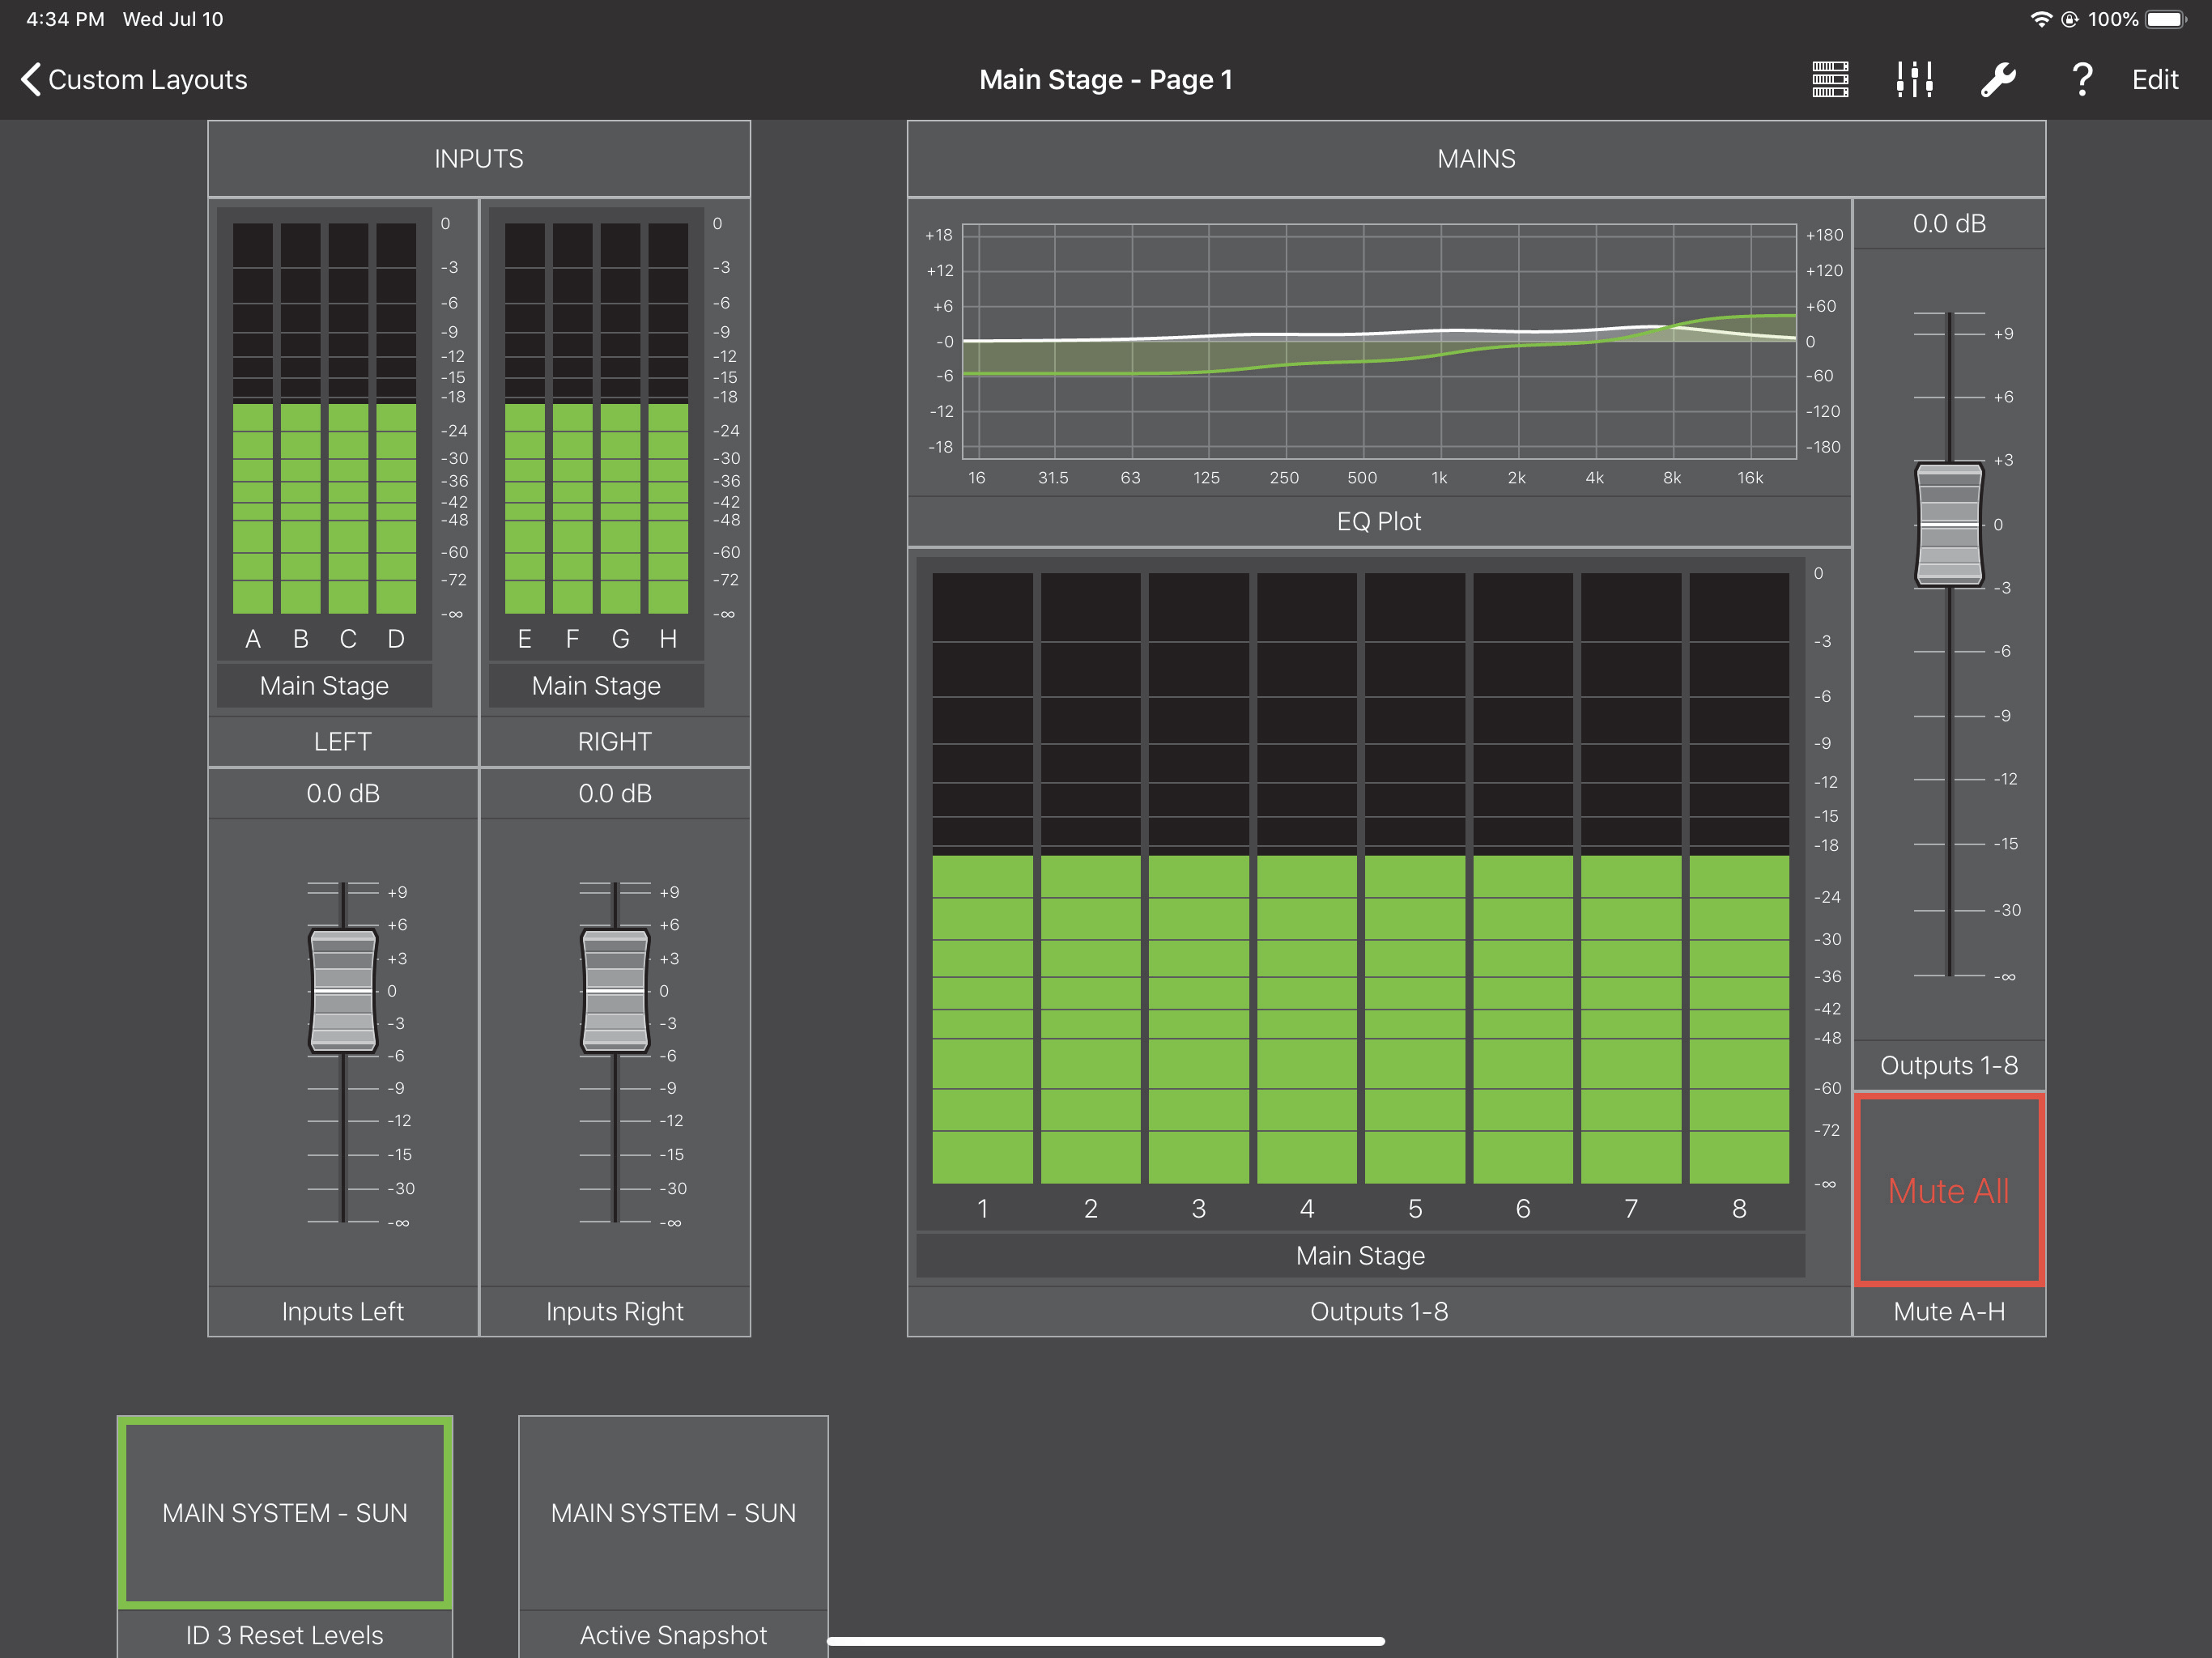
Custom Layouts View
Creating a custom layout
Tap Custom Layouts on the Devices View.
Tap Add Custom Layout.
A blank Custom Layout appears along with a keyboard to name it.
Name the Custom Layout.
Adding a device to a custom layout
Tap the Devices Icon from the top-right of your Custom Layout.
Tap Add Device.
The Add Device dialog appears.
Tap in the Device Name field and use the keyboard to assign a unique name so it is easy to identify.
Tap Device Type and choose from the corresponding Galileo, Galileo Callisto, or Galileo GALAXY types to match device in use.
Enable Device Auto Mapping by moving the switch to the right so it lights green.
Compass Go will automatically map this device next time the app is launched.
Tap the Devices Icon and select the devices to include in your Custom Layout.
Devices on the network are listed. A red dot to the left of the device shows it is not yet mapped. A yellow triangle shows it is mapped but disconnected.
If a device has a red dot, tap Map Devices.
The Map Devices dialog opens showing Devices already in this Custom Layout on the left and Discovered Devices on the right. Lines between the columns indicate valid mappings.
Tap a Device in either column that you wish to map.
Note
Only the same Device Types can be mapped to each other; incompatible device types are grayed out in each column.
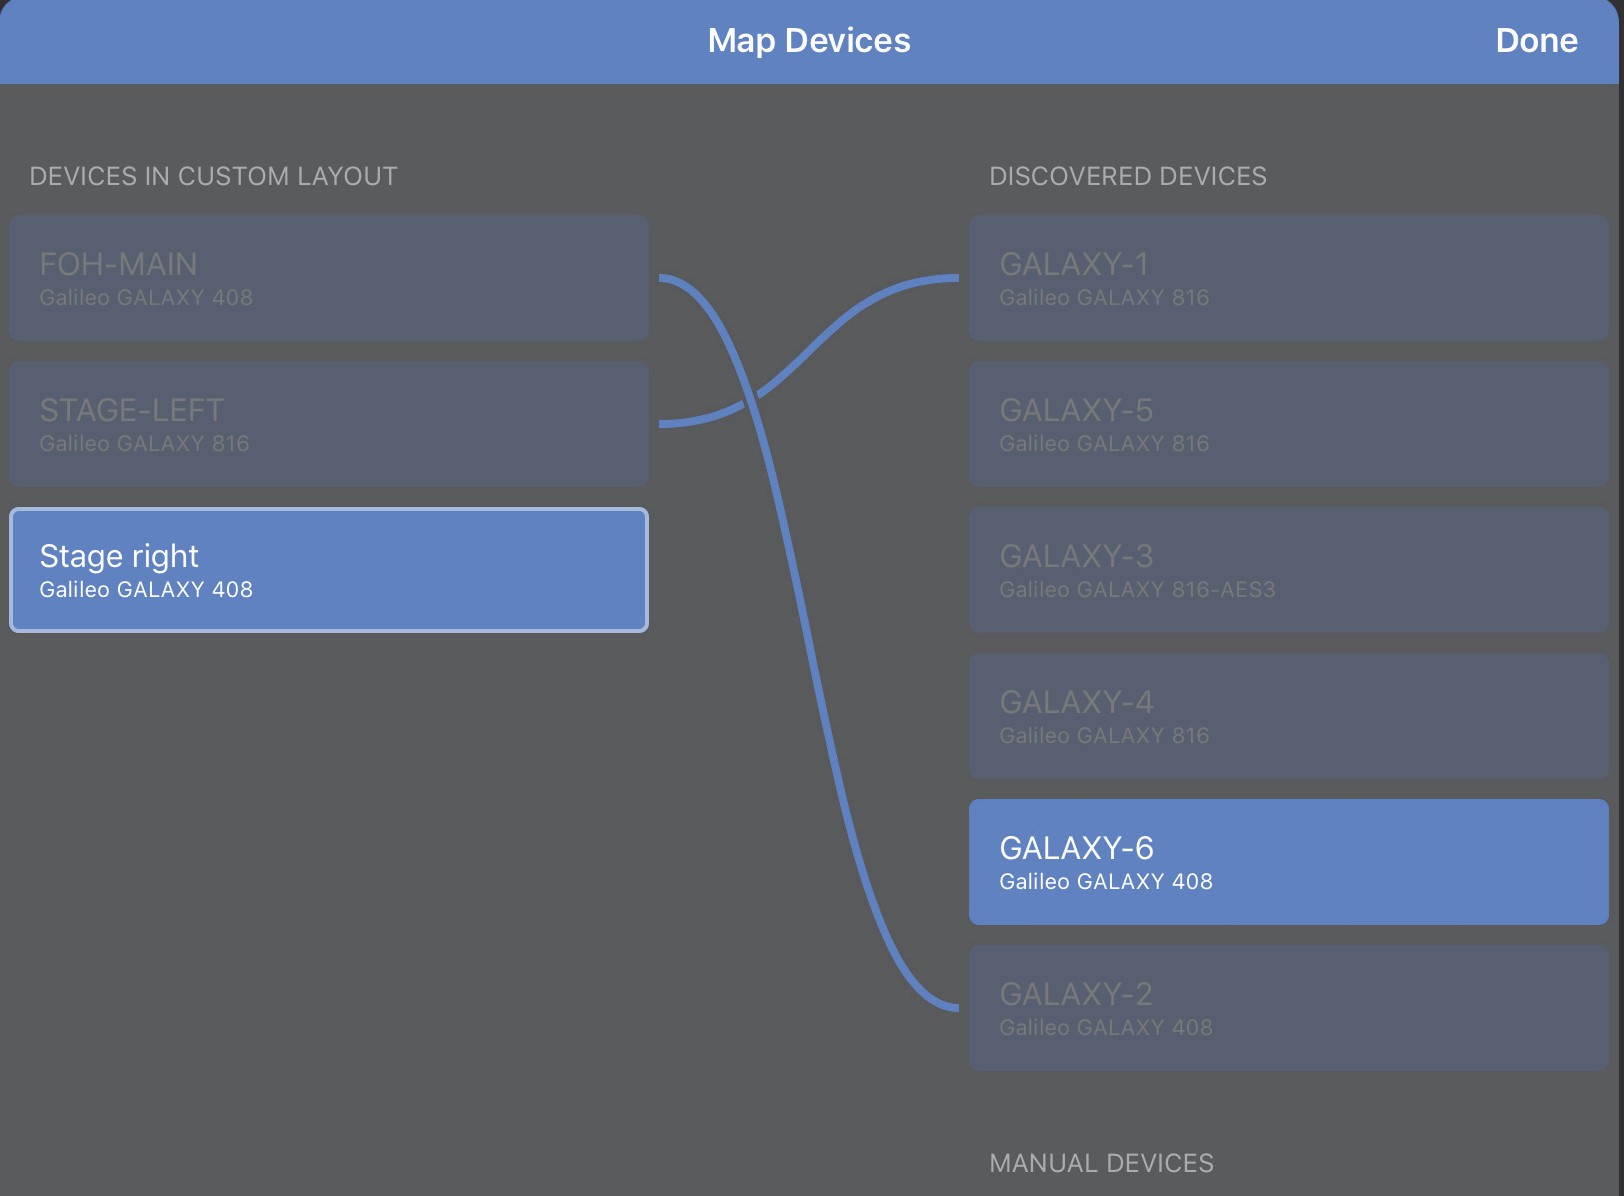
Devices valid for mapping
Tap the corresponding Device (in the other column) that you wish to connect to.
A line between the Devices shows the mapping was successful.
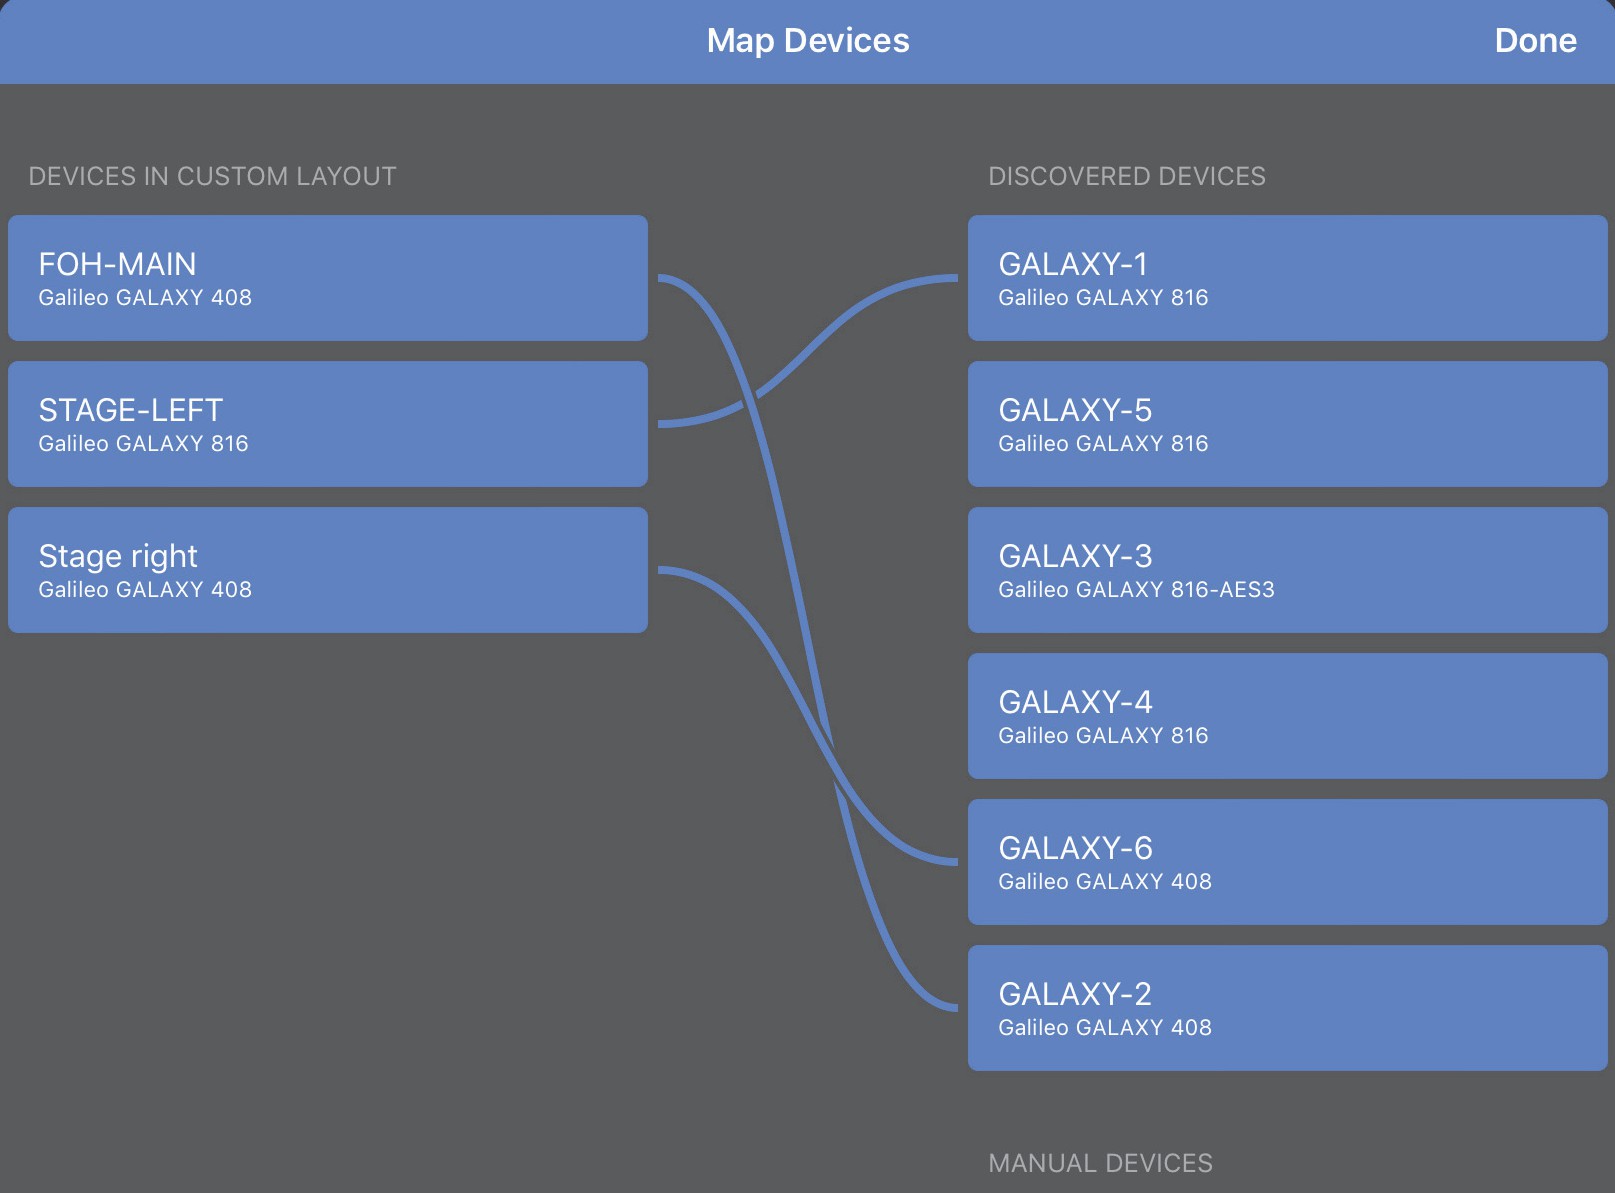
Devices successfully map
To unmap a mapped Device, tap the Device in either column, then tap the X that appears in the center of the line connecting them.
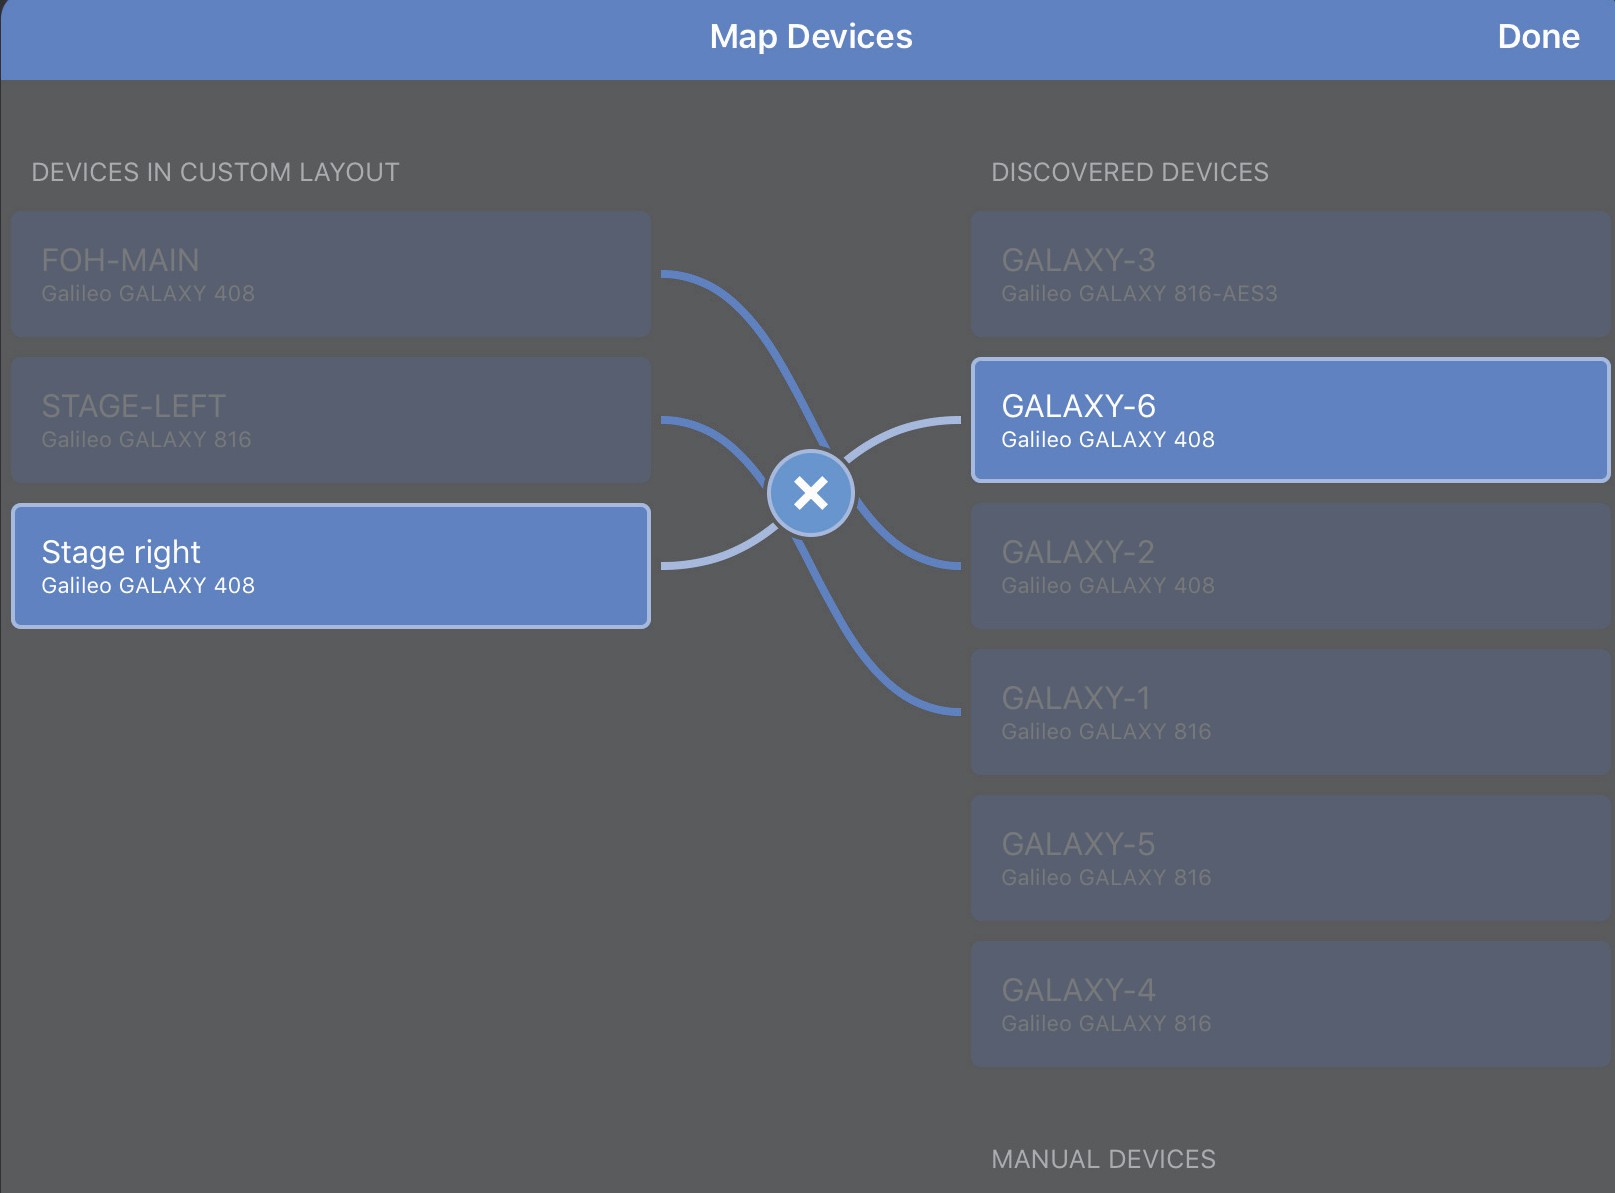
Devices being unmapped
Map each Device.
In the Devices menu, all Devices should have a green circle on their left.
Select a mapped Device to disconnect it but leave it mapped (yellow triangle).
Tip
Most controllers attempt to preserve the relative values of the multiple parameters they adjust if they differ. A blue band appears on the controller if this is the case.
Adding controls to a custom layout
Fader
Tap the I/O Icon in the menu bar, and select Fader. The Fader dialog opens.
Tap in the Control Label field and assign a name.
Tap in the Control Point Type field and select Gain.
Tap Channel Type and select Output.
Tap in the Channel Assignments section to select the Output channel(s) to control.
Tip
Most controllers attempt to preserve the relative values of the multiple parameters they adjust if they differ. A blue band appears on the controller if this is the case.
Rotary
Tap the I/O Icon in the menu bar, and select Rotary. The Rotary dialog opens.
Tap in the Control Label field and assign a name.
Tap in the Control Point Type field and select Delay.
Tap Channel Type and select Output.
Tap to select the Output channel(s) from the Channel Assignments section.
Spin Dial
Tap the I/O Icon in the menu bar, and select Spin Dial. The Spin Dial dialog opens.
Tap in the Control Label field and assign a name.
Tap in the Control Point Type field and select Delay.
Tap Channel Type and select Output.
Tap to select the Output channel(s) from the Channel Assignments section.
Wheel
Tap the I/O Icon in the menu bar, and select Wheel.
The Wheel dialog opens.
Tap in the Control Label field and assign a name.
Tap in the Control Point Type field and select Parametric EQ.
Tap Channel Type and select Output.
Tap Parametric EQ Attribute and select Gain.
Select a parametric Band.
Callistos have five bands of Output EQ, Galileo and Galaxy have 10.
If Input is the selected Channel Type, Callisto 616s are not available as they do not have parametric EQs on their inputs.
Tap to select the Output channel(s) from the Channel Assignments section.
Mute Button
Tap the I/O Icon in the menu bar, and select Mute Button. The Mute Button dialog opens.
Tap in the Control Label field and assign a name.
The Control Point Type field is automatically set to Mute.
Tap Channel Type and select Output.
Tap to select the Output channel(s) from the Channel Assignments section.
If Mute states differ among controlled channels, the label on the control changes from Mute All (or Unmute All) to Mute/Unmute. When tapped, a dialog appears with the following choices: Mute All, Unmute All, Toggle All, and Cancel.
Snapshot Recall
Tap the I/O Icon in the menu bar, and select Snapshot Recall.
Tap in the Control Label field and assign a name.
Tap the +/- controls to set the Snapshot ID to use for each device.
When the Snapshot control is tapped, the selected Snapshots are recalled into their respective devices.
Meter
Tap the I/O Icon in the menu bar, and select Meter.
The Meter dialog opens.
Tap in the Control Label field and assign a name.
The Control Point Type field is automatically set to Meter.
Tap Channel Type and select Input.
Tap to select an Input channel from the Channel Assignments section.
Response Curve
Tap the I/O Icon in menu bar, and select Response Curve. The Response Curve dialog opens.
Tap in the Control Label field and assign a name.
The Control Point Type field is automatically set to Response Curve.
Tap Channel Type and select Input.
Tap to select an Input channel from the Channel Assignments section.
Background image
Background images add context to a Custom Layout, making it easier to find and use controls. To add a Background Image to your Custom Layout:
Tap the I/O Icon in menu bar, and select Background Image (from the Miscellaneous section). The Photos dialog from your iPad opens.
Tap the folder containing your background image and select it.
The image appears as a background in your Custom Layout.
Background Images can be resized and moved when a Custom Layout is in Edit Mode.
From your Custom Layout View, tap Edit in the top-right of the menu bar.
To resize the image, use two fingers to pinch inward or expand outward to shrink or enlarge the image, respectively.
To move the image, tap it with two fingers and drag to the desired location.
Tap Done when finished.
Label
Labels add context to a Custom Layout, making it easier to remember how to use the controls.
Tap the I/O Icon in the menu bar, and select Label (from the Miscellaneous section). The Label dialog appears.
Tap to assign a name using the onscreen keyboard then tap Done.
The new Label appears in your Custom Layout.
From the Custom Layout containing the Label, tap Edit.
Edit handles now surround all controls and Labels on the Custom Layout.
Tap a Label.
The Label dialog appears.
Tap Delete Label.
Tip
Tapping the Label name also lets you rename the Label instead of deleting it.
Editing controls in a custom layout
Any control that appears in a Custom Layout can be cut, copied, deleted, and pasted within that Custom Layout, but you cannot edit between two Custom Layouts.
Tap Edit on the upper-right of the menu bar. Editing handles appear surrounding each control.
Tap and hold a control until you see Cut Control, Copy Control, Paste Control, Delete Control appear on top of it.
Touch to select Cut Control, Copy Control, or Delete Control.
With a control copied to the clipboard, tap and hold a blank area of the Custom Layout until you see Paste Control appear.
Touch Paste Control to paste the cut or copied control onto that area.
Each editing command behaves as follows:
Cut copies the control into the Custom Layout’s clipboard, then deletes that control from the view. Paste is now active.
Copy copies the control into the Custom Layout’s clipboard. Paste is now active,
Paste inserts the cut or copied control into the current Custom Layout View. The clipboard retains its conents for repeated Paste commands.
Delete removes the control from the view without copying it to the clipboard. Note that a previous Copy command may still reside in the clipboard.
Selecting a new custom layout
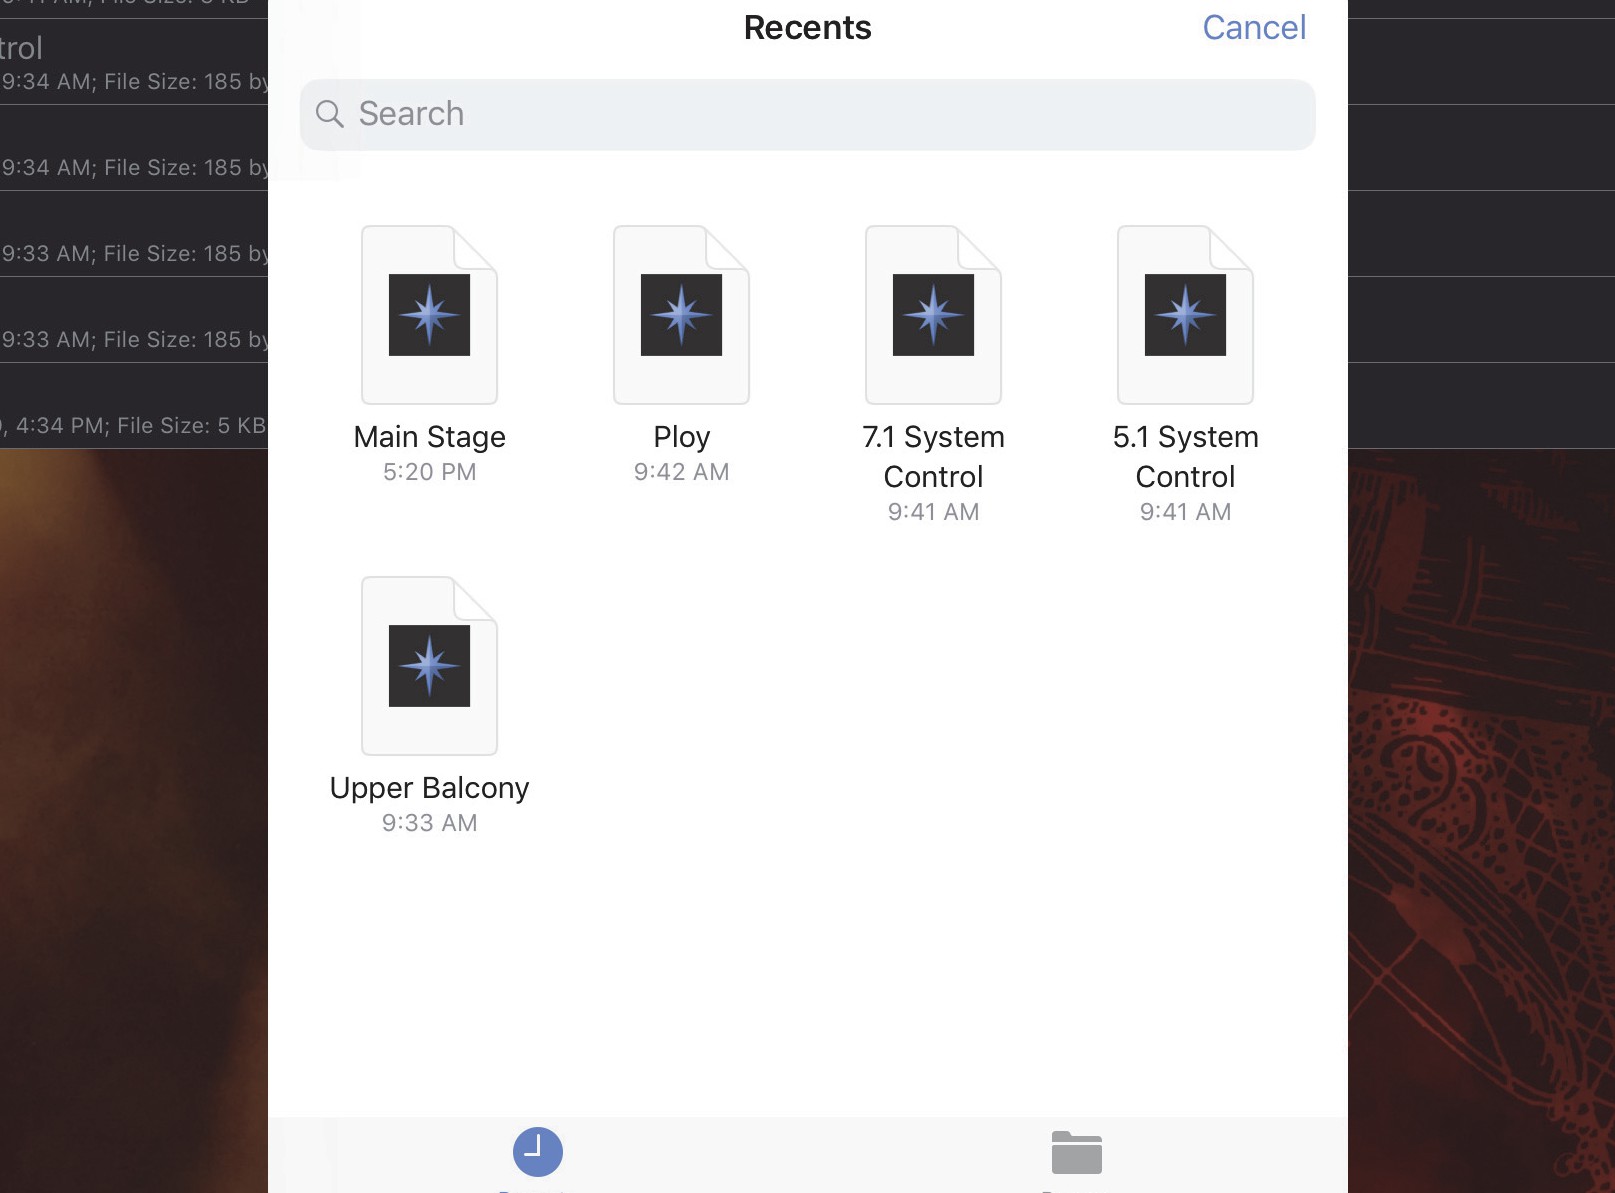
Navigate to the Compass Go Custom Layouts Library.
Tap a Custom Layout.
The new Custom Layout will automatically load.
Managing views in custom layouts
Views can be added, deleted, and reordered.
Managing Custom Layouts
Adding a view
In your Custom Layout (any view), tap the title at the top.
The Custom Layout views dialog opens showing the current views.
Tap Add view.
A blank view is added at the end of your current view list.
Deleting a view
In your Custom Layout (any view), tap the title at the top.
The Custom Layout views dialog opens showing the current views.
Swipe the desired view left.
A red Delete button appears at the right of the dialog.
Tap the Delete button to delete the view.
Reordering a view
In your Custom Layout (any view), tap the title at the top.
The Custom Layout views dialog opens showing the current views.
Tap and hold a view you wish to reorder.
A shadow appears around the outside of the view’s rectangle when it is selected.
Drag the view to its new location and release your finger.
Storing and sharing custom layouts
From the Custom Layouts Library View, tap Edit in the top-right of the menu bar.
All Custom Layouts appear with a selection circle to the left of each, and three horizontal bars to the right.
Tap anywhere (except on the three bars) to select the Custom Layouts to share or store.
Selected Custom Layouts display a check mark to their left.
Tap the Upload Icon in the top-right of the menu bar.
Choose Share or Save to iCloud Drive.
To reorder the Custom Layouts in your Library, tap and hold the three bars at the far-right of a Custom Layout until a rectangular shadow appears, then drag it to a new location.
Deleting custom layouts
In the Compass Go Custom Layouts Library, tap Edit in the top-right of the menu bar.
Tap to select the Custom Layouts you wish to delete.
A check mark appears beside selected Custom Layouts.
Tap the Trash icon.
Tap Done when finished.
- OR -
In the Compass Go Custom Layouts Library, swipe the Custom Layout you wish to delete to the left (do not tap Edit first).
A red Delete rectangle appears at the far right of the selected Custom Layout.
Tap Delete to confirm you wish to delete that Custom Layout.

Selecting Custom Layouts